

Already have the GoodTV app?
… and need some help getting started?

Take a look at the tips and tricks for operation. We have sorted all the information for you by topic – simply open any topic with one click!
Some content currently available in German only.
Note: these instructions only apply to the GoodTV app for Android TV / Google TV televisions and streaming boxes with these logos!
These Tips & Tricks are valid for GoodTV App versions from 2.0.1.2145 on.
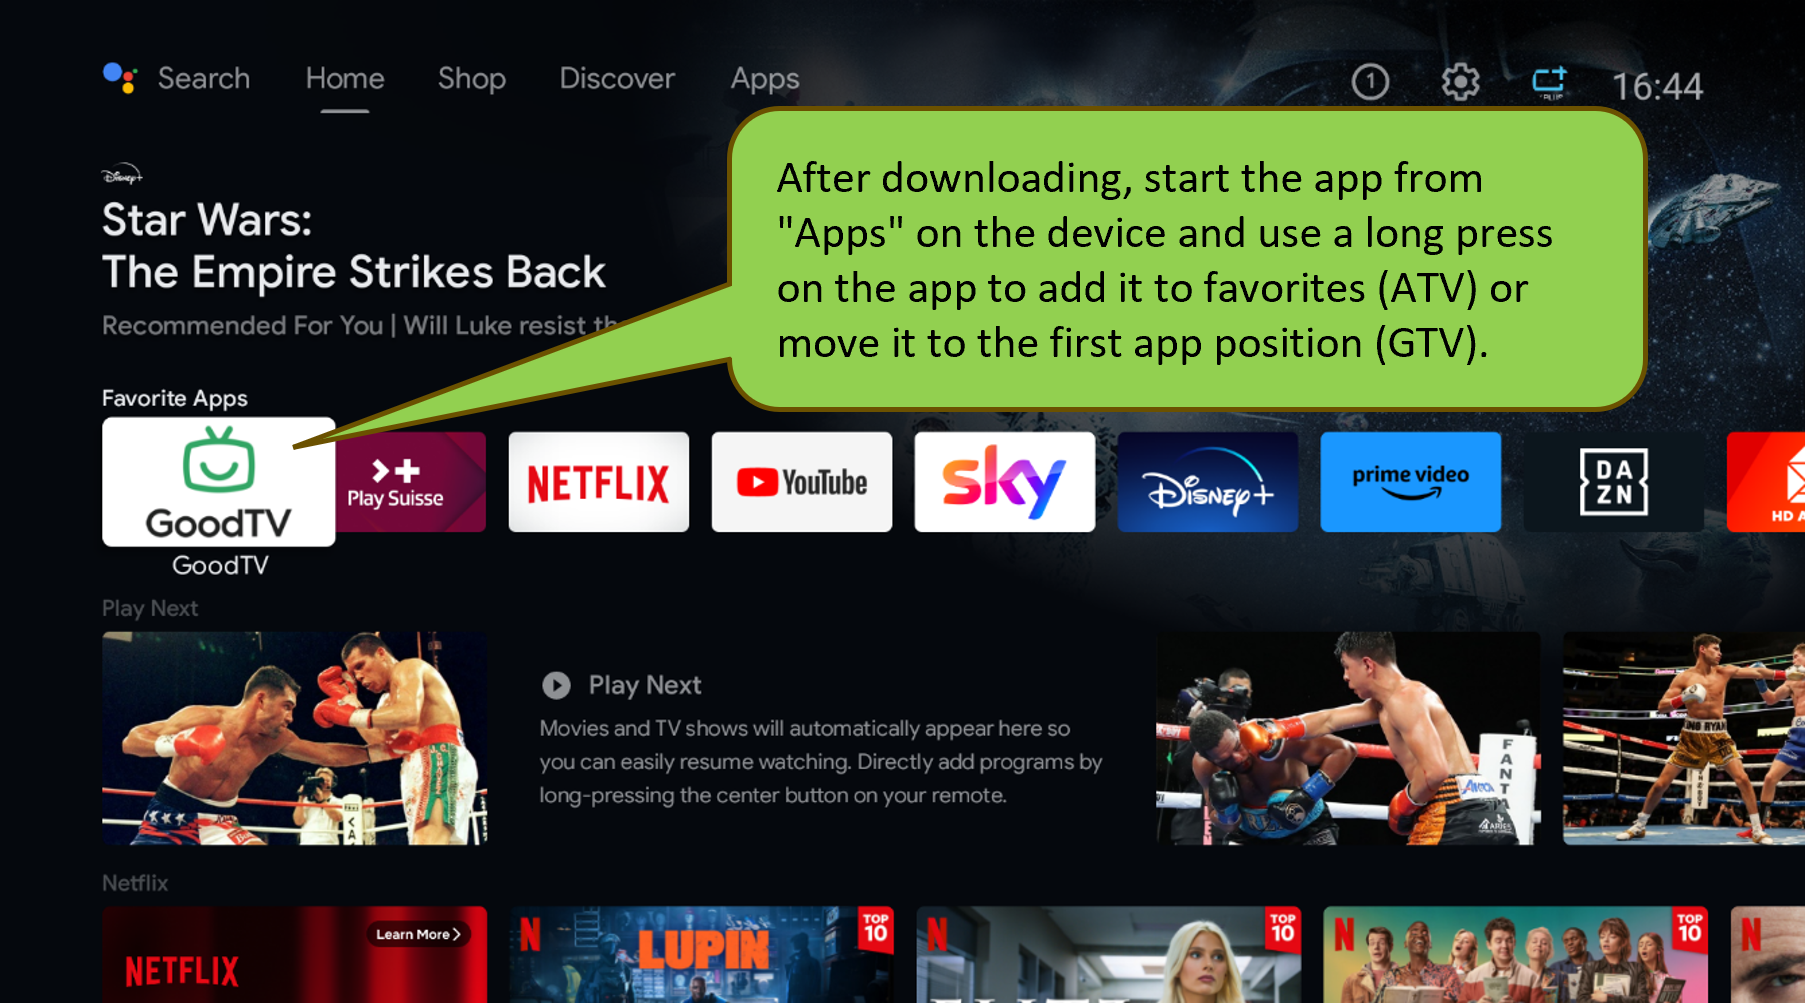
You can download the GoodTV app directly from the Google Play Store to your Android TV (“ATV”) or Google TV (“GTV”) device. Just search for “goodtv” or “goodtv swiss” in the Play Store.
Alternatively, you can send the app from your PC browser to your device: Simply log into your Google account on both your PC and the Android TV device, go to this link, and select your device.
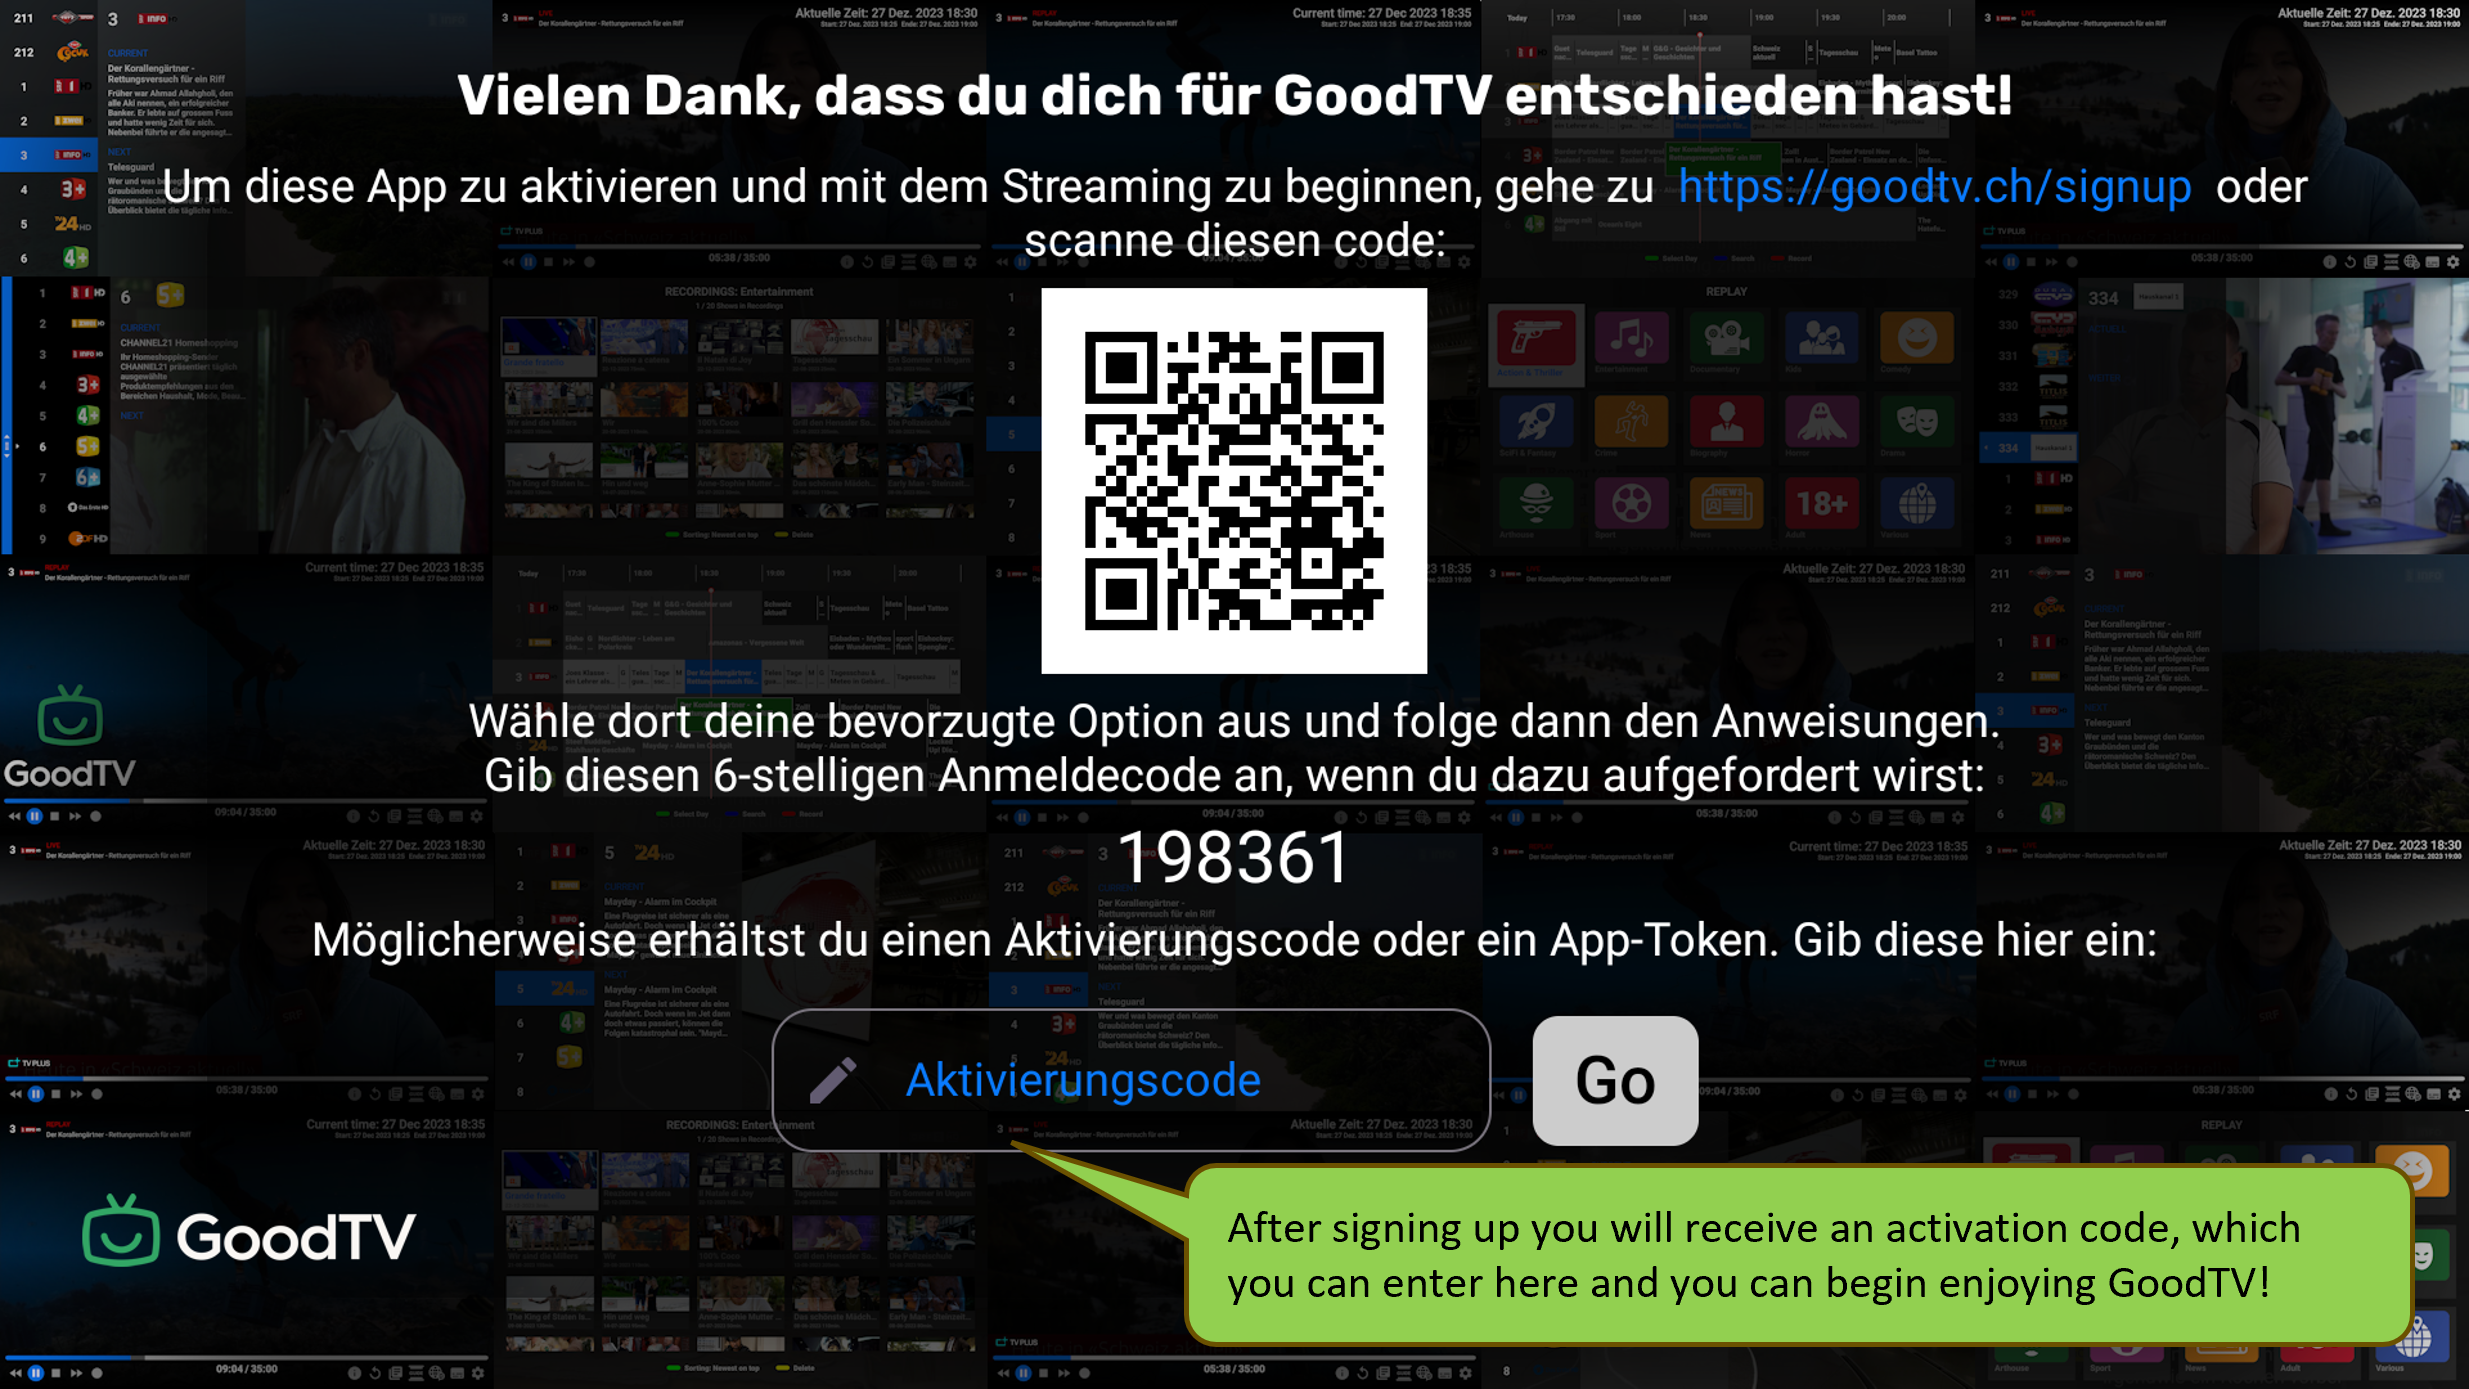
When you open the GoodTV app, you’ll first choose your language, followed by the login screen. A TV subscription is required to stream content. Detailed instructions for activation can be found here.
After activation, a page with instructions for using the remote will appear once. These instructions are only shown the first time after activation but can be accessed at any time from the settings menu.
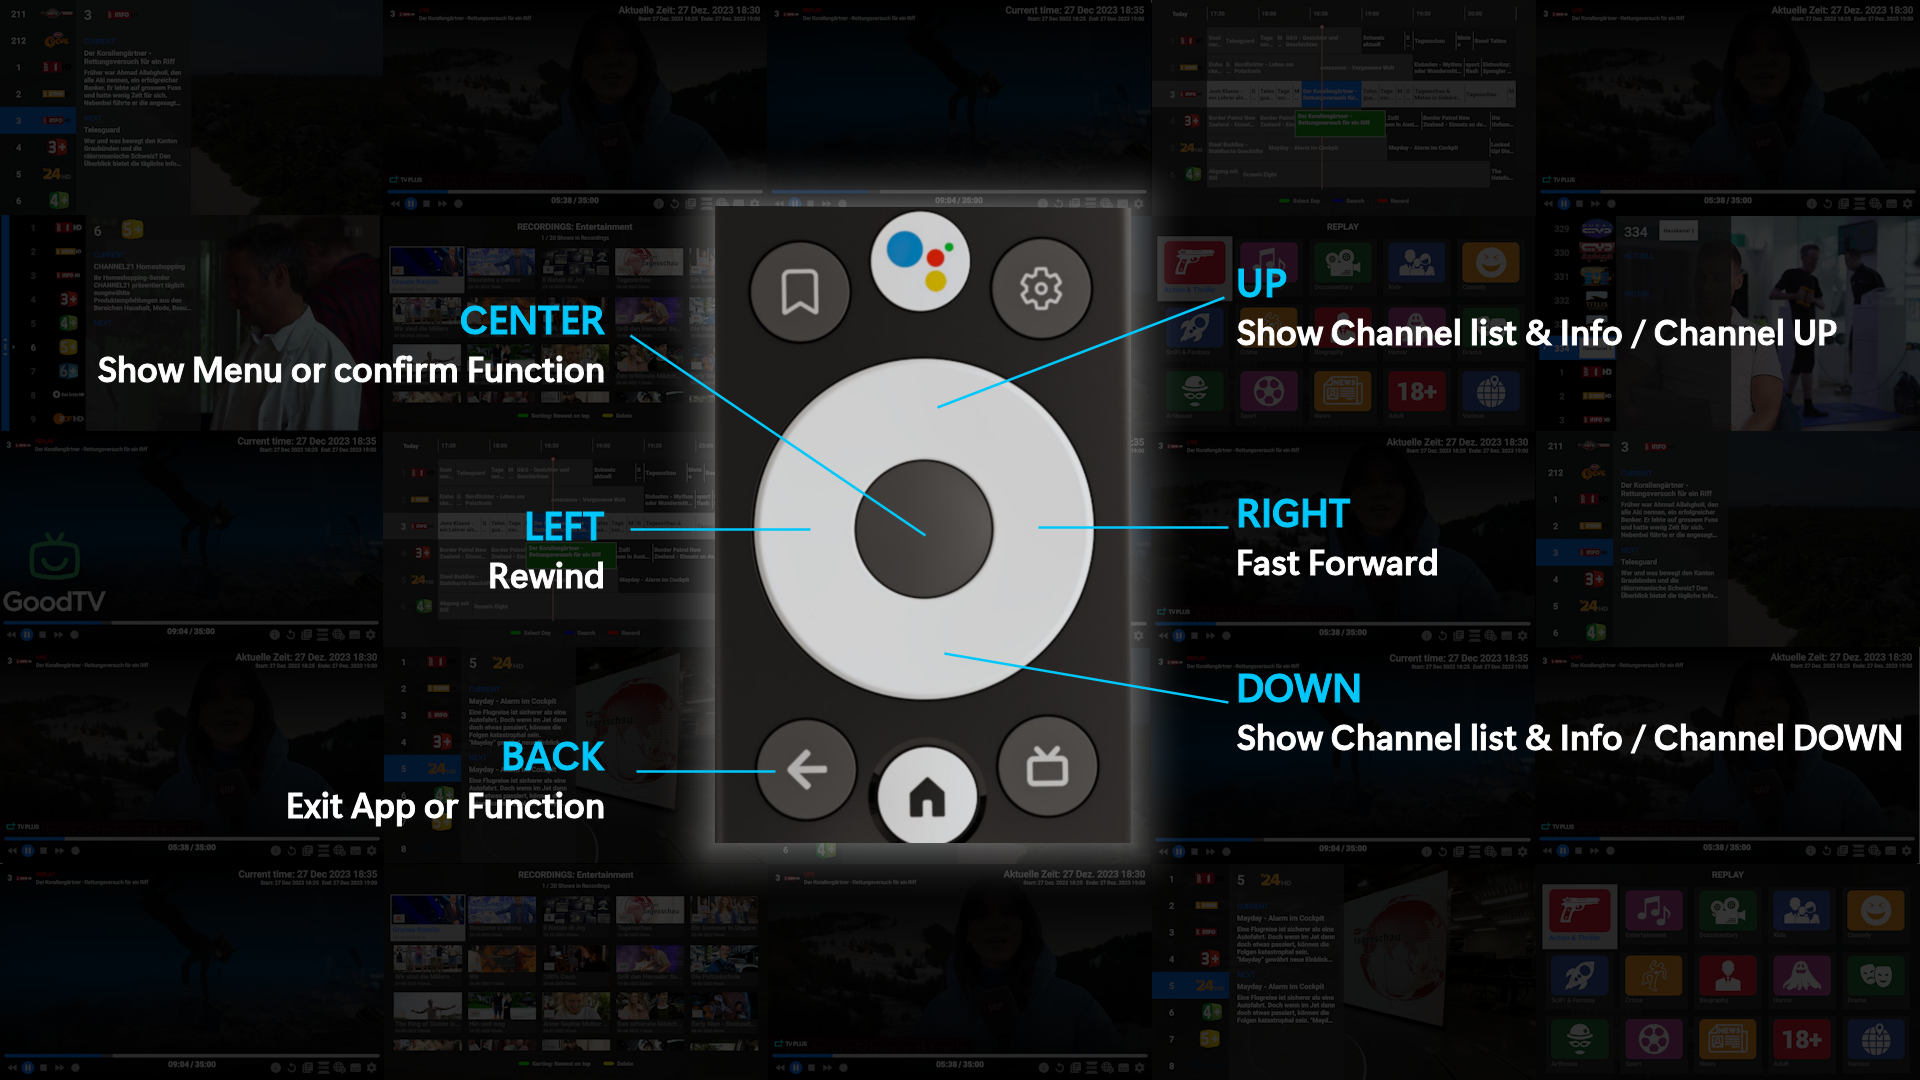
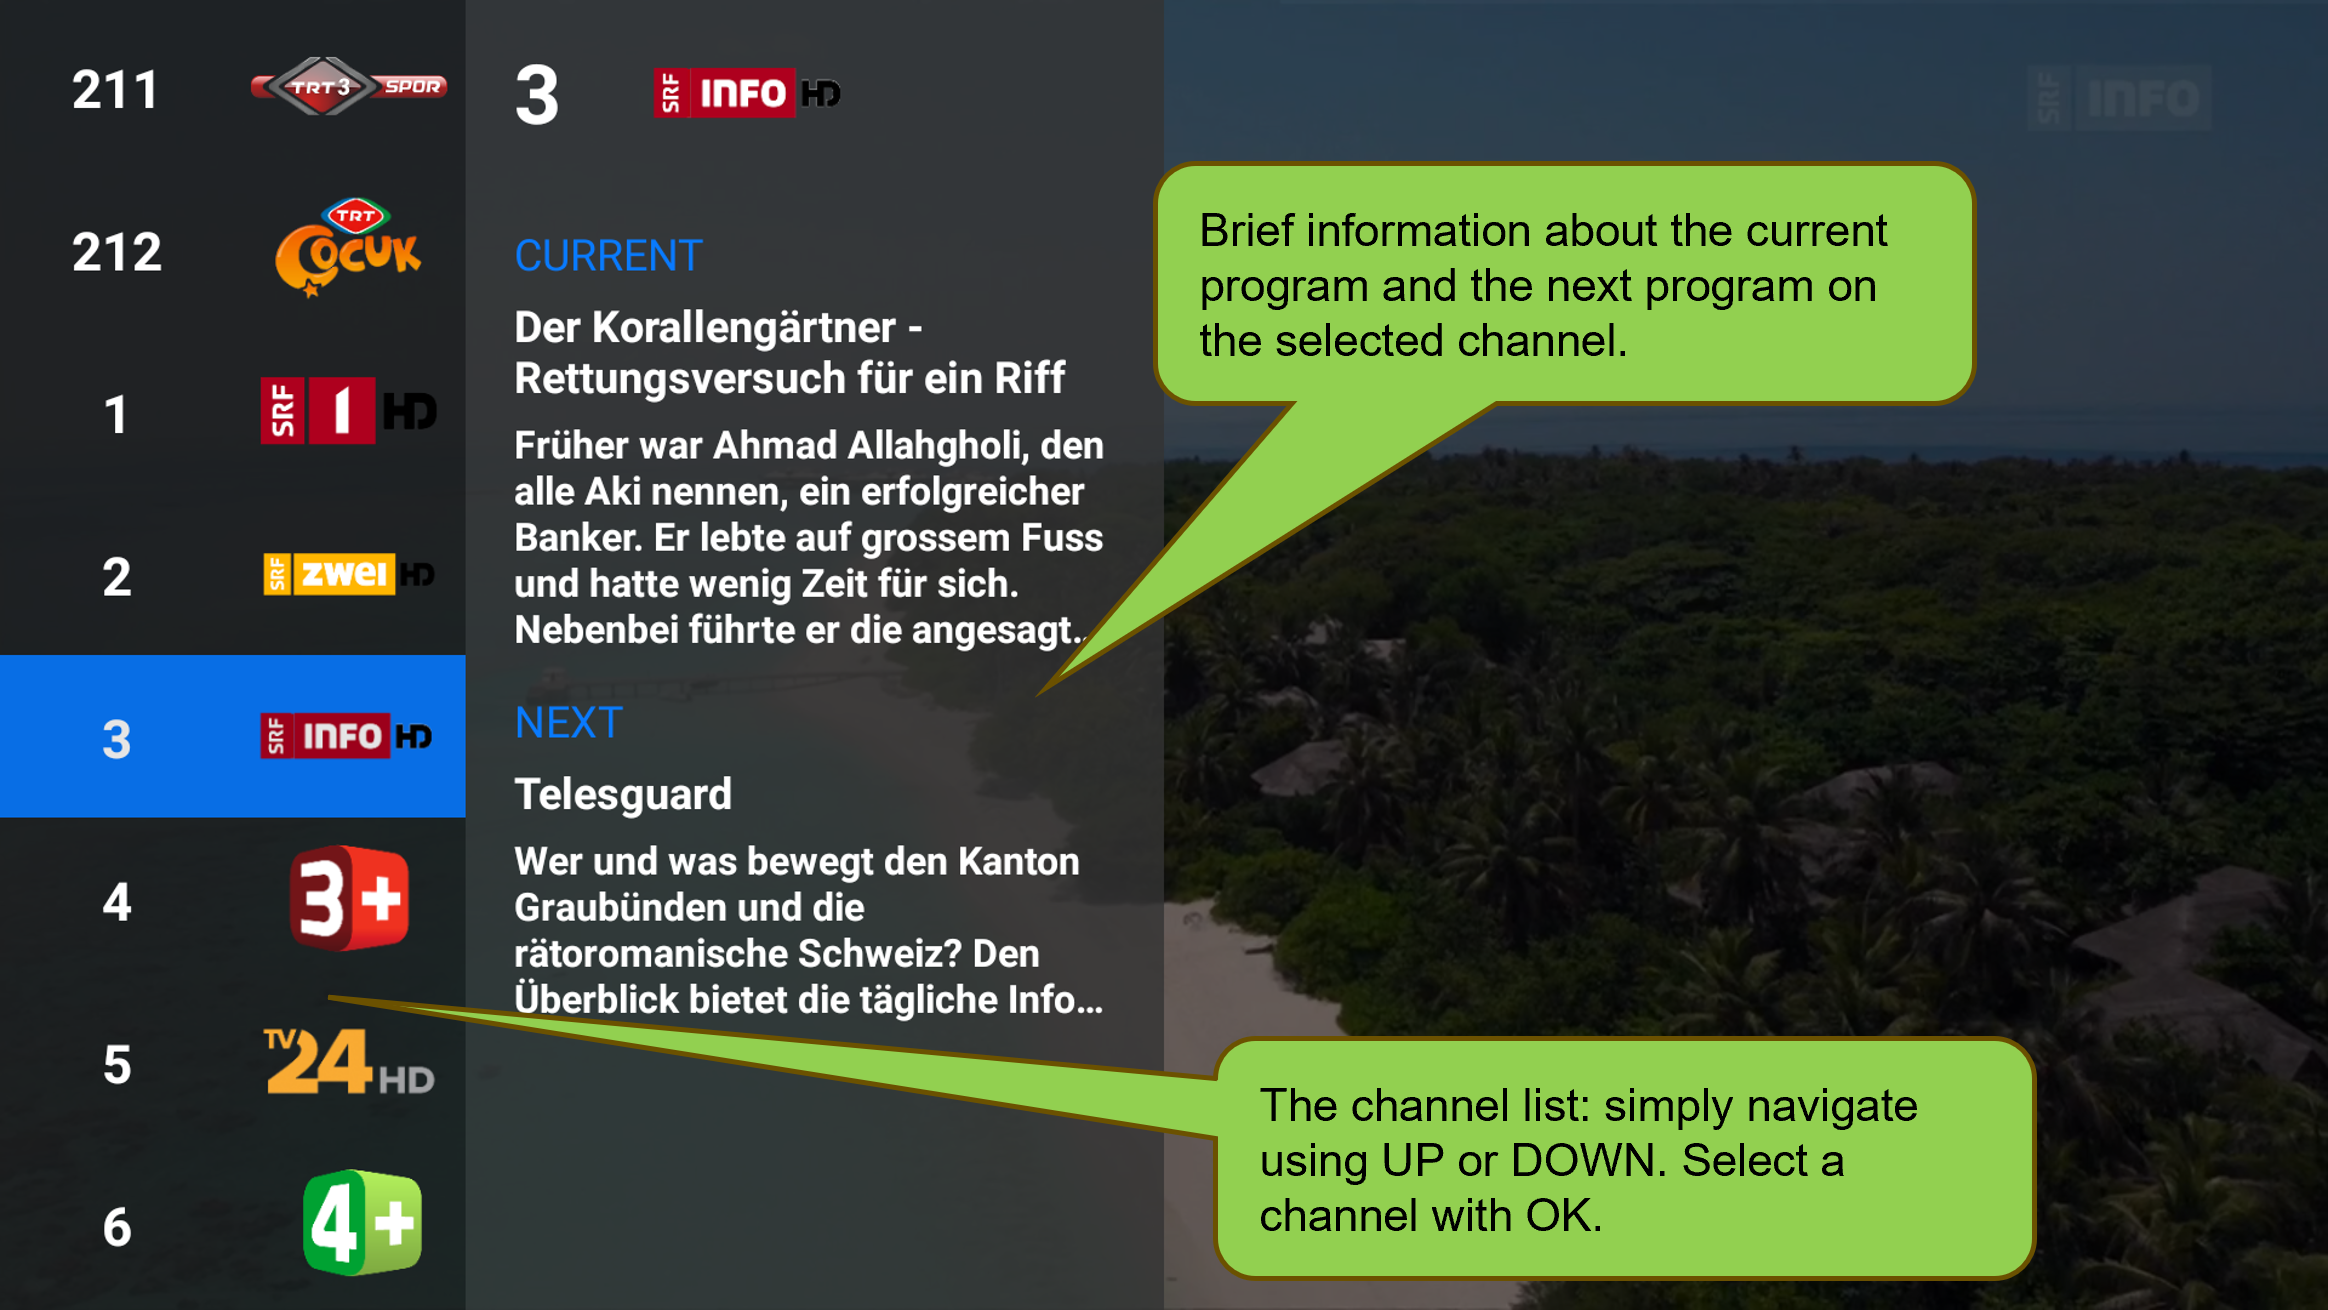
Once the app is launched, you’ll see a channel, which will always be the last one you watched. Press the OK button (the center button on the circular control pad) to view information about the current program and access the controls.
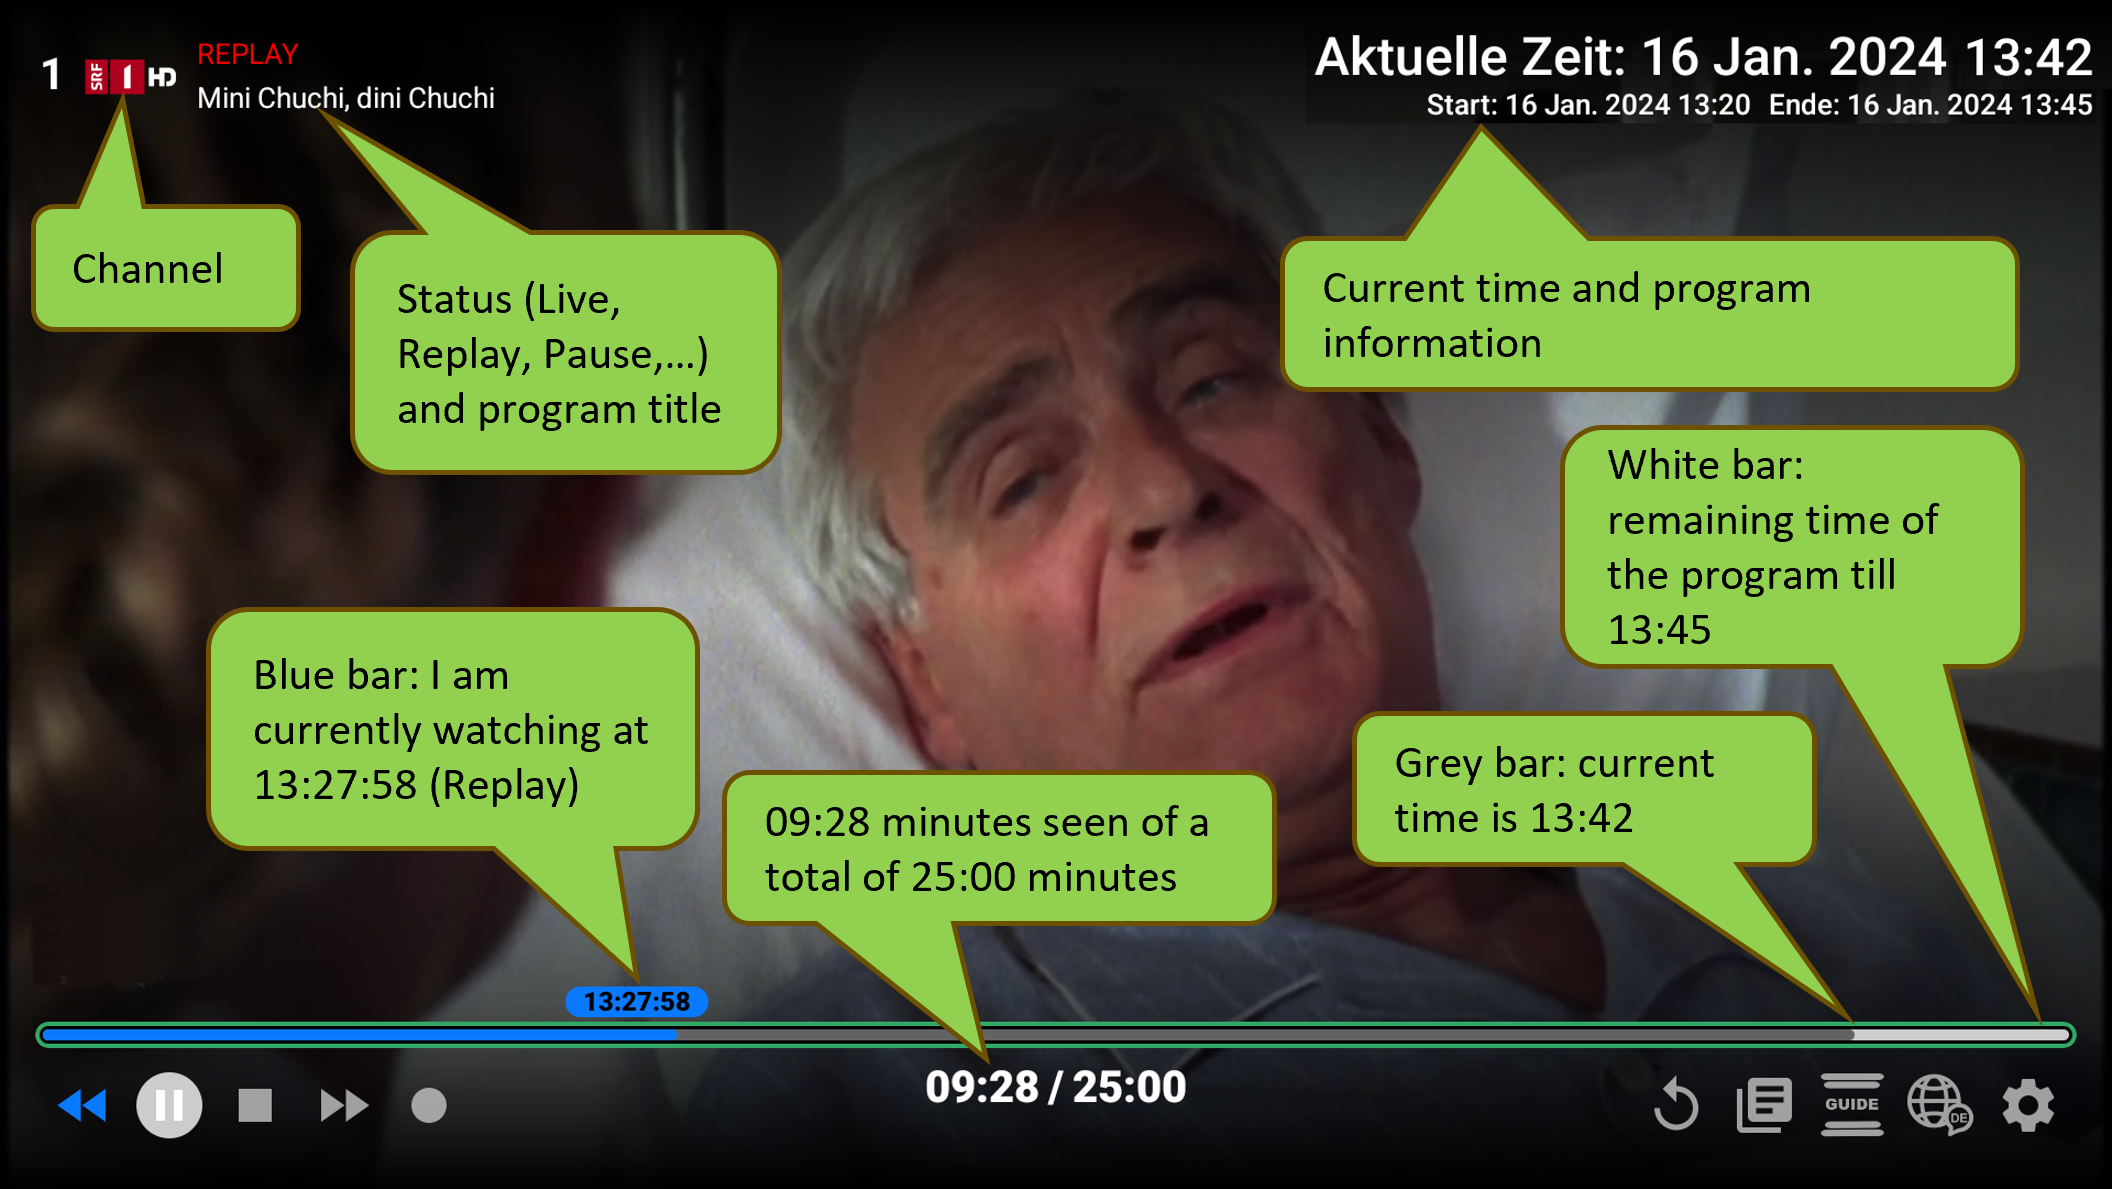
Here’s the information about the current TV show:
App Controls allow you to interact with the app:
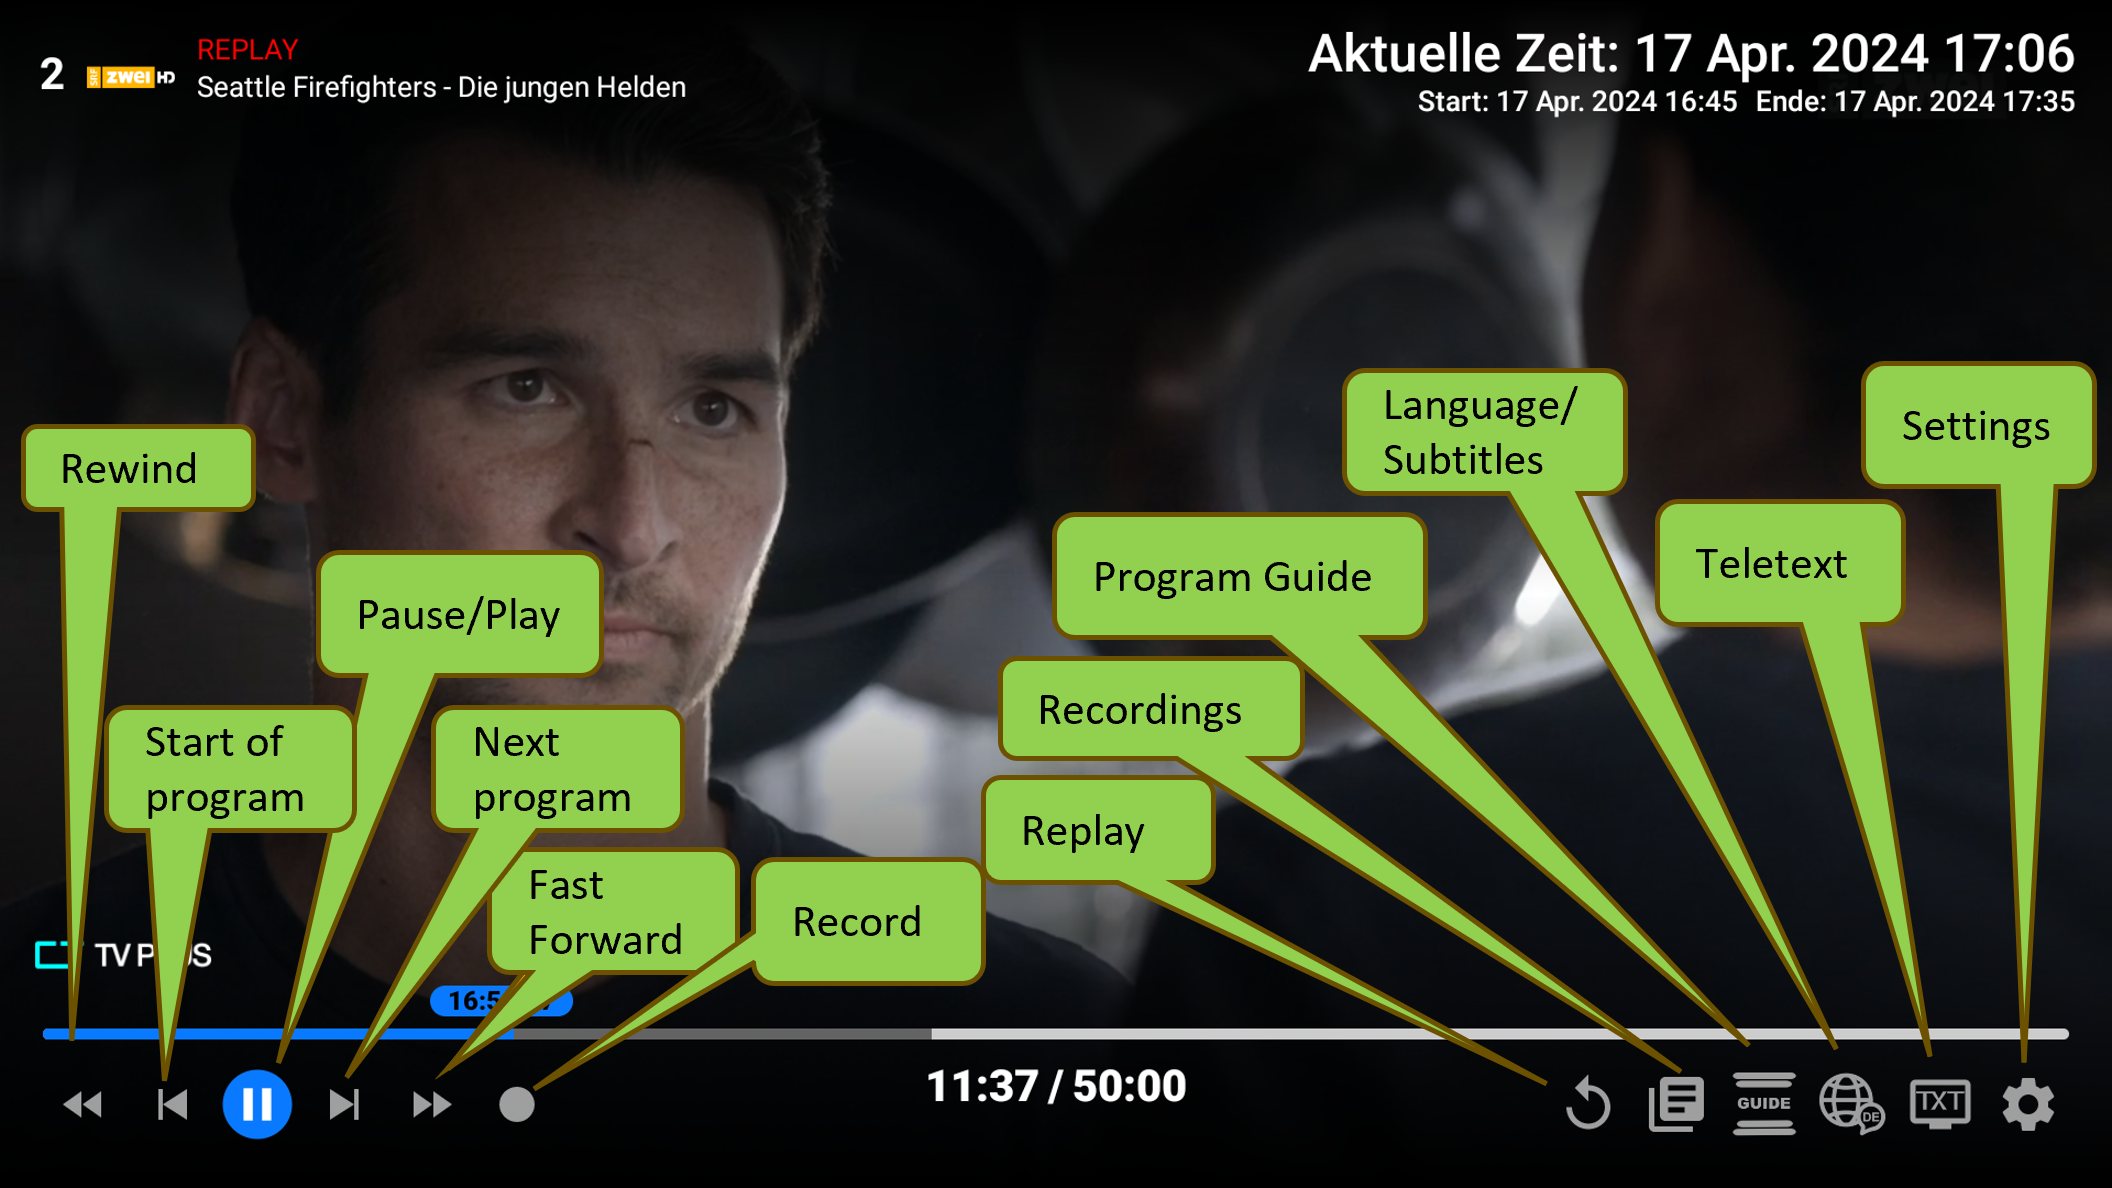
Use the LEFT or RIGHT buttons on the remote to navigate between the controls. When an item is highlighted in blue, pressing the OK button will activate that function. Try out all the options!
Tip: the Rocket-Key on the remote control of our ATV10 Box
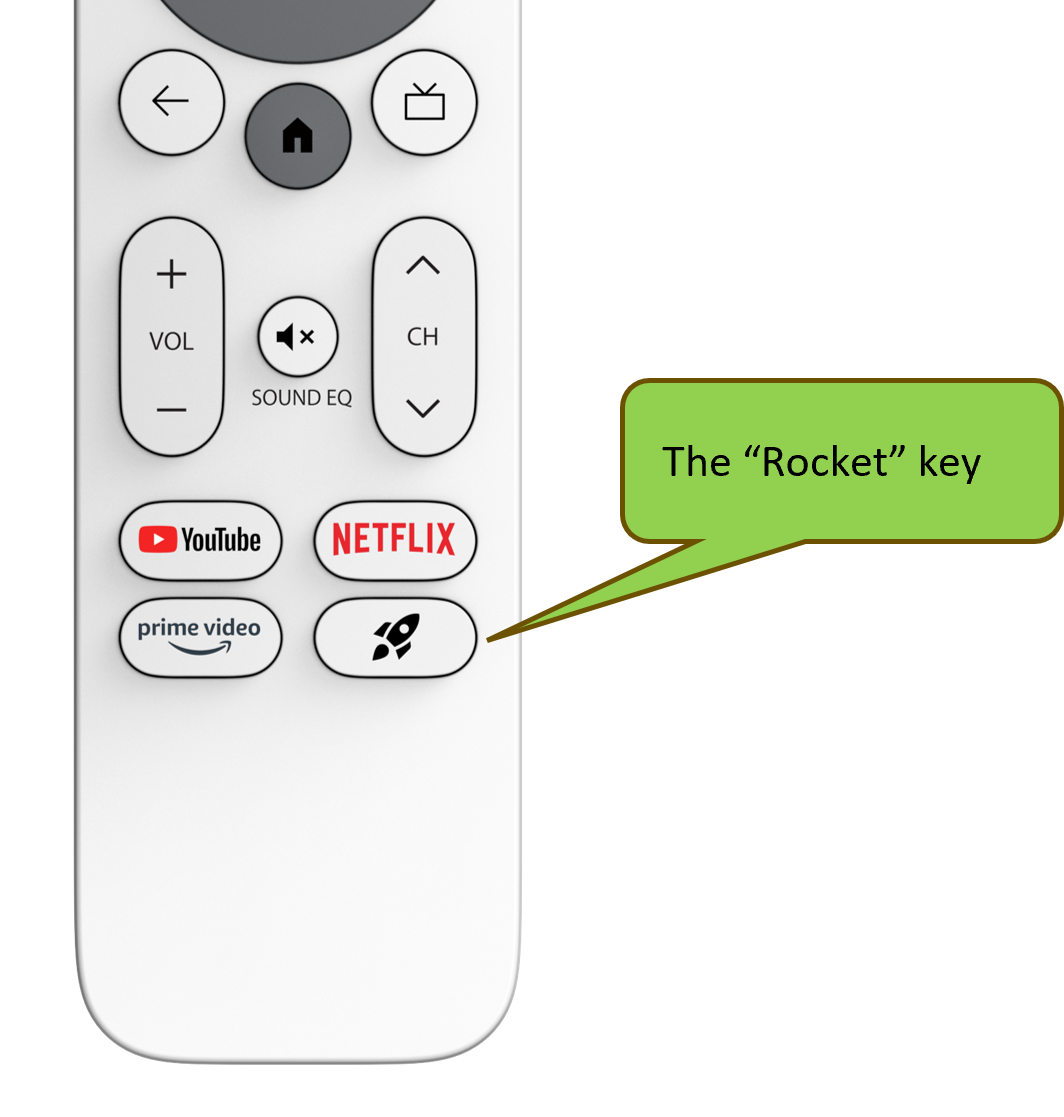
The Rocket-Key can be programmed to start the GoodTV App directly and simplifies the operation of the App.
Press the Rocket-Key on the remote control once and select the GoodTV app from the list. From now on, you can launch the GoodTV app directly with a single press of the Rocket-key.
This key also turns on the TV box from standby mode. If the Rocket-key is already programmed for a different app, go to Settings > Device Settings > App Key Definition and adjust it according to your needs.
The Mk2 Remote Control of our ATV10 Box
This Mk2 RCU is included in our newer ATV10 Boxes or can be ordered separately.
Note: Where the user sees “Longpress on OK,” e.g., in the Guide page, the green button will directly open the day selection, etc., without requiring a long press. The buttons always follow the context displayed on the screen.
Pause:
While a program is playing, simply press the OK button twice. Press OK again, and the program will resume. When the program is paused, the word “PAUSE” will appear in the top-left corner.
Restart, Live und next program:
For most channels, you can easily jump to the beginning of a program, switch to live TV, or go to the next program. Here’s how:
- Press OK once to open the menu.
- Use the I< control in the menu to jump to the beginning of the current program. “REPLAY” will appear in the top-left corner.
- Use the >I control to return to live programming while the show is still airing. “LIVE” will appear in the top-left corner.
- If you’re watching an older program in Replay, pressing >I will take you to the start of the next program in Replay.
IMPORTANT: If the progress bar is outlined in green (as shown in the image below), you can use the LEFT or RIGHT buttons to fast forward or rewind.
Spulen:
On most channels, you can easily rewind or fast-forward. Here’s how:
If you’re watching a program and no controls are visible on the screen, simply press the LEFT or RIGHT button on your remote.
- Each press skips backward or forward, and the controls will appear on the screen.
- Press multiple times for more skips or hold the button down for faster skipping.
- You’ll see the word “REPLAY” in the top left corner.
IMPORTANT: If the progress bar, like in the image below, is outlined in green, the LEFT and RIGHT buttons will work for skipping.

If the progress bar is not outlined in green, you’ll need to use the << and **>> controls in the menu. Here’s how:
- Use the LEFT or RIGHT buttons on your remote to navigate between the menu options.
- When an option is highlighted in blue, press OK to activate that function.
- You can switch between these two control modes by pressing the UP or DOWN buttons.
Try them all out and see what works best for you!
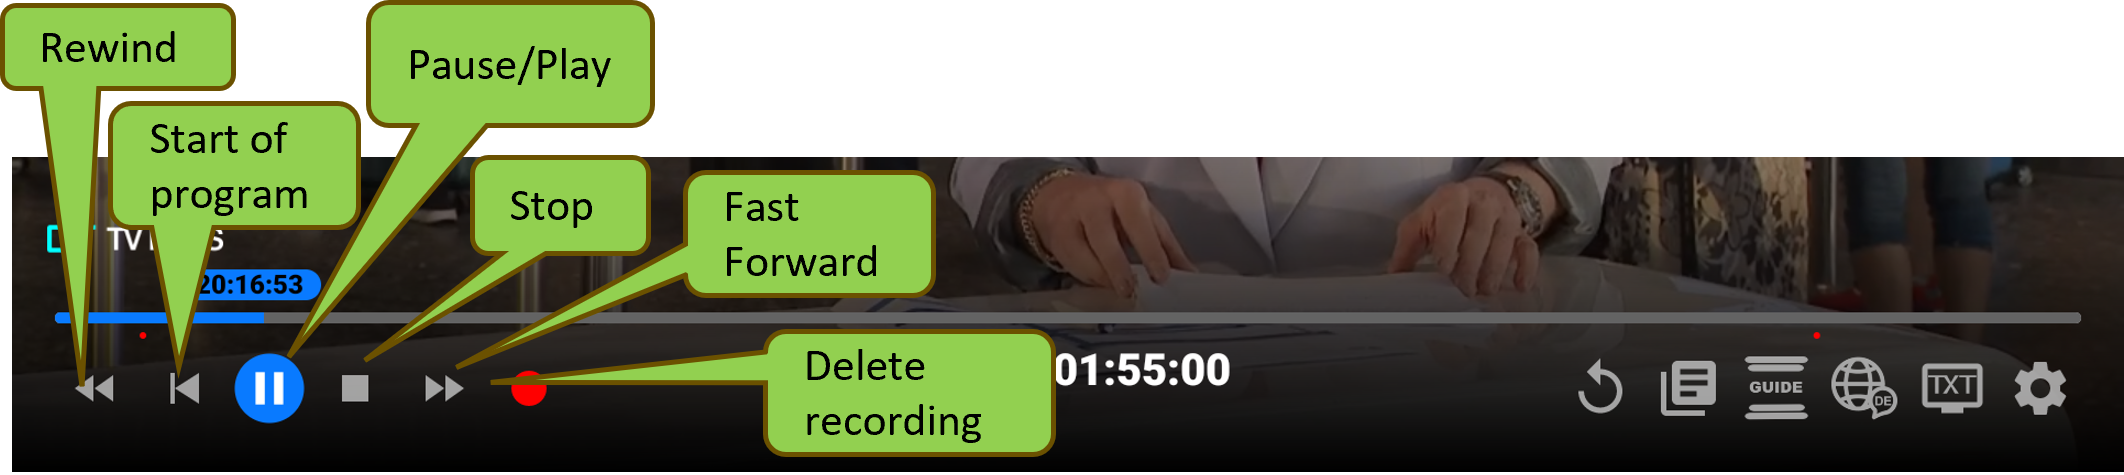
Playing back Recordings:
When playing recordings, the control panel looks slightly different, as shown below. To return to the Recordings menu where you started playback, use the STOP button.
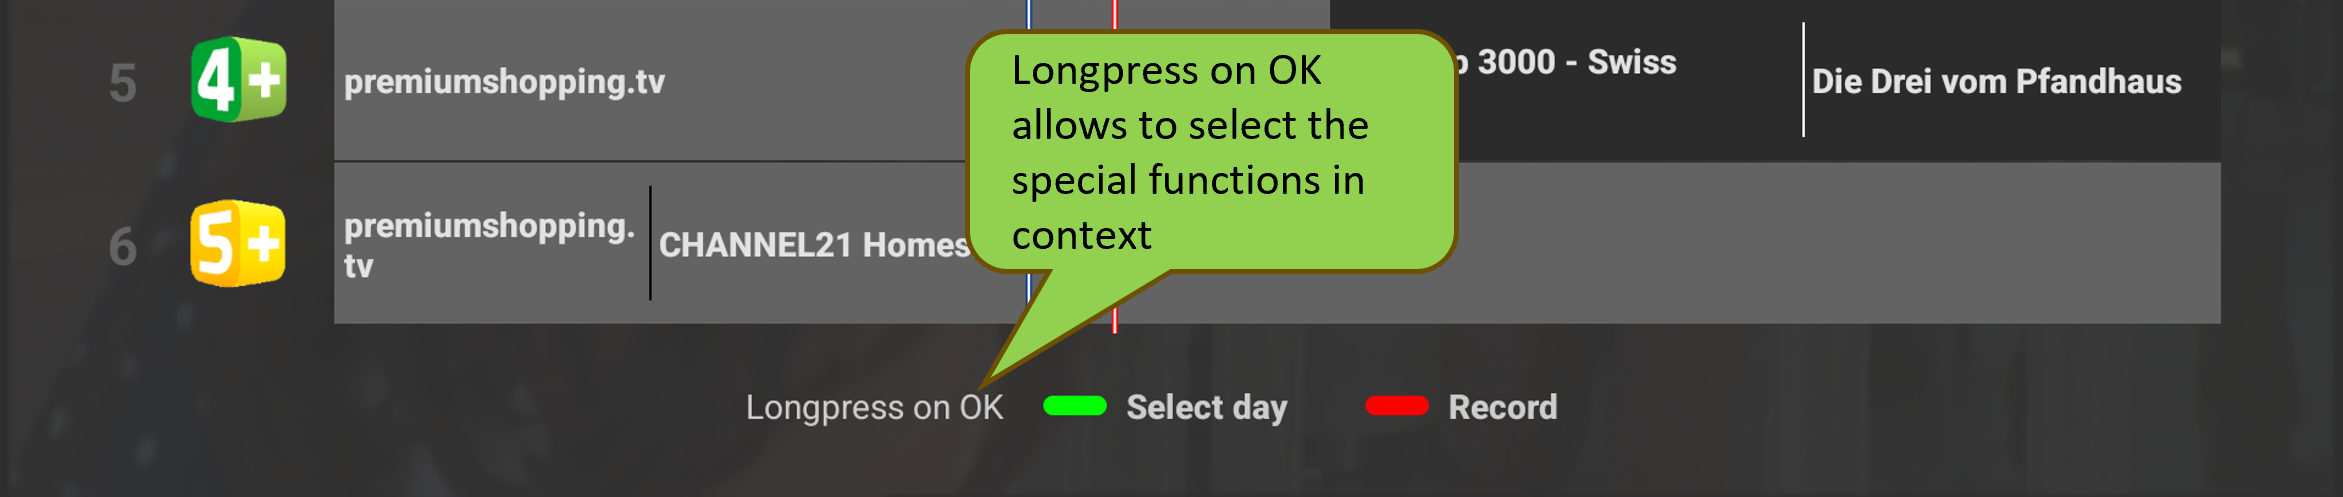
Longpress:
In some places, like the GUIDE, there are special controls located below a menu. Simply press and hold the OK button (a “long press”) to access these options and make your selection.
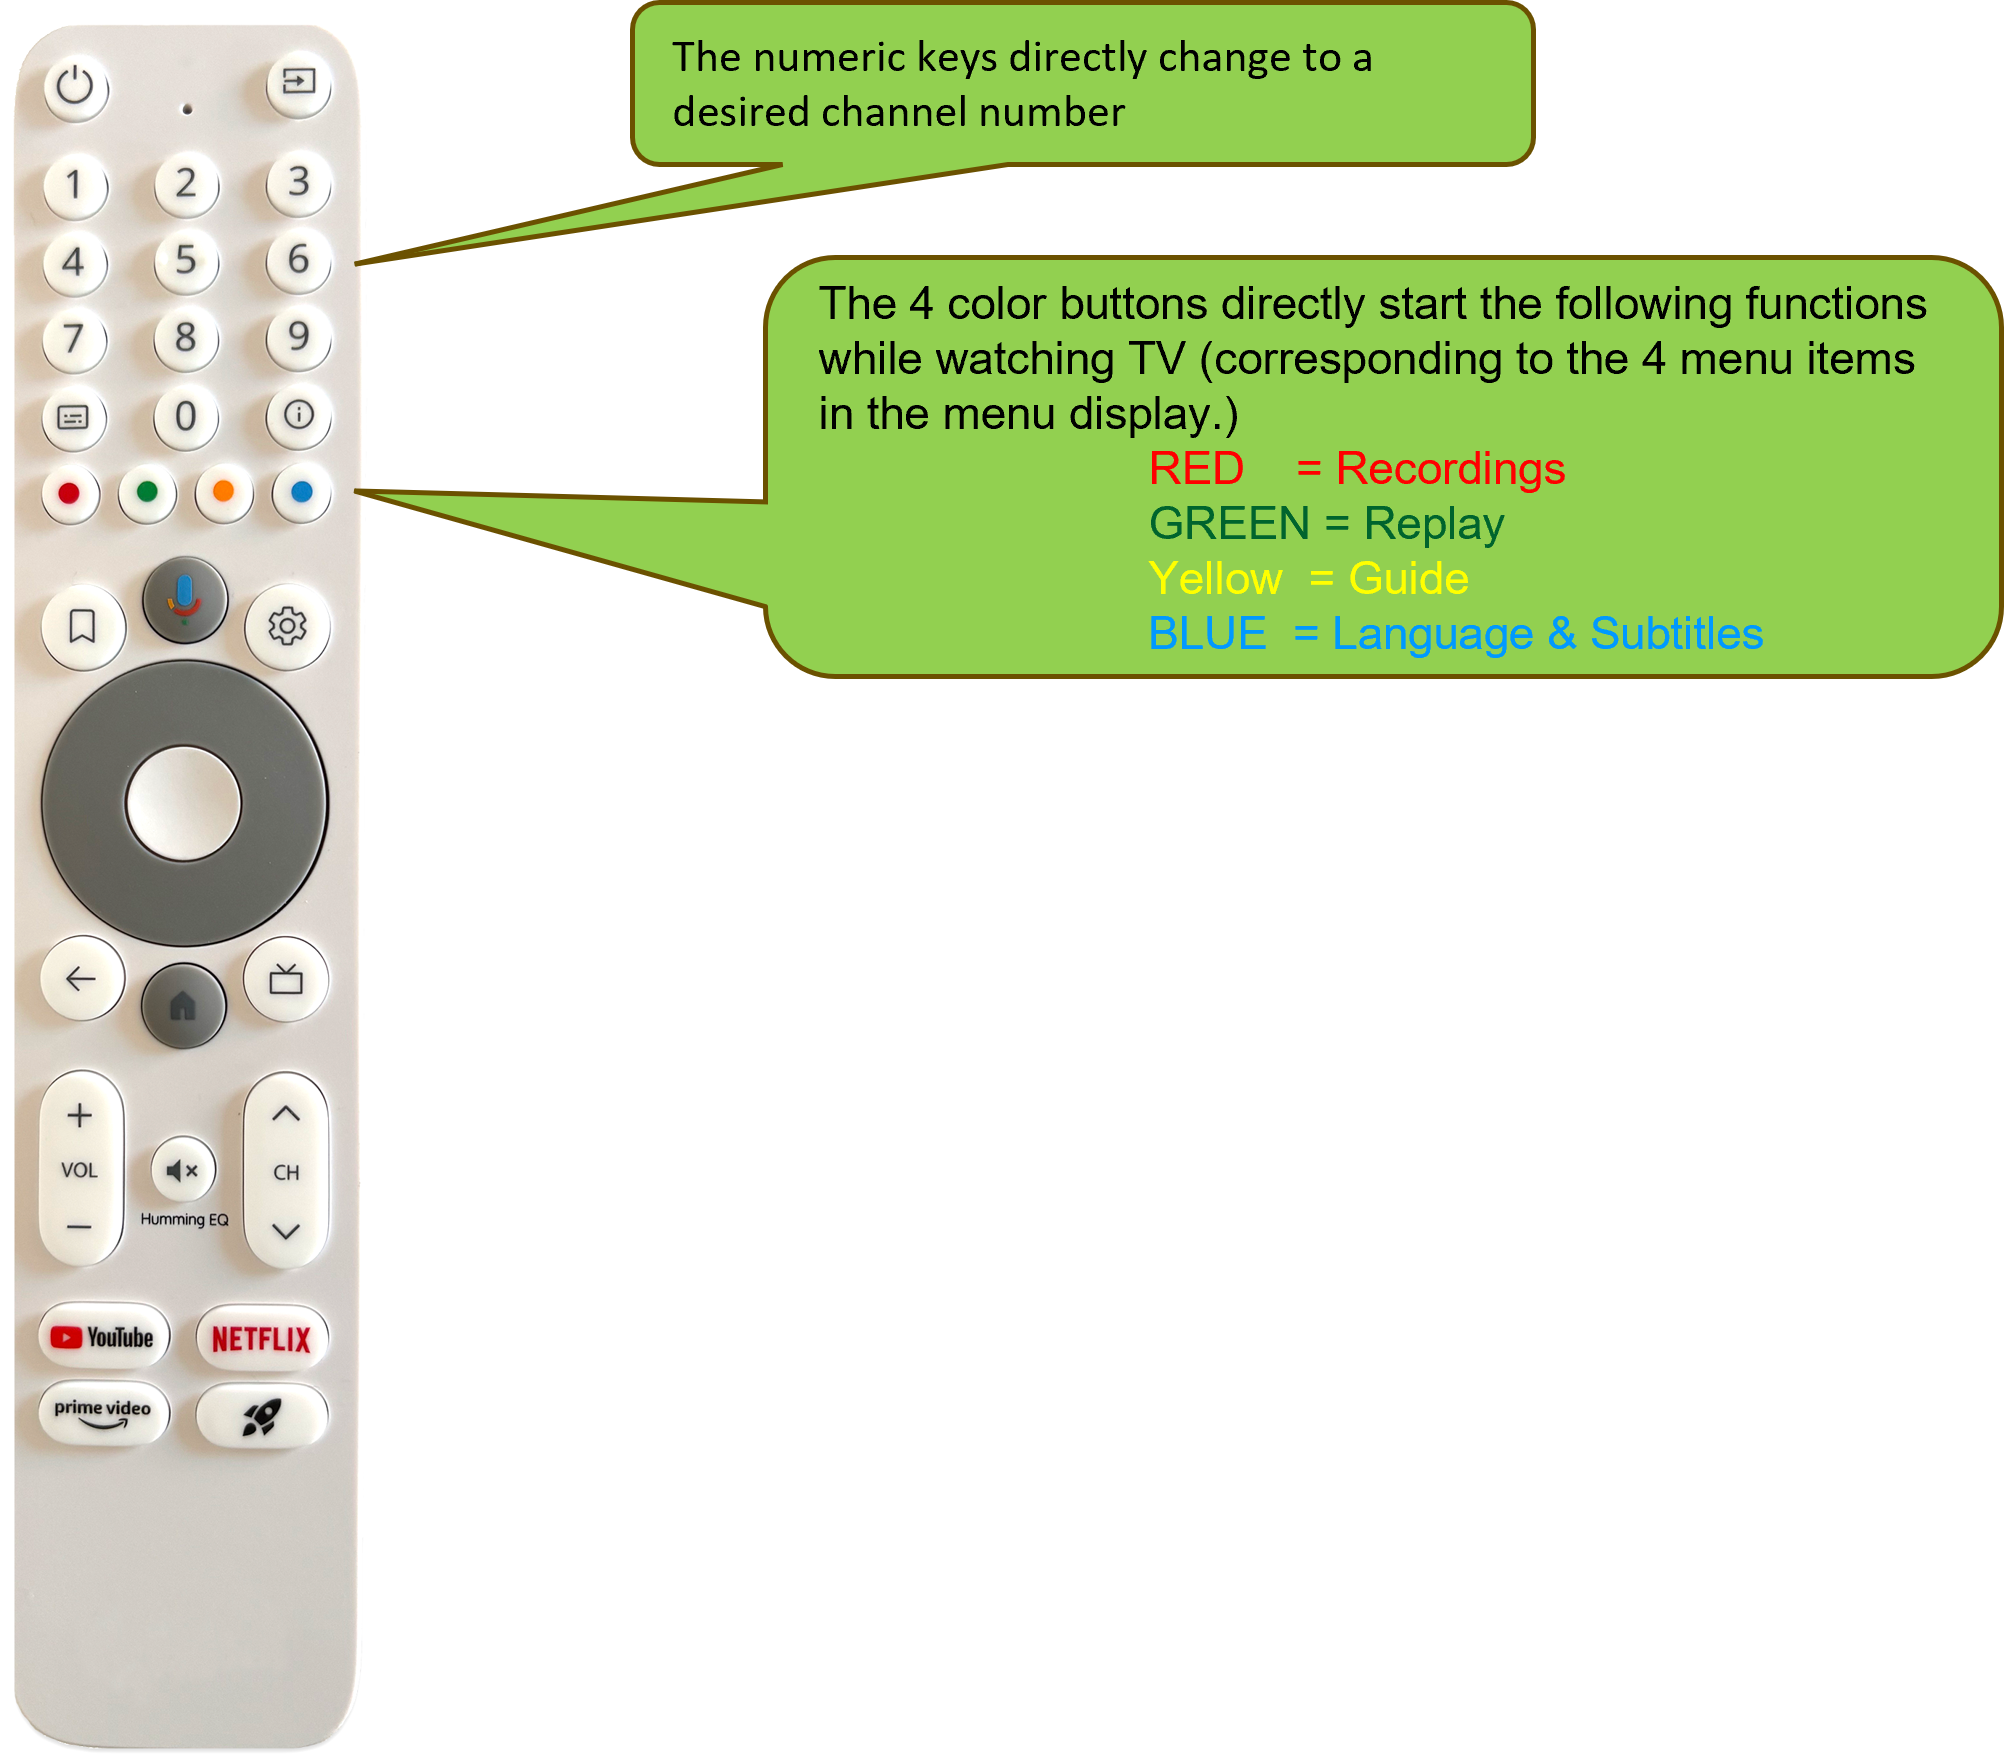
NOTE: if you have one of our remote controls with numeric keys and color buttons, when watching TV you can:
- Use the numeric buttons (up to 3 digits) to dierectly go to a channel
- Press RED = go to Recordings
- Press GREEN = go to the Replay menu
- Press YELLOW = go to Guide
- Press BLUE= open the Language & Subtitles menu
Remote controls by other manufacturers:
Some Android TV models come with remotes that have more buttons, such as number keys or dedicated PLAY, PAUSE, REW, FF, and REC buttons. With these remotes, you can, for example, select channels using the number keys or use a direct PAUSE button, making navigation easier. You can also pair other compatible Bluetooth remotes or remote-control apps for smartphones with your device (via the device’s settings) and experiment with them.
While a program is playing and no controls are visible on the screen, simply press the UP or DOWN button once. This will bring up the “Zapper” menu.
You can zap through channels faster by pressing the LEFT button.
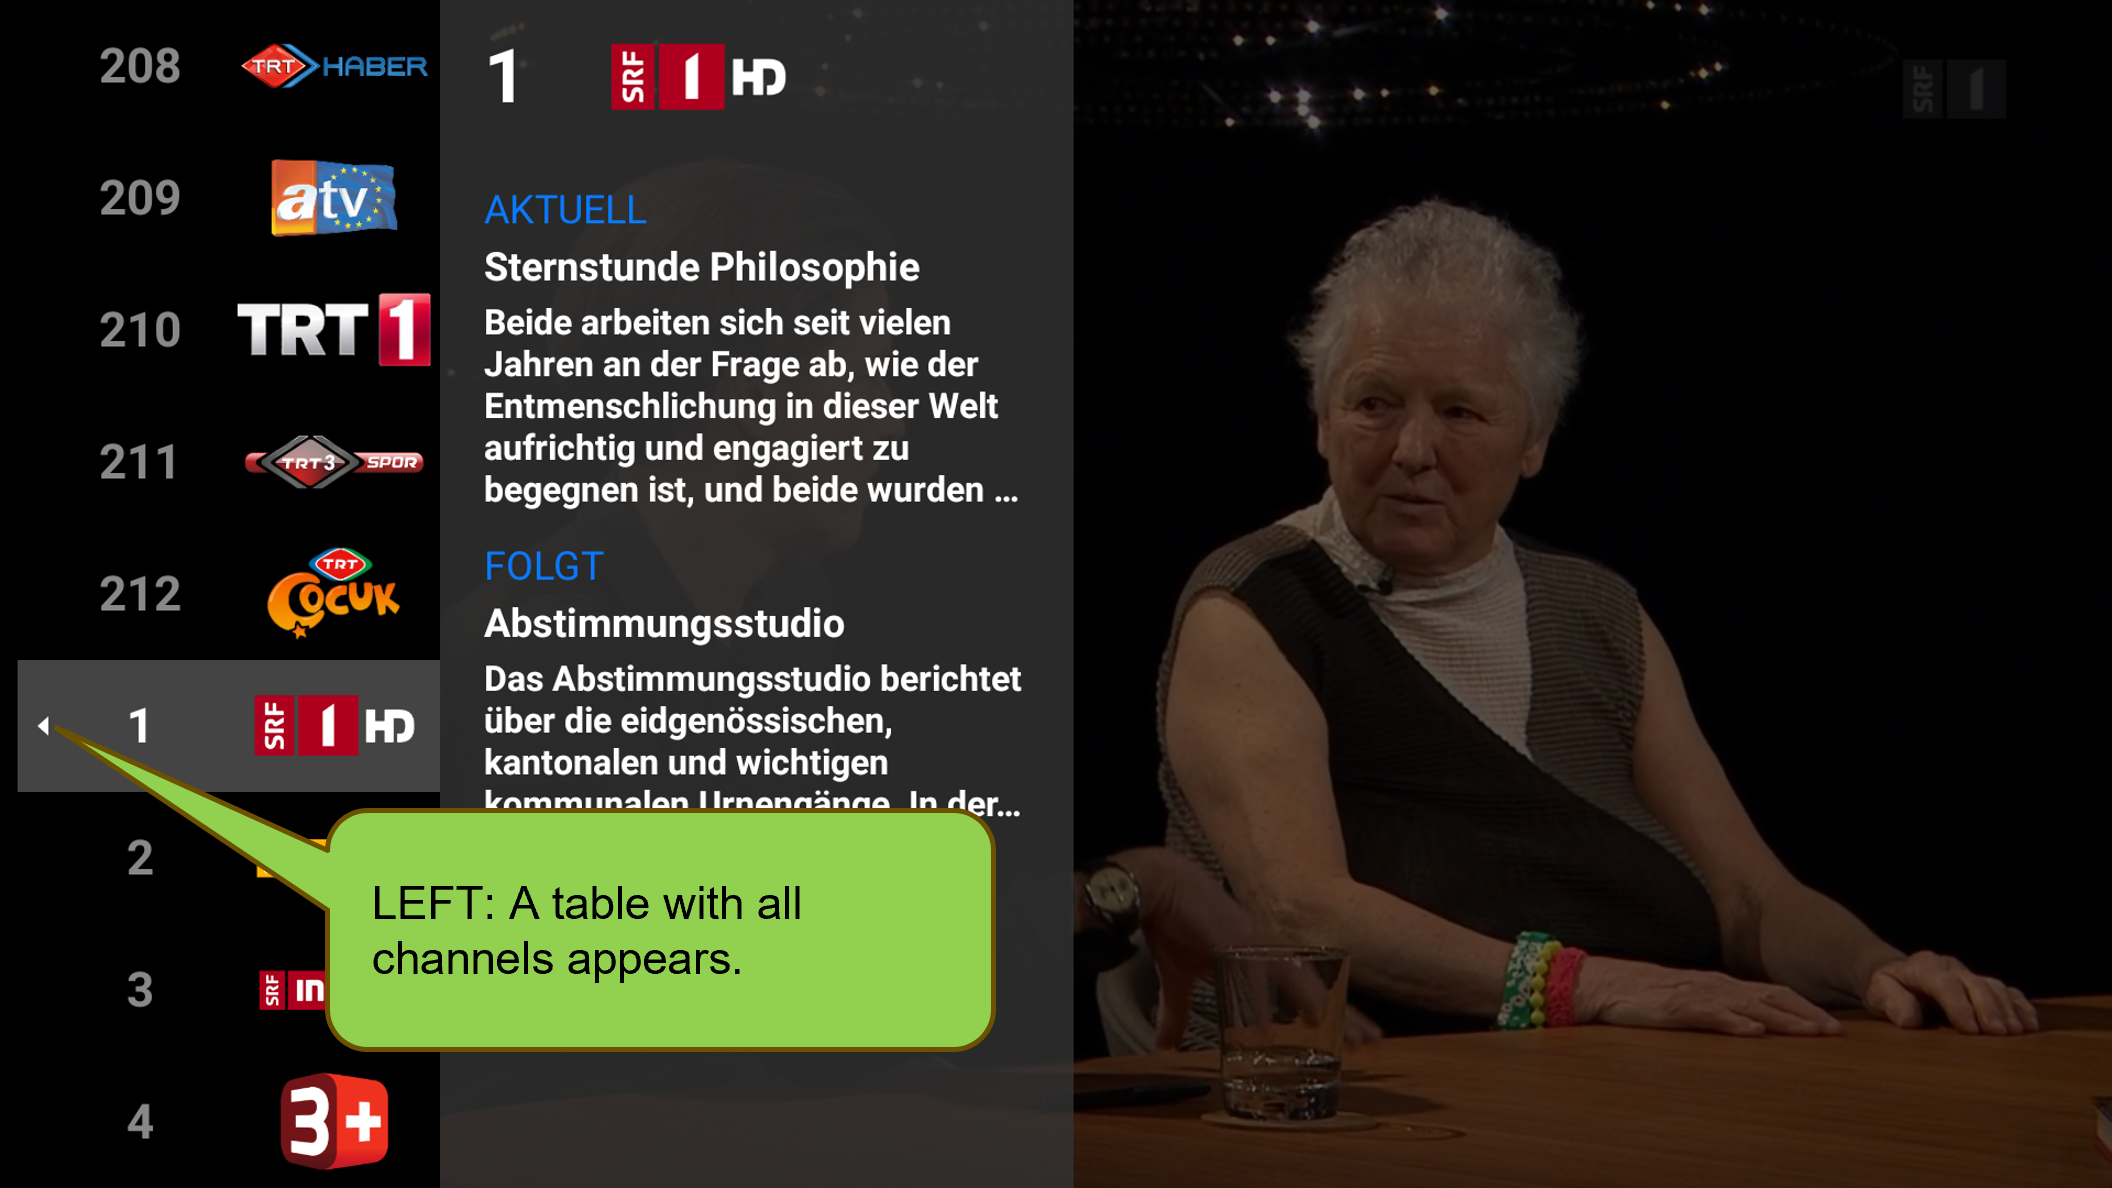
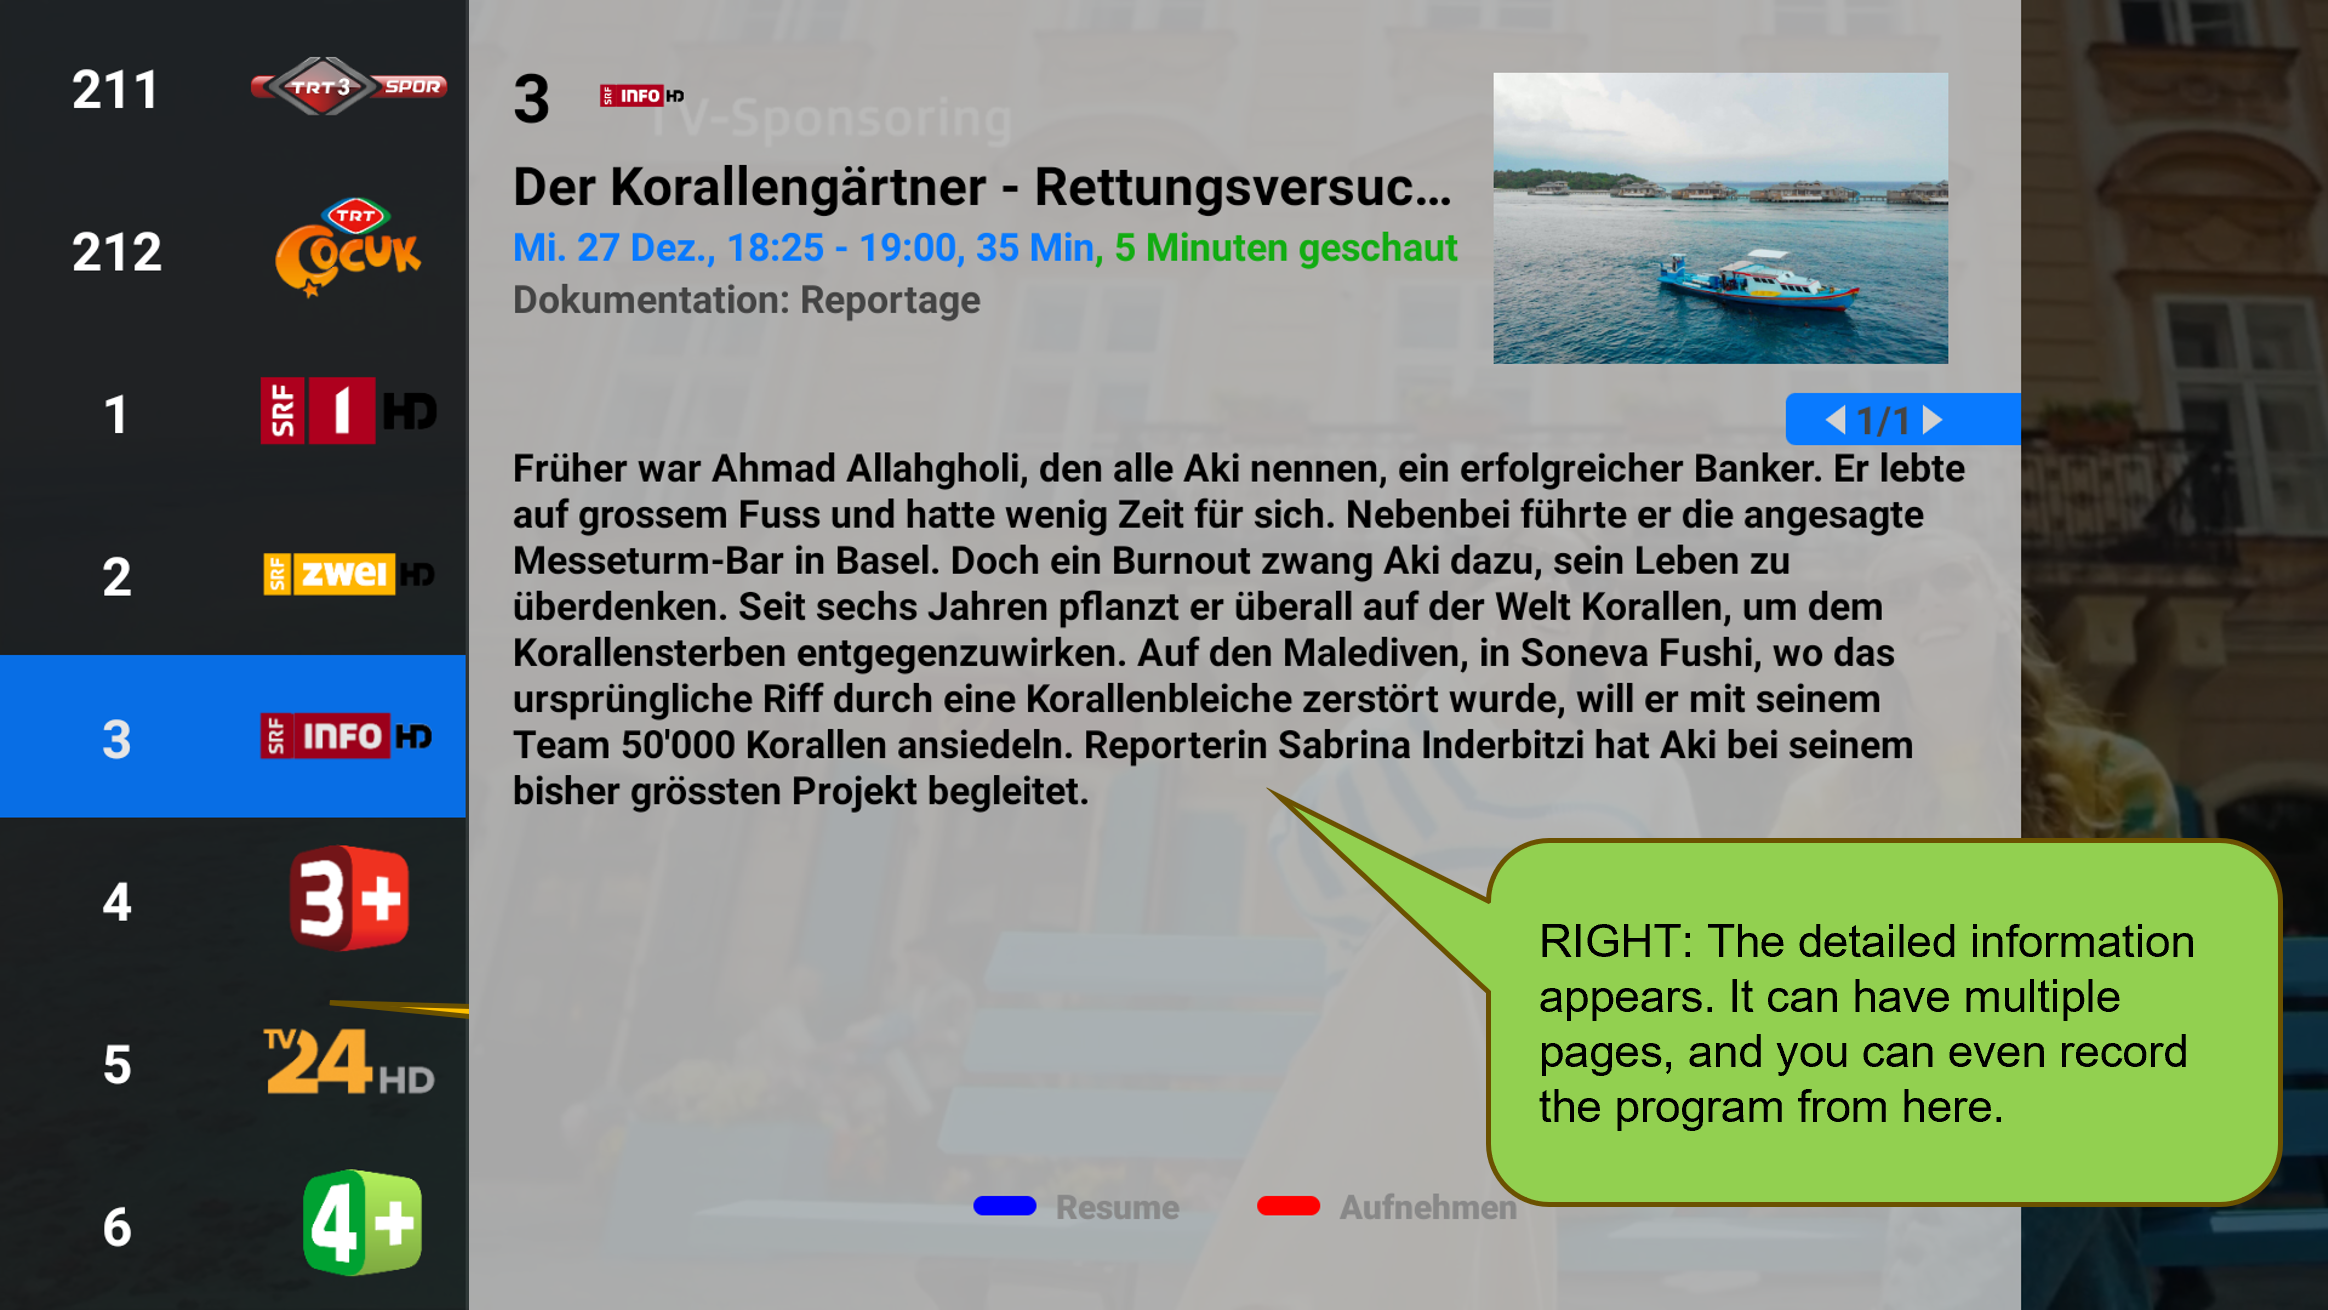
Press the RIGHT button to view detailed information about the selected program.
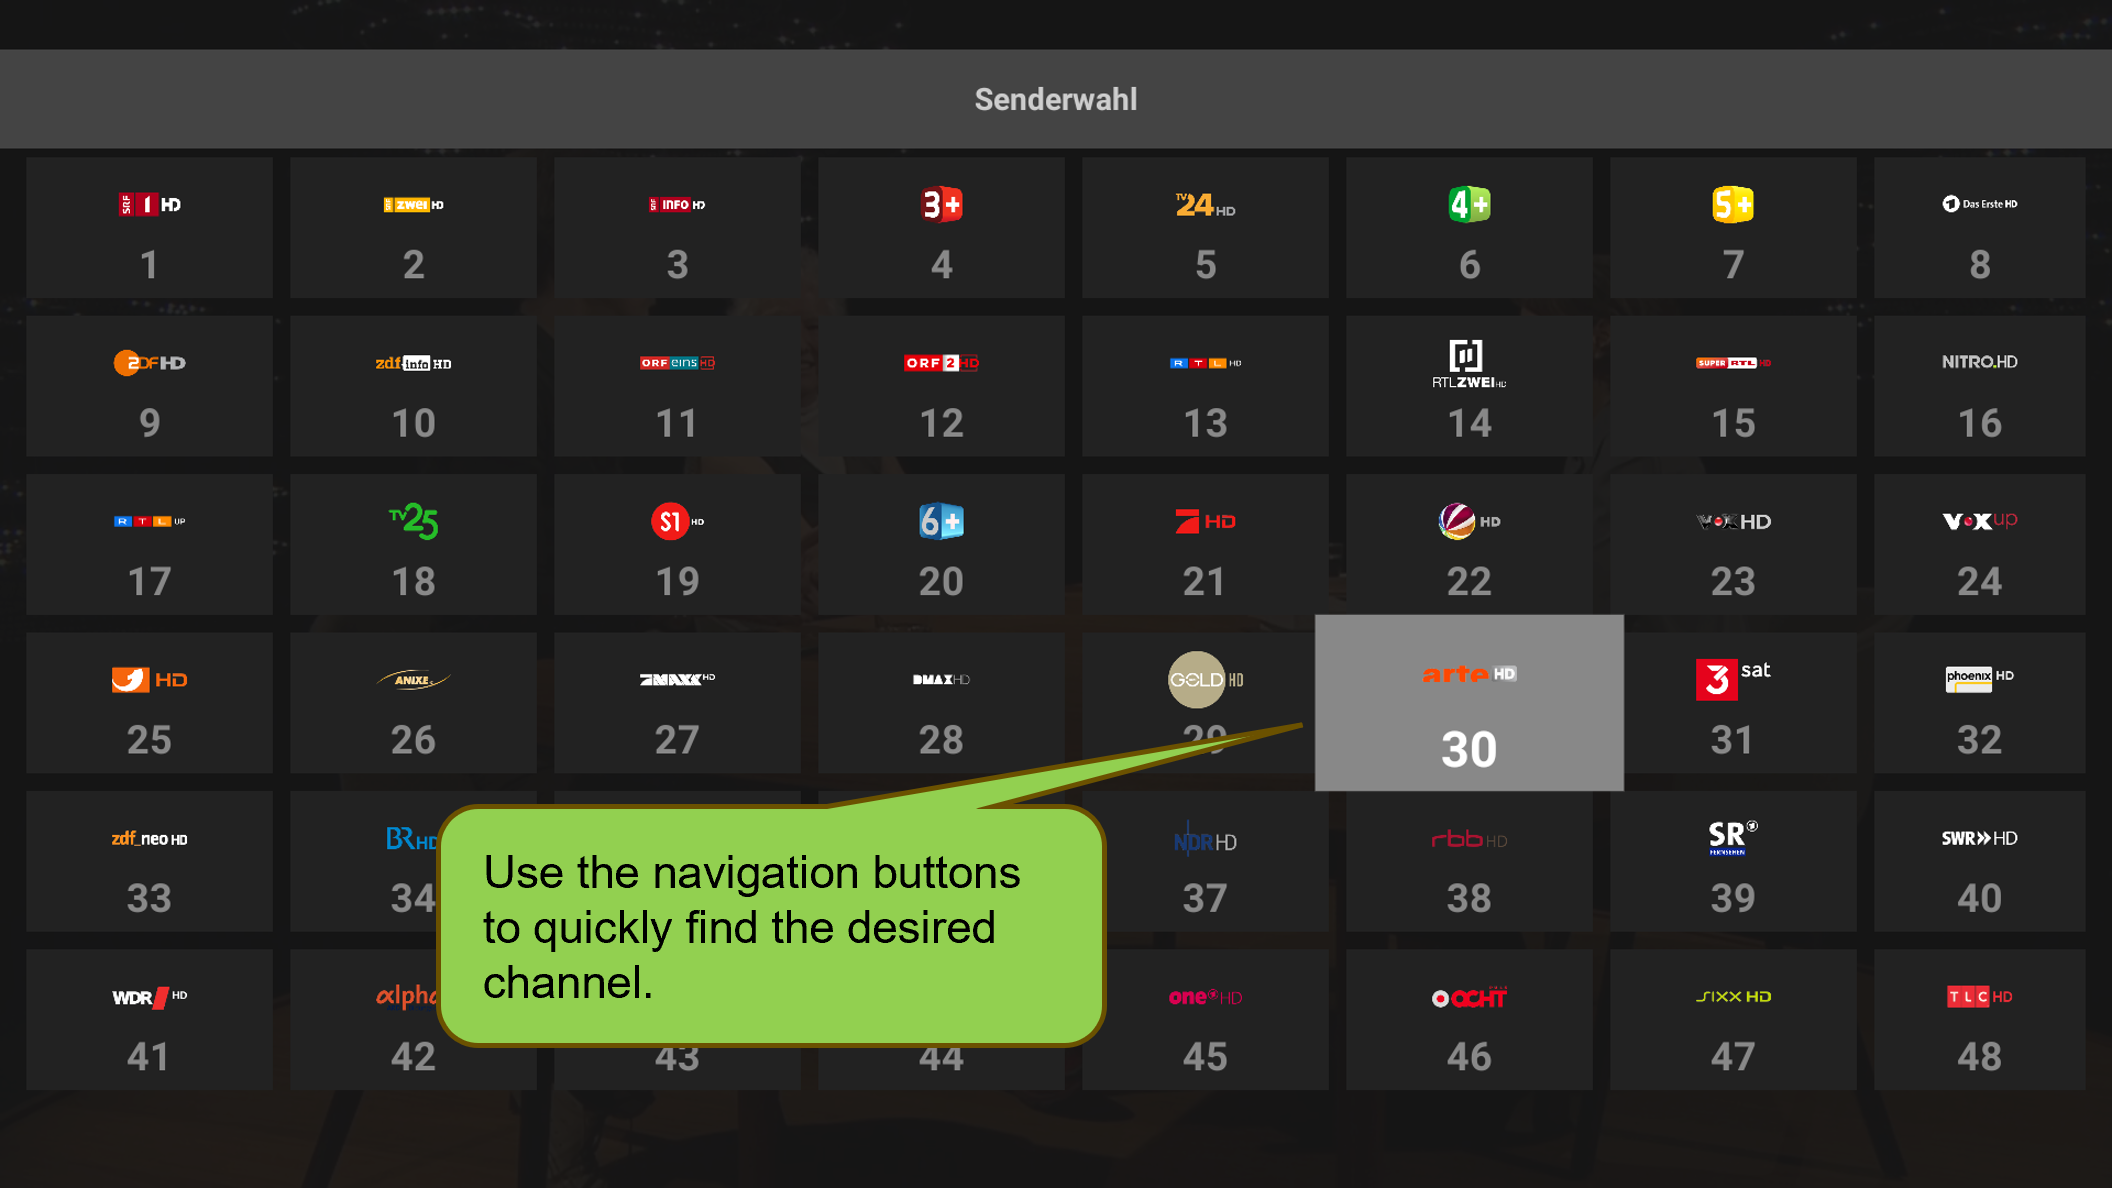
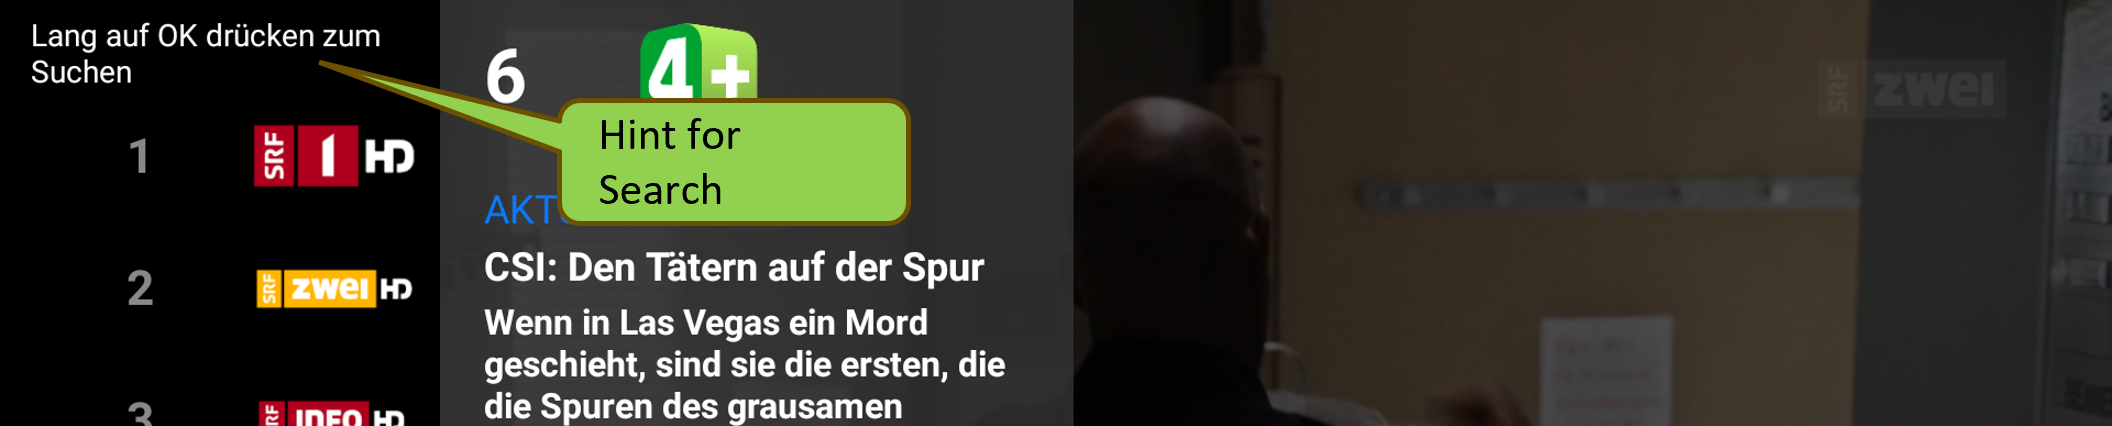
You can also search for a channel by name. To do this, while the “Zapper” is open, press and hold the OK button (“long press”).
A text field will appear. Here, you can type in the full name, part of the name, or even a number (for example, to find the channel “Channel 9”).
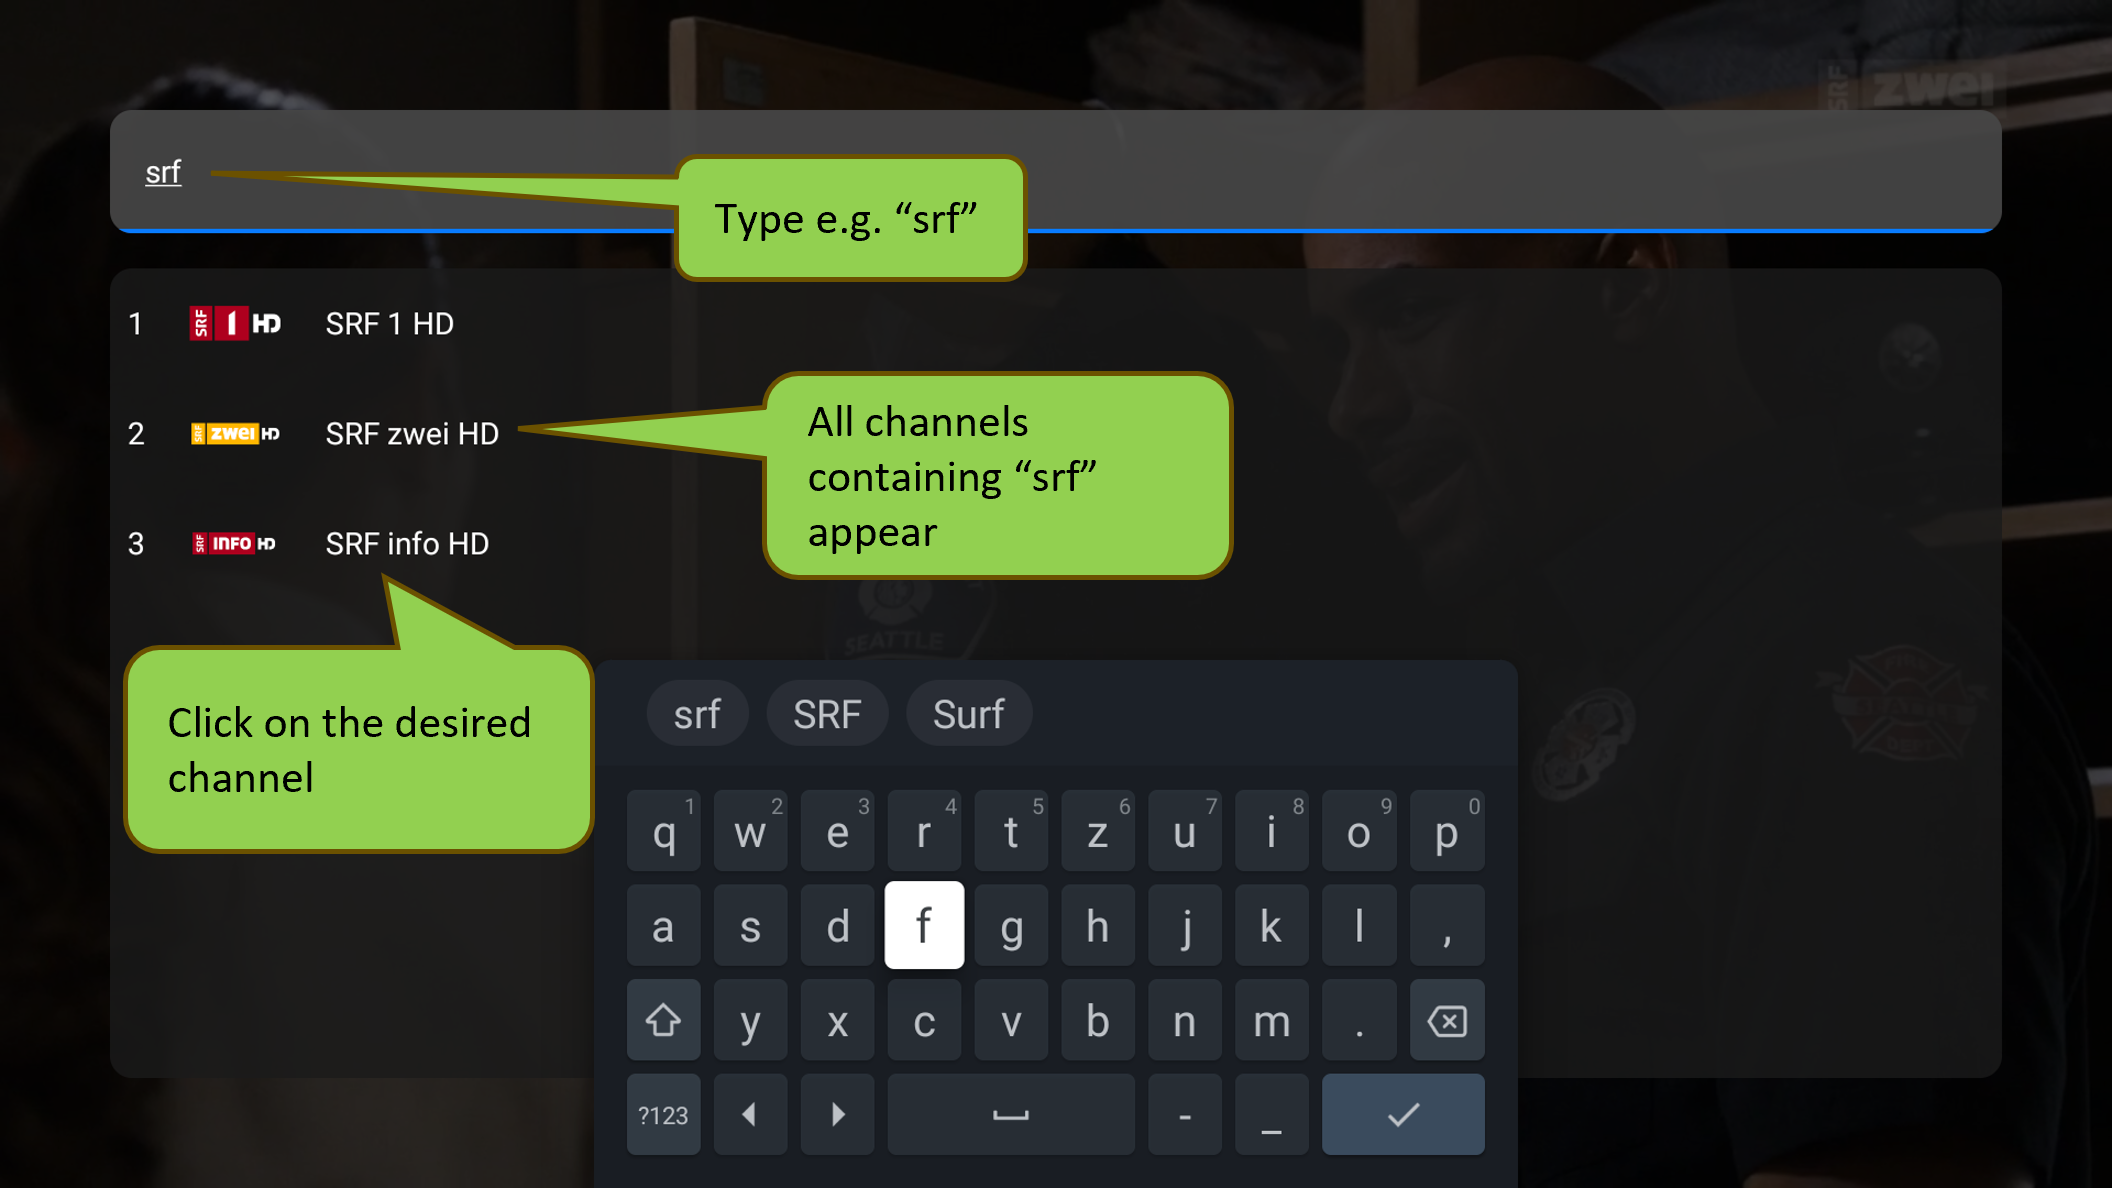
In the example above, “srf” was entered. The case (uppercase or lowercase) doesn’t matter.
You can set up up to 3 custom favorite lists for your favorite channels. Go to the gear icon (GoodTV Settings) and select “Favorite Lists”. The options for your favorites will appear.
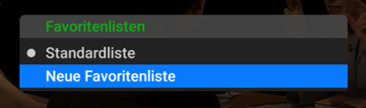
You have the following options:
- Activate the default list, which includes all the TV channels from your subscription. This list is enabled by default and is marked with a white dot.
- Create up to 3 additional favorite lists, which you can name and add your favorite channels to. To do this, select “New Favorite List”.
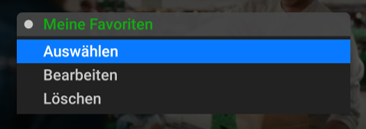
- You can also activate, edit, or delete an existing favorite list. The default list cannot be deleted or edited.
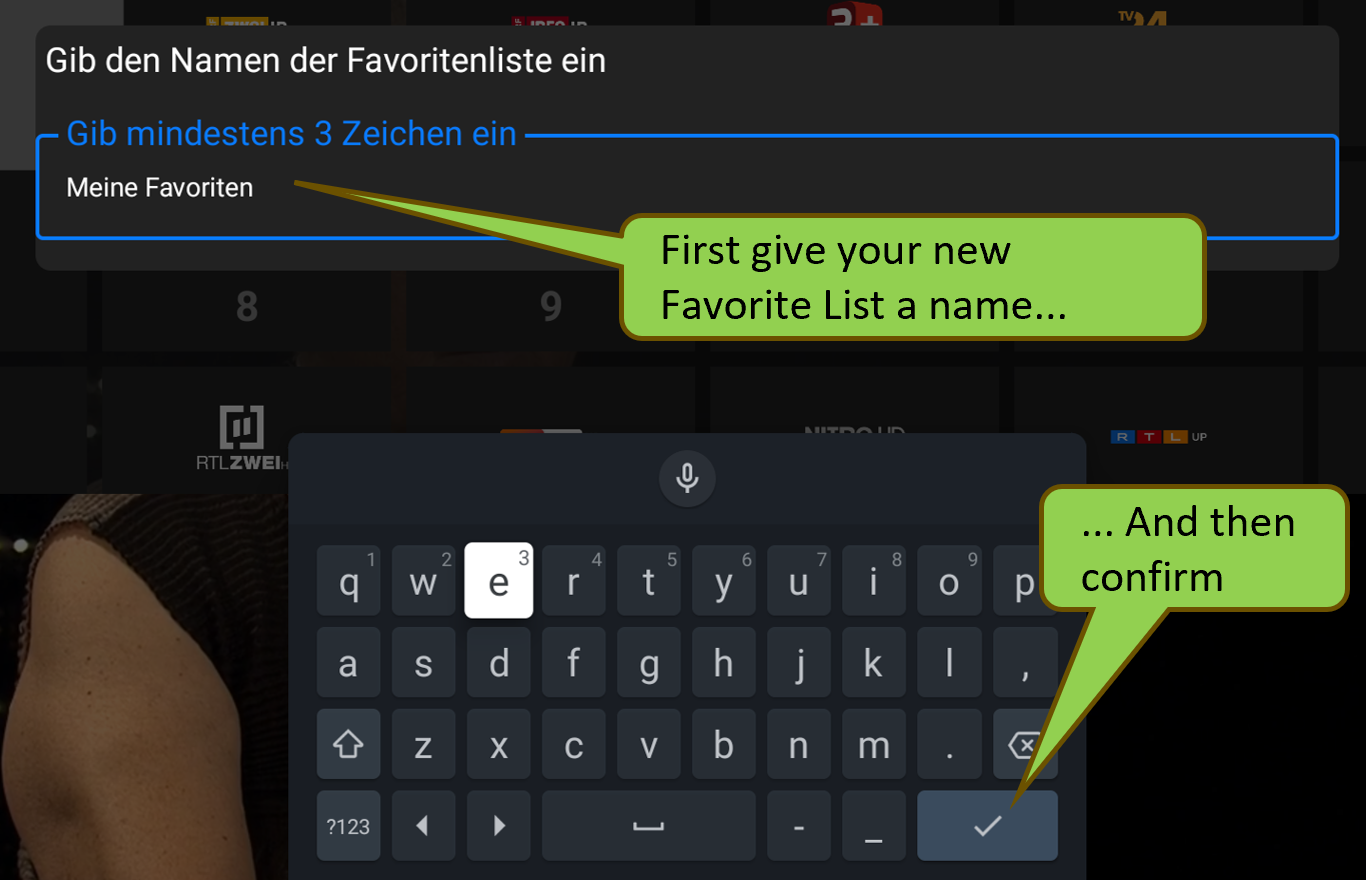
Make a new Favorite List:
The new list must first be named using the on-screen keyboard, for example, “My Favorites”, and then confirmed:
At the beginning, all 4 lists contain all the TV channels from your subscription. The currently active list is marked with a white dot. The highlighted list can be selected for editing by pressing OK.
You can edit these 3 custom lists using the options at the bottom of the screen (simply press and hold the OK button). The options are context-dependent and will be displayed on the screen.
Any changes made to the channels (selection/positioning) will be automatically saved when you exit the list, and the favorite list will be renamed to the name you entered.
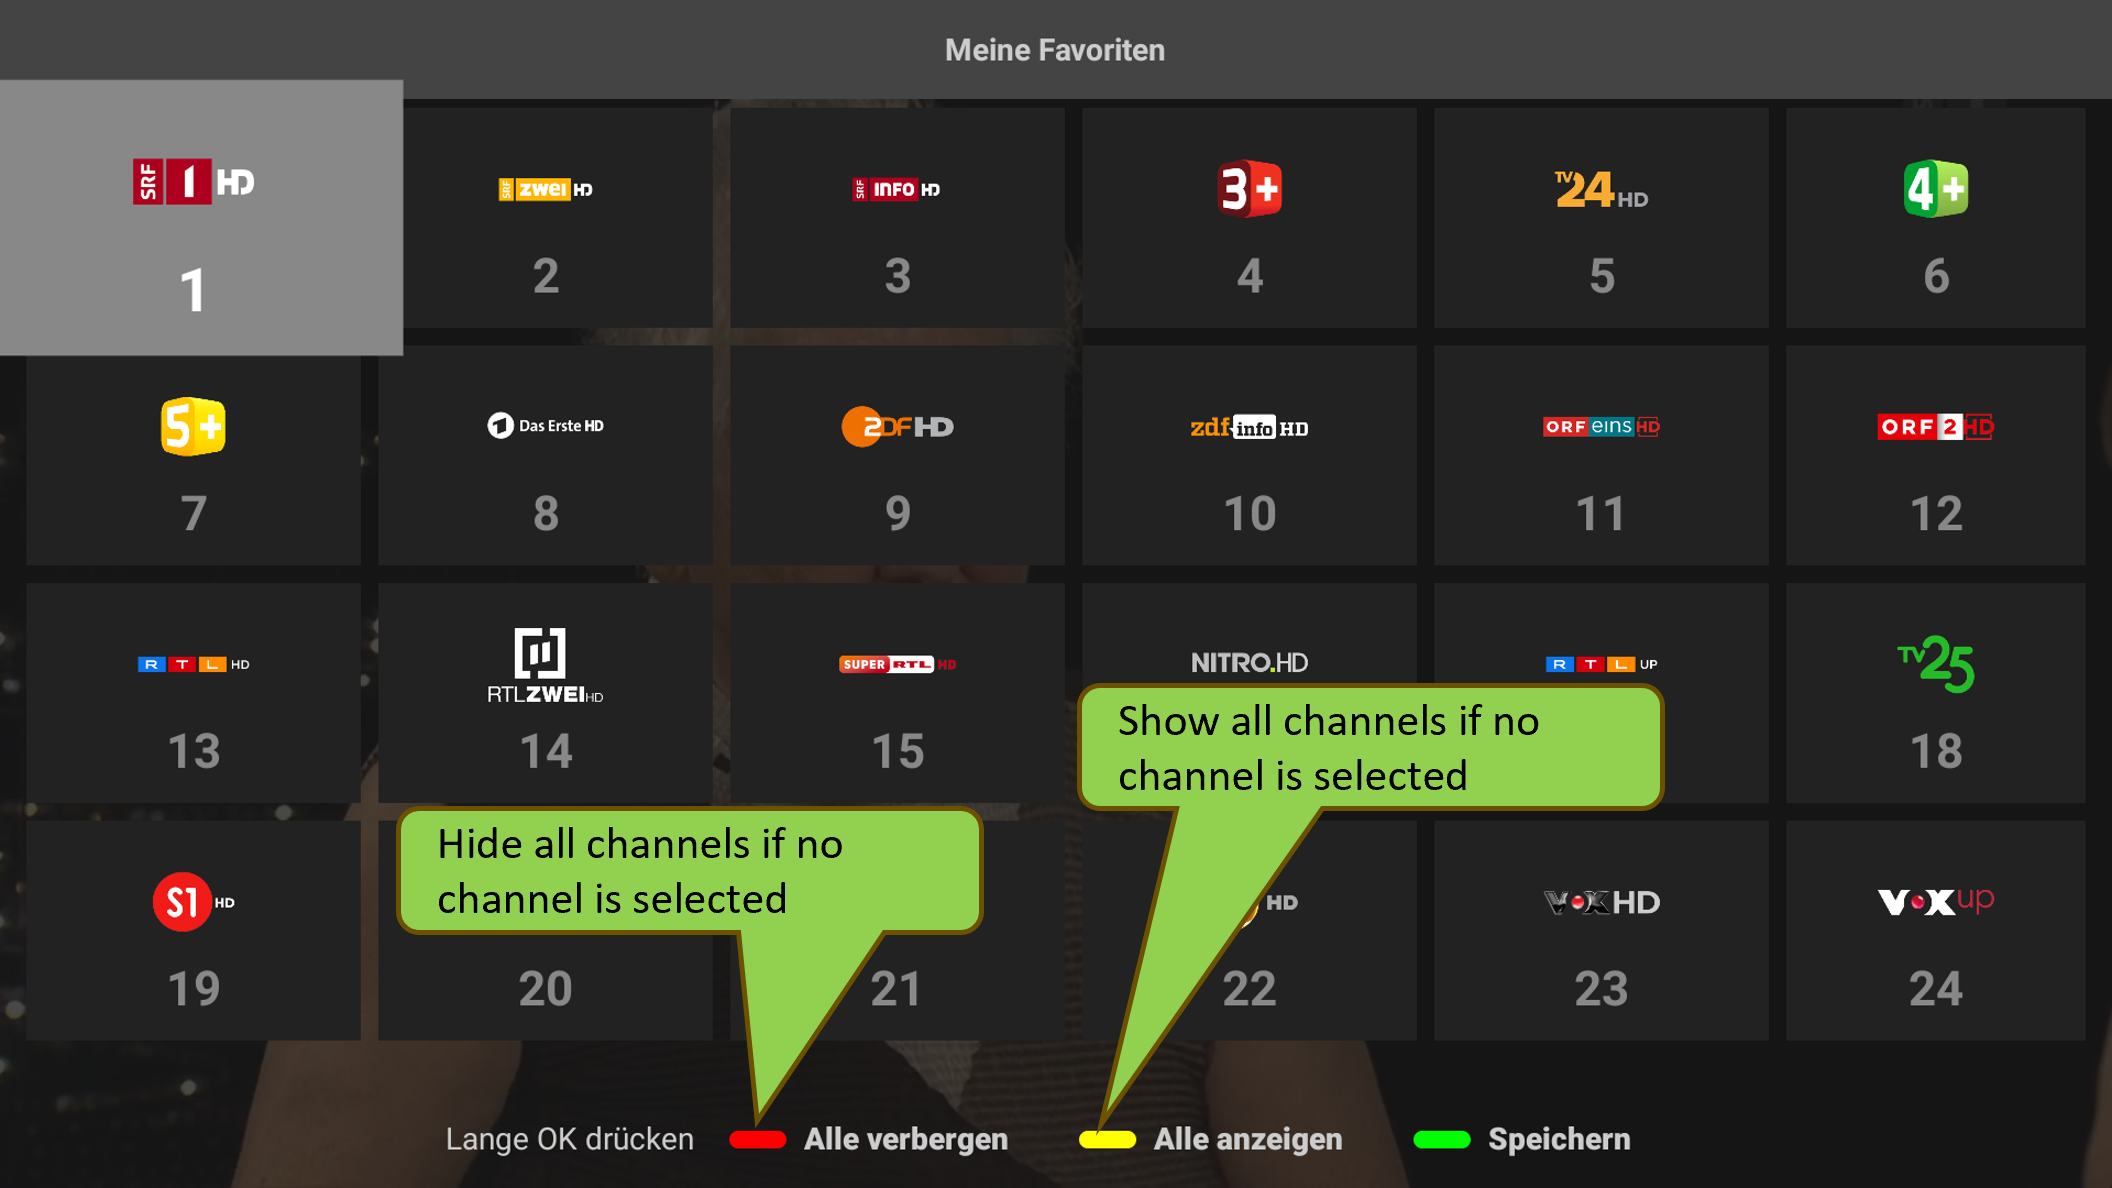
The options HIDE ALL and SHOW ALL are available at the start of the editing process.
Editing the List:
There are essentially two adjustment options available:
- Hide or Show TV Channels: You can choose to hide or show all channels (as mentioned above) or just some channels.
- Adjust the Order of TV Channels:
Here’s how to perform the most common adjustments:
1) Hide some channels:
First, select one or more channels by pressing the OK button. Then, press the red Hide/Show option. All selected channels will be hidden.
2) Create a Short List:
First, hide the entire channel list by selecting the HIDE ALL option (red button). Then, select the desired channels using the OK button. Press the red Hide/Show option to make the selected channels visible, and they will automatically move to the top of the list. Save the list by pressing the Save option or simply press the BACK button to save and exit.
3) Reorganize the List:
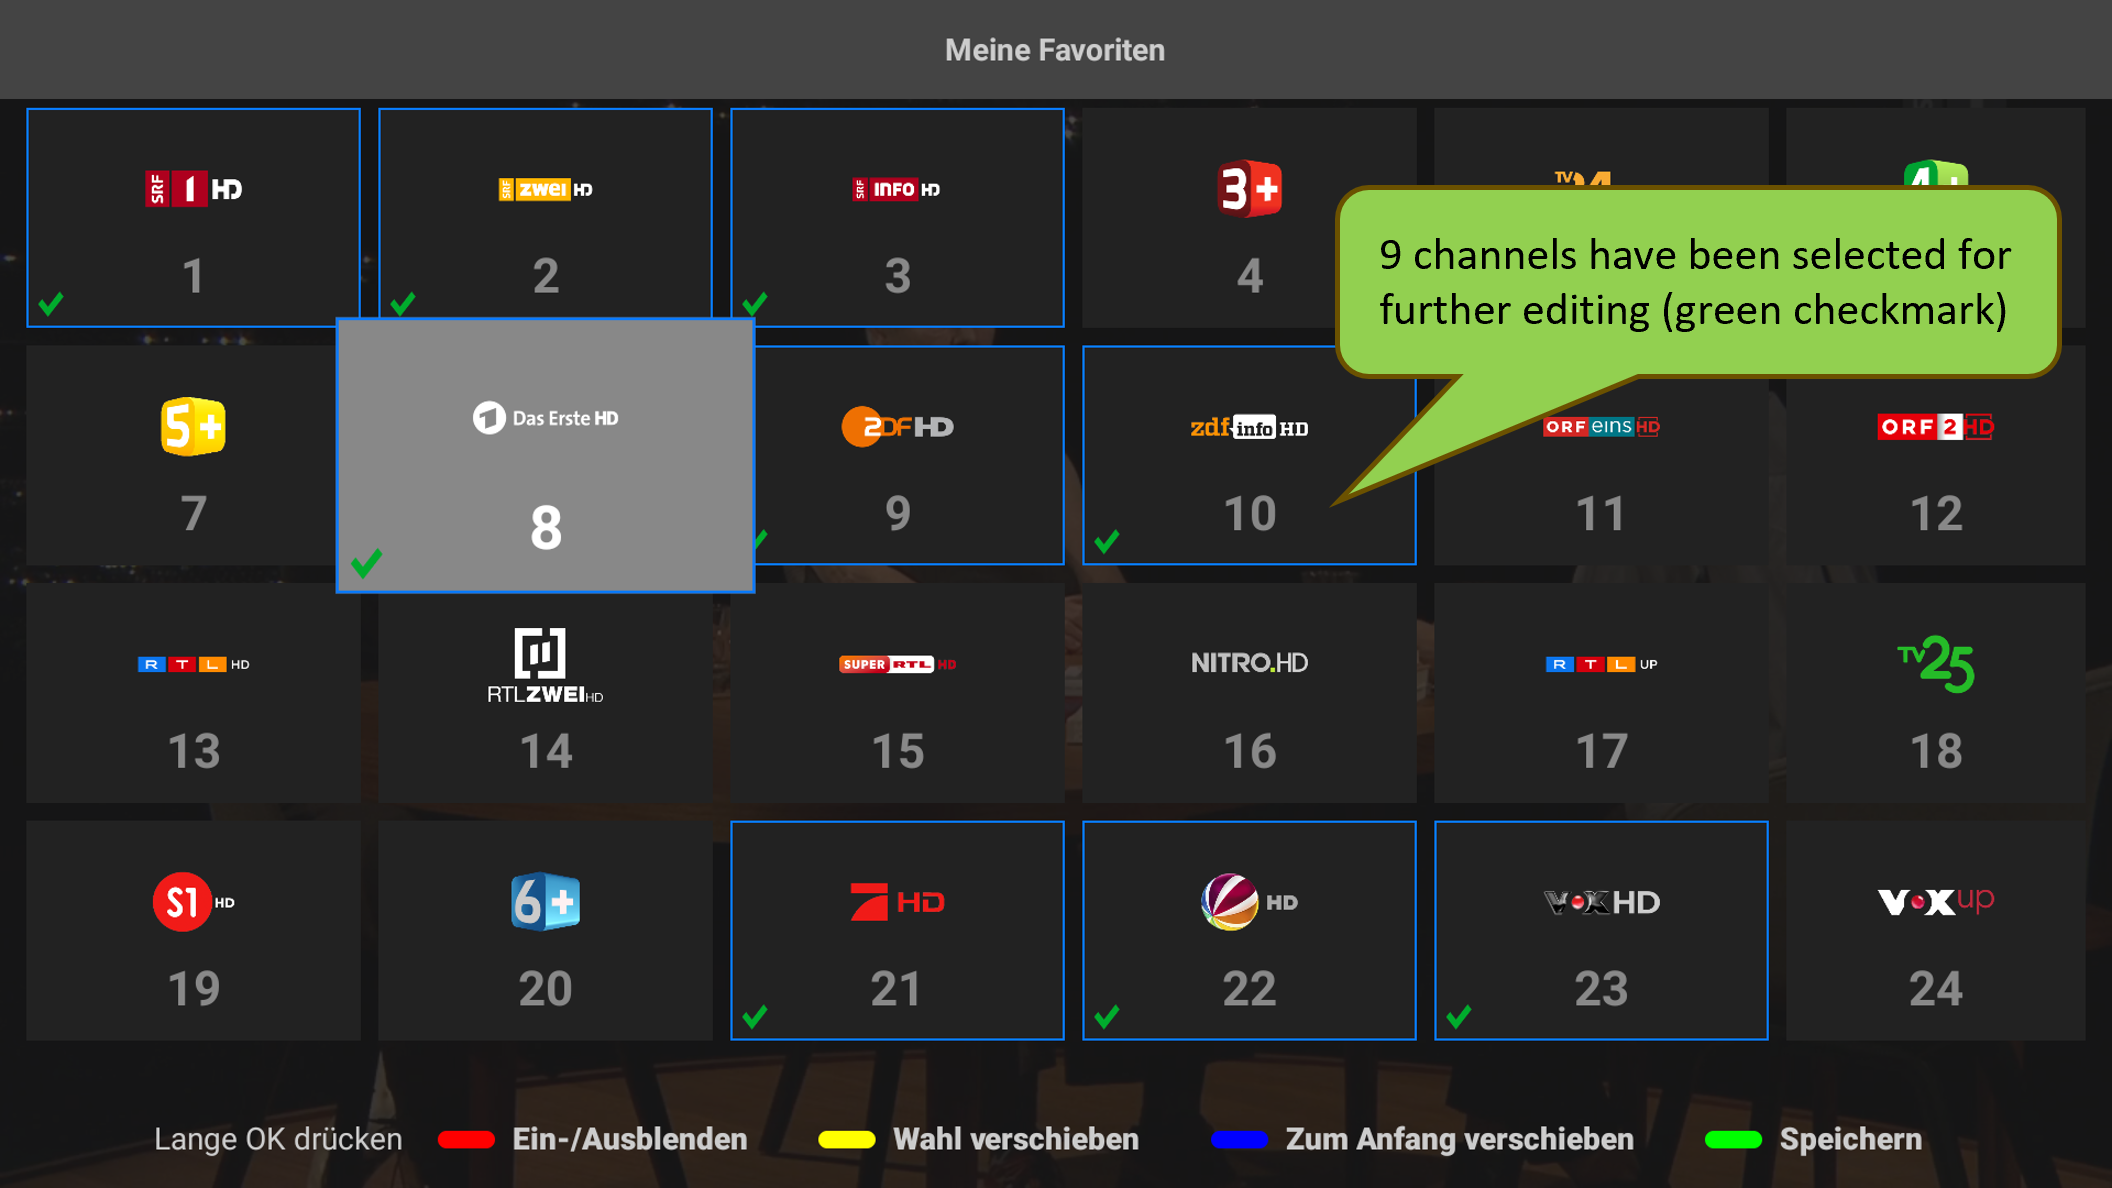
First, select one or more channels by pressing the OK button. Use the arrow buttons to position the cursor where you want the selected channels to be moved. Press the yellow Move Selection option to move the selected channels to the chosen position, and all other channels will be automatically reordered.
4) Move Channels to the Top:
First, select one or more channels by pressing the OK button. Press the blue Move to Top option. The selected channels will be moved to the top, and all other channels will be automatically reordered. After each adjustment, always save the list by pressing the green Save option or simply press the BACK button to save and exit.
Tips:
- The yellow SHOW ALL option can be used to make all channels visible again in their current positions.
- You can deselect a selected channel by pressing the OK button.
- Visible channels are displayed with black tiles, while hidden channels are shown with transparent tiles.
Press the BACK button or the SAVE option to automatically save all changes and exit the list.
Replay:
Go to the Replay control. A selection of programs will appear, grouped by genre.
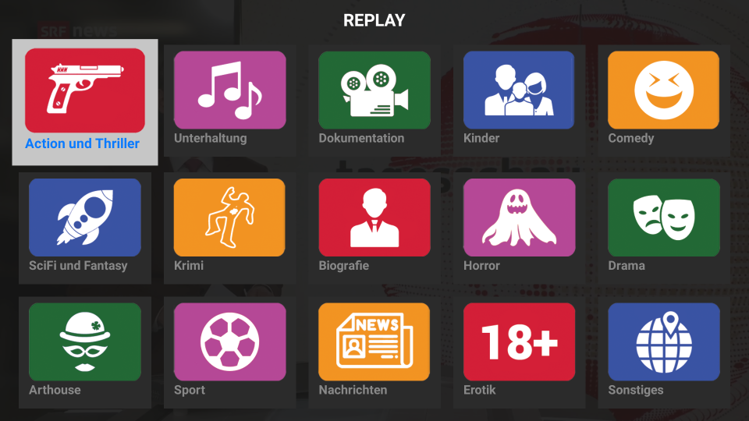
Select a genre, and the available programs will appear, sorted by Newest First. You can adjust the sorting as needed.
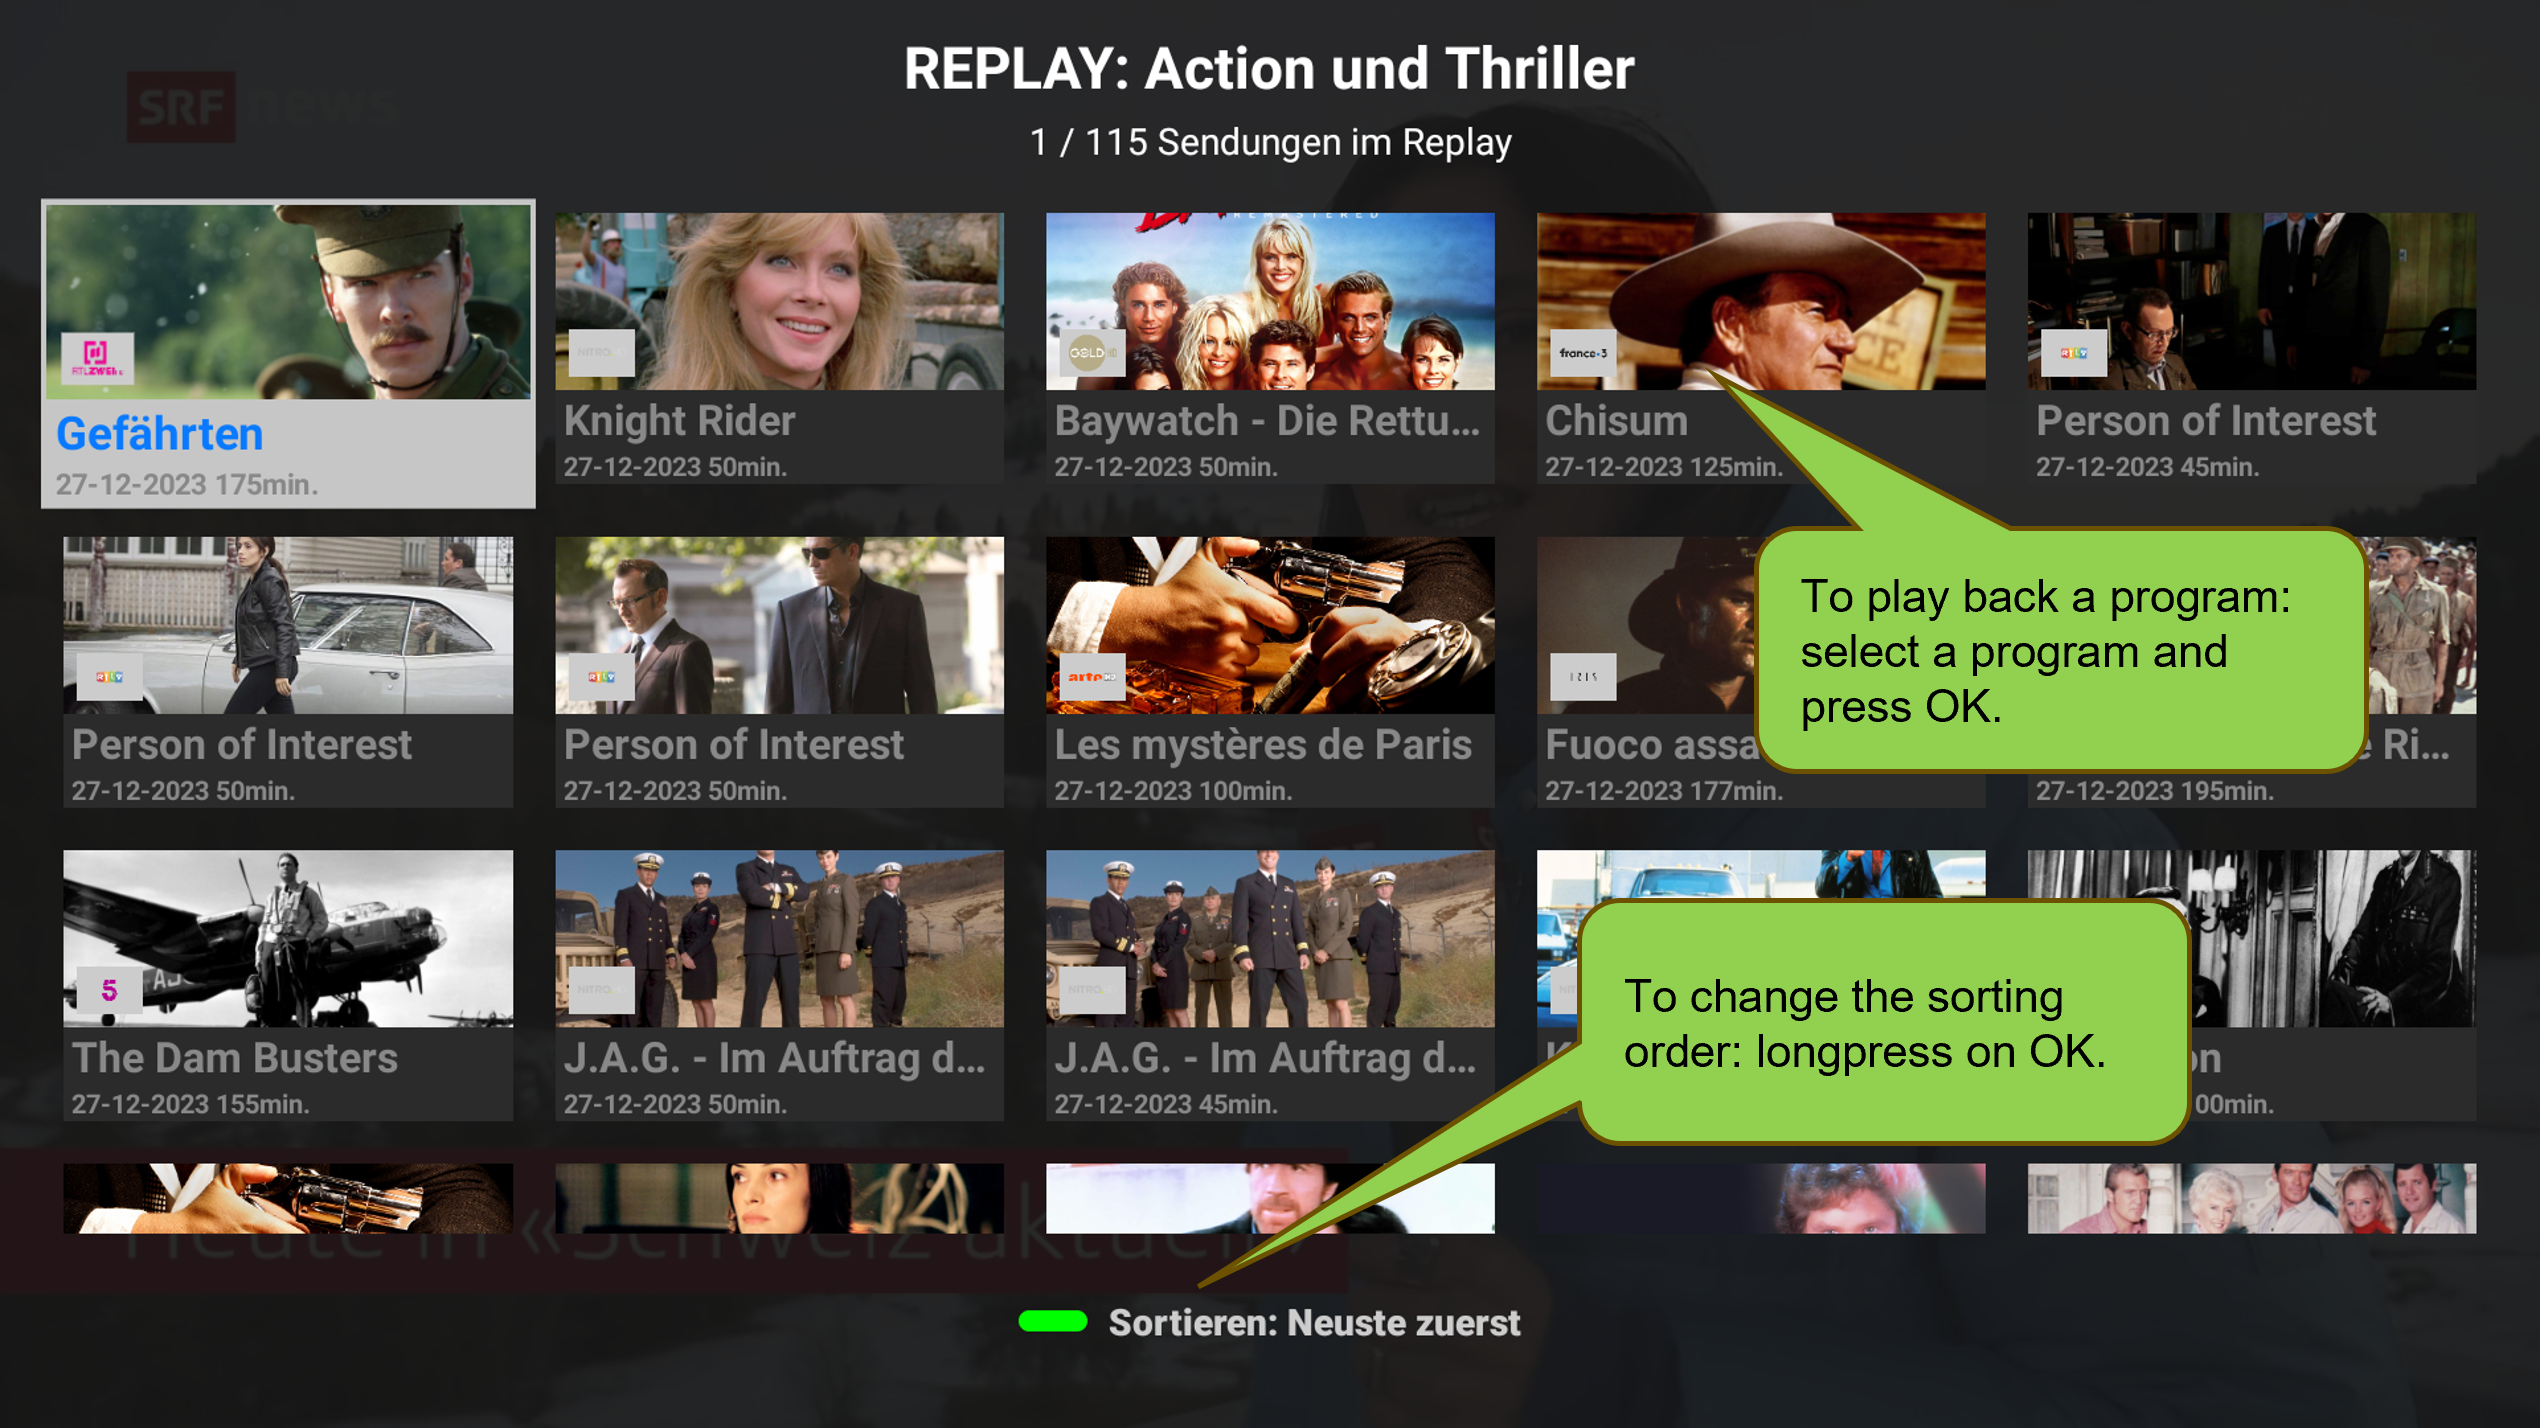
After pressing OK, you’ll see information about the program. Press OK again to start playing. Press and hold OK to watch from the beginning or to record the program permanently. Note: Programs remain available in Replay for 7 days after having aired.
Recordings:
Go to the Recordings control. All your recordings will appear, grouped by genre, similar to the Replay section, with similar controls.
Select a genre, and the recordings will appear, sorted by Oldest First. You can adjust the sorting as needed. In the Recordings section, you can also use filters to show only recorded programs, only scheduled recordings, or both. Of course, you can also delete recordings as you wish.
A special genre is Series. For series, a list of all scheduled series will appear first, followed by the episodes.
Go to the Guide (Program Guide) control. The programs will appear, with the current channel listed at the top. Use the LEFT, RIGHT, UP, and DOWN buttons to navigate between programs and channels. When a program is highlighted in blue, it is selected.
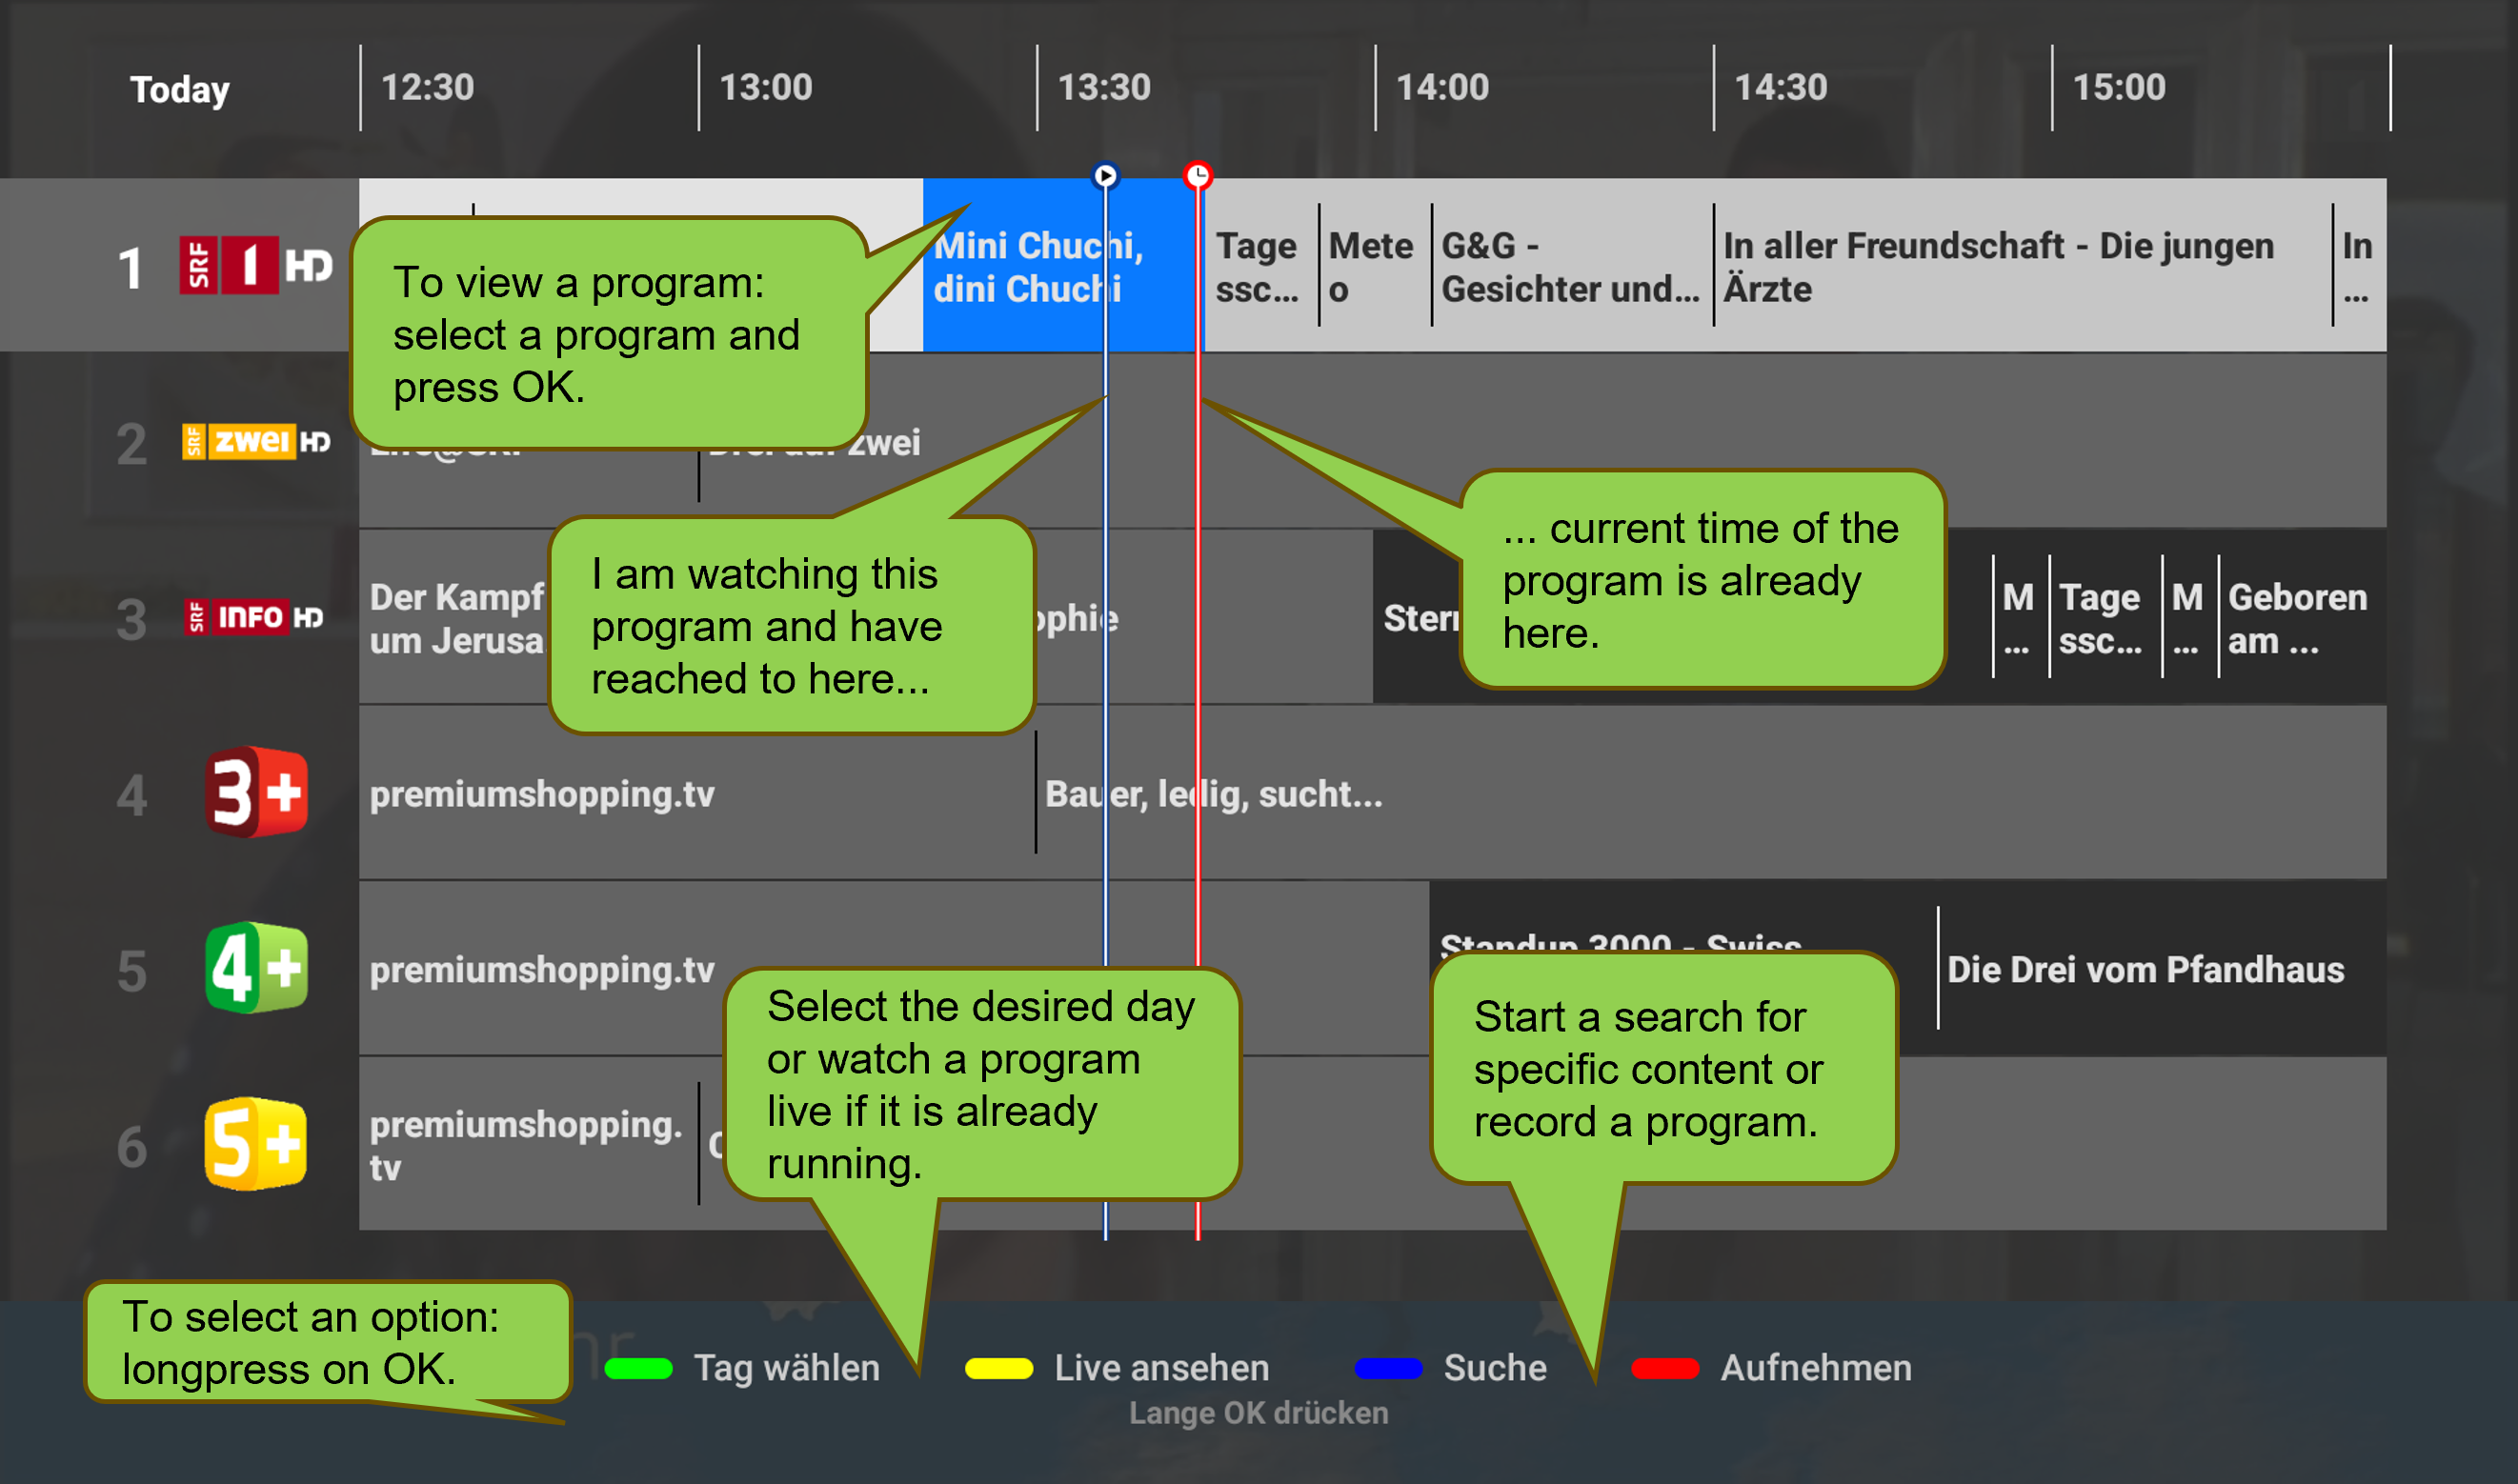
After pressing OK, information about the program will appear first. Press OK again to start playback, and press and hold OK for more options. Program information is available for 7 days in the past and 7 days in the future.
You can find interesting content using the search function. Go to the Guide (Program Guide) control. The programs will appear, with the current channel listed at the top.
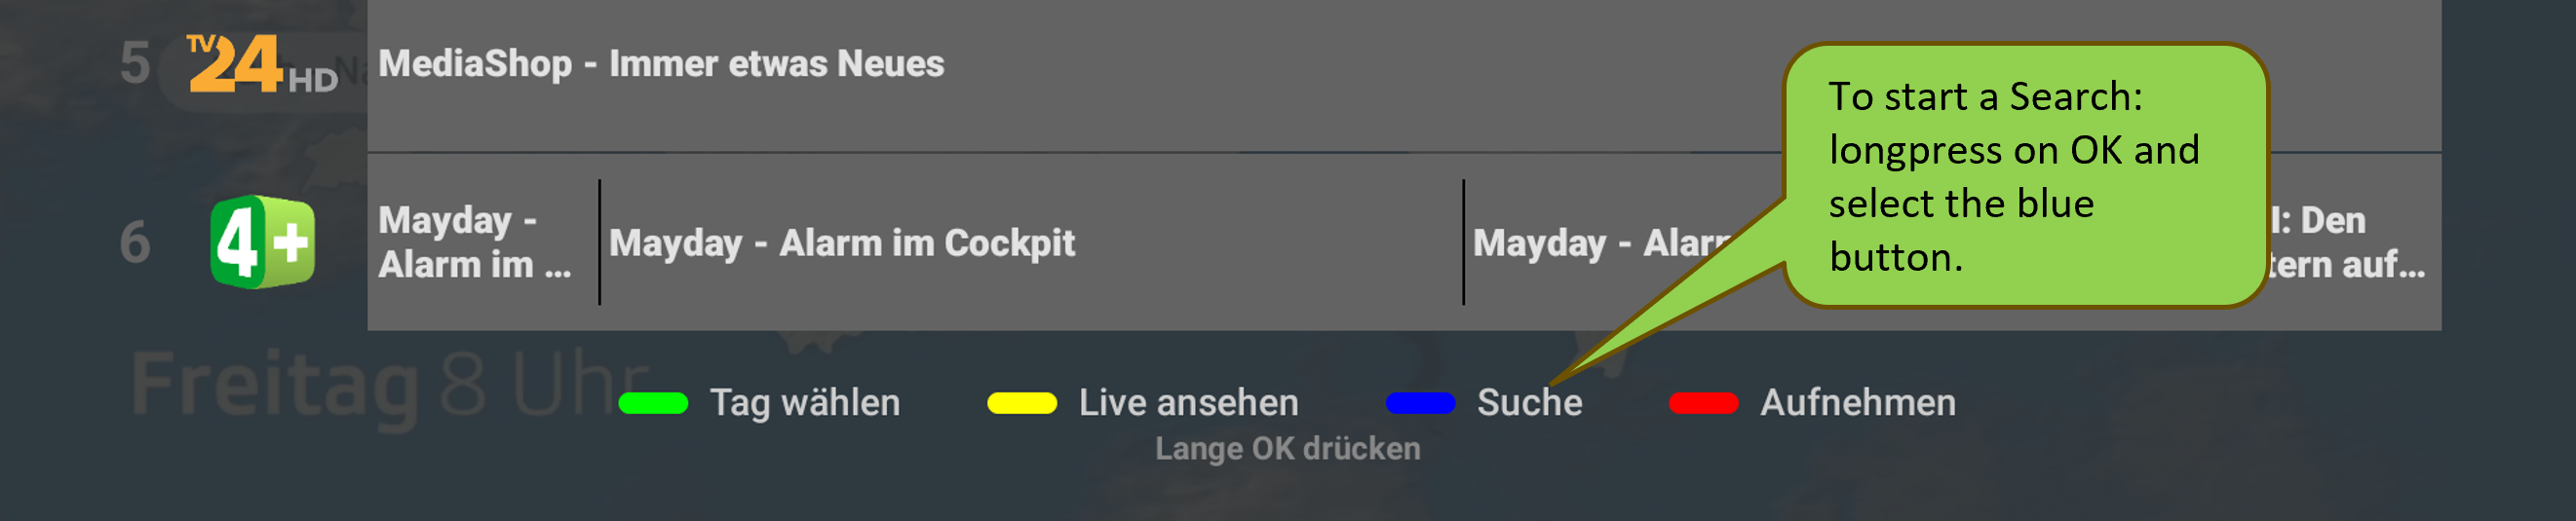
By pressing and holding the OK button and selecting the blue “Search” option, you can start the search. A search screen will appear with a text field for entering your search and additional options.

After a click, the on-screen keyboard will appear. Type in your search term and confirm.
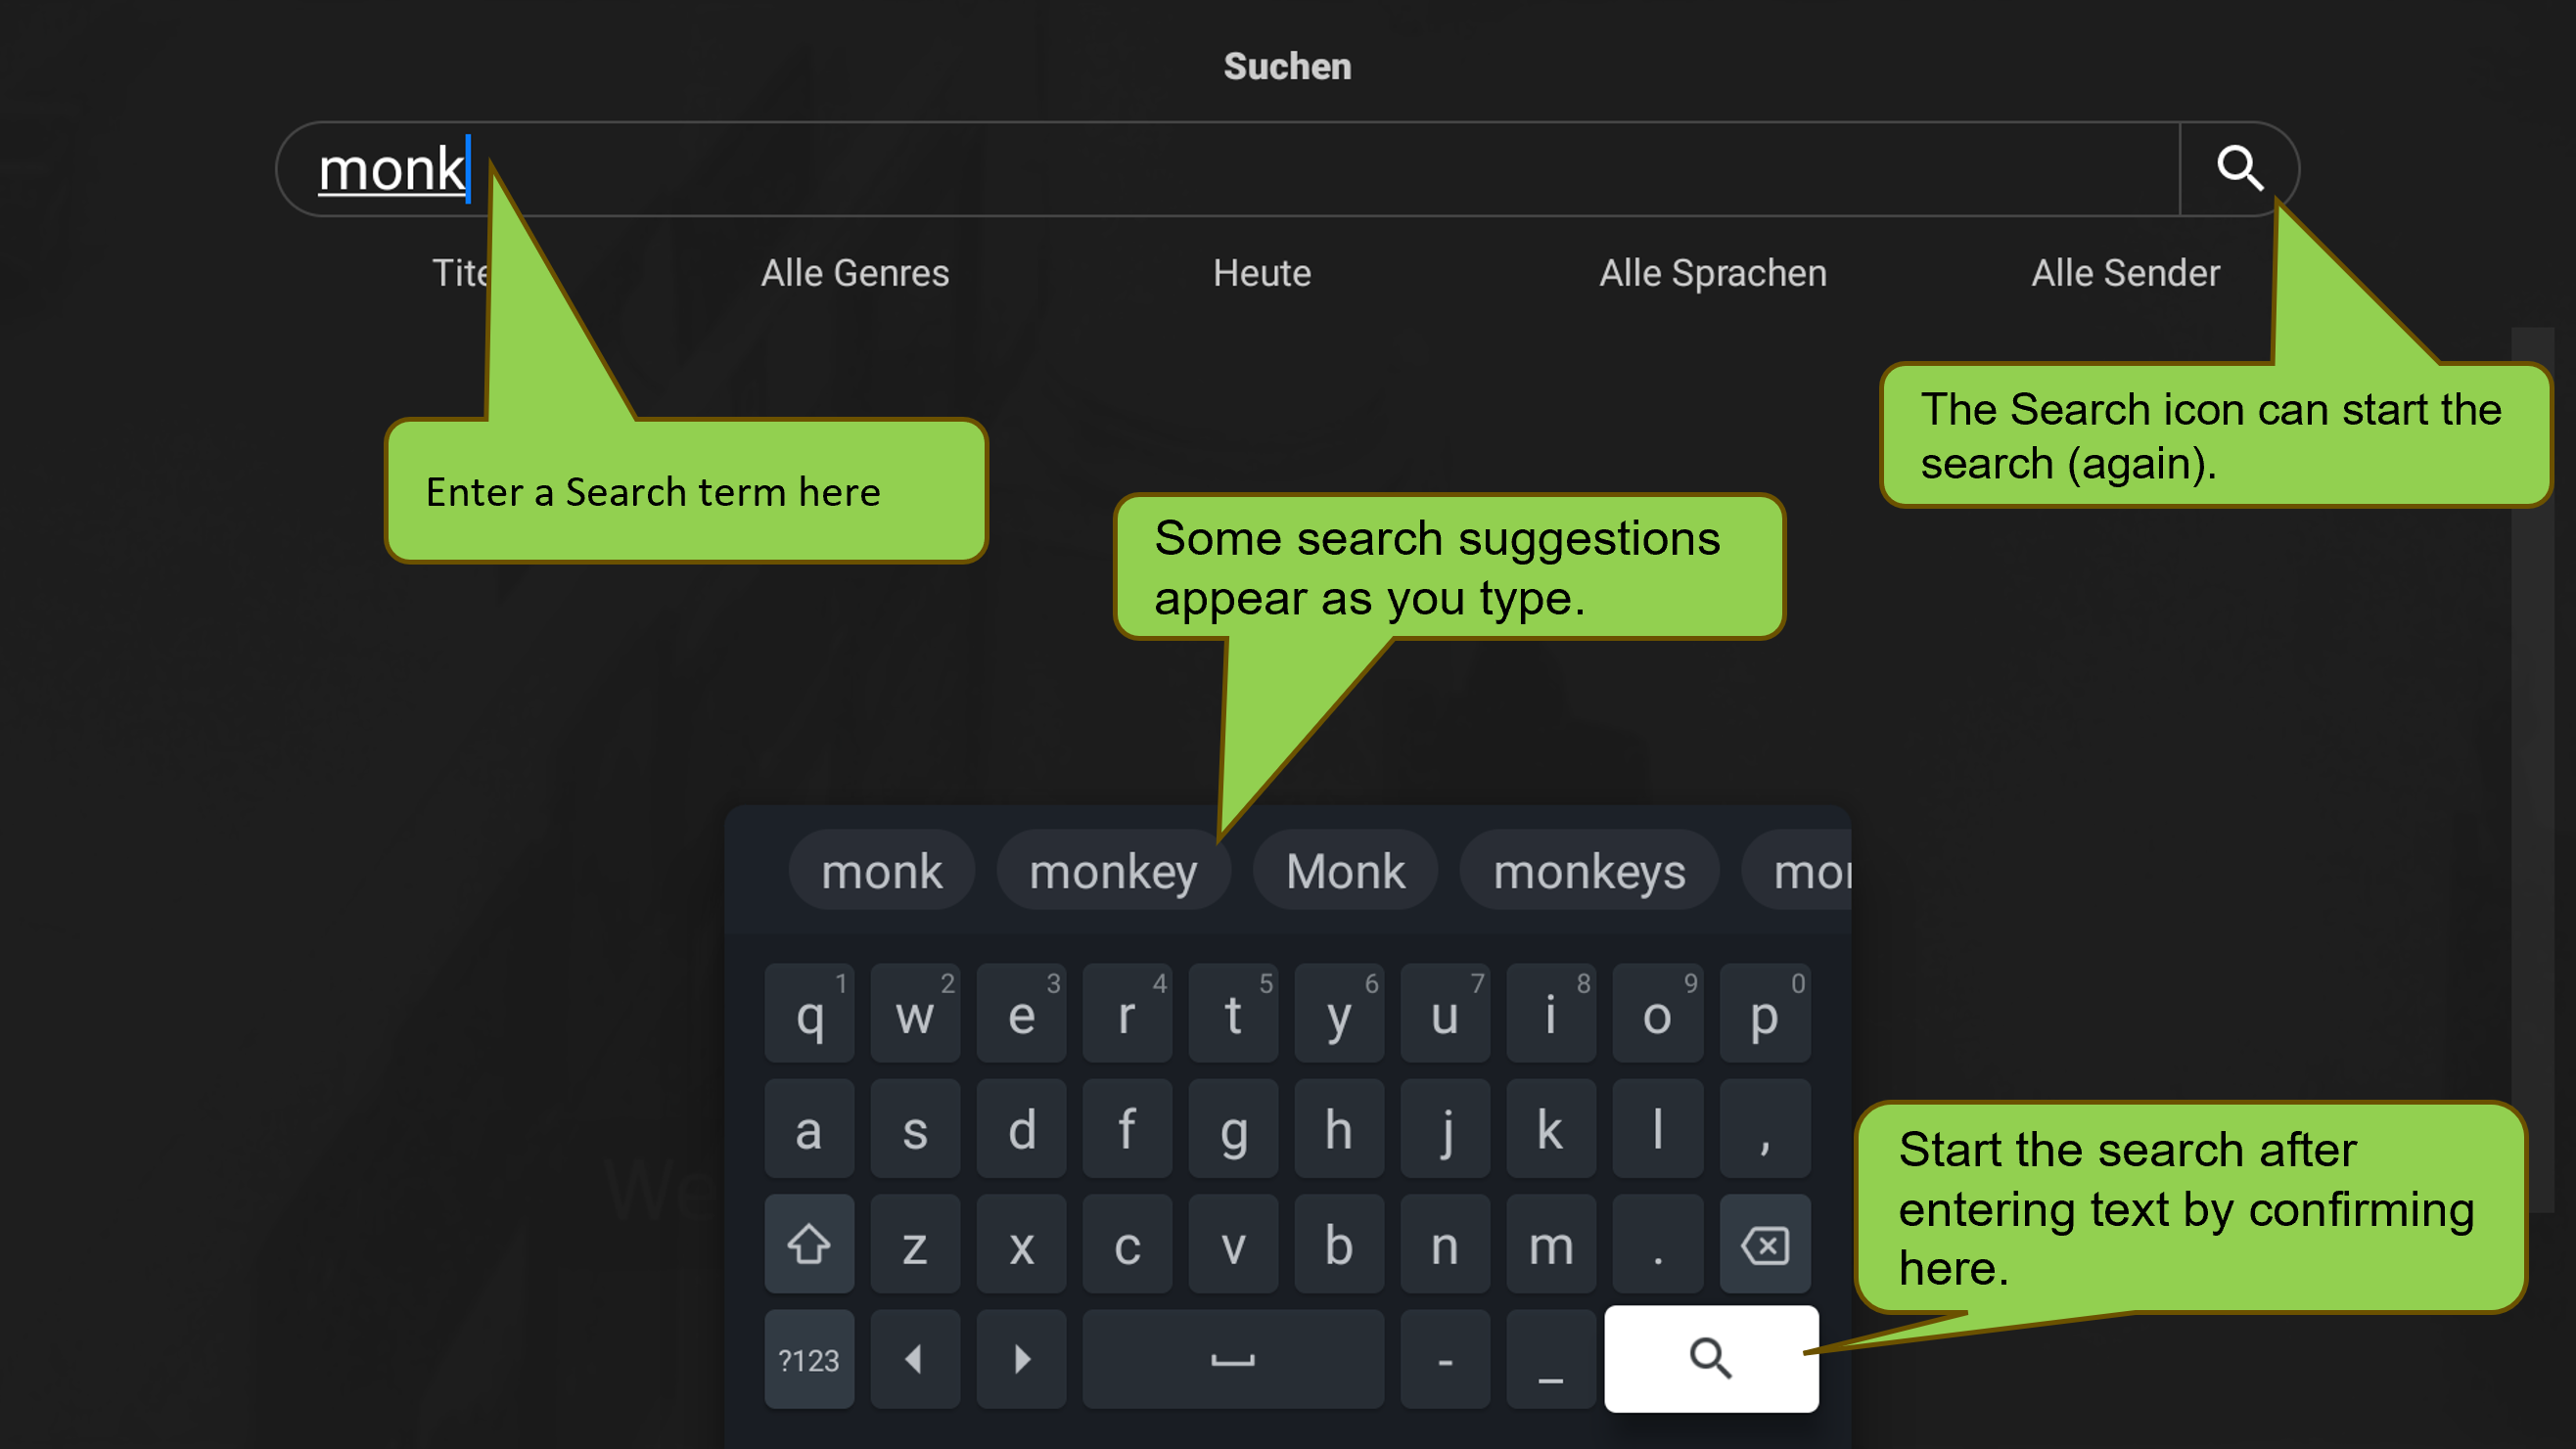
Tip: You can start a new or adjusted search at any time. If you change your search criteria, simply go back to the Search icon (it will be highlighted in green) and restart the search.
Optimizing Search
Before starting the search, you can narrow it down by selecting categories using filters. This can make your search more precise and faster. There are 5 categories: Program Info, Genre, Time Range, Languages and Channels.

Tips:
- If you use a favorite list, the search will be faster since it will only search within your favorites.
- Choosing the “Today” time range means the period from 00:00 to 23:59 on the current date.
- Choosing the “Last / Next 24h / 28h / 7 Days” time range means the app will search from “now”, plus or minus the selected time range.
Search is running
After confirmation, the search will run within the selected categories, and the blue bar will move.
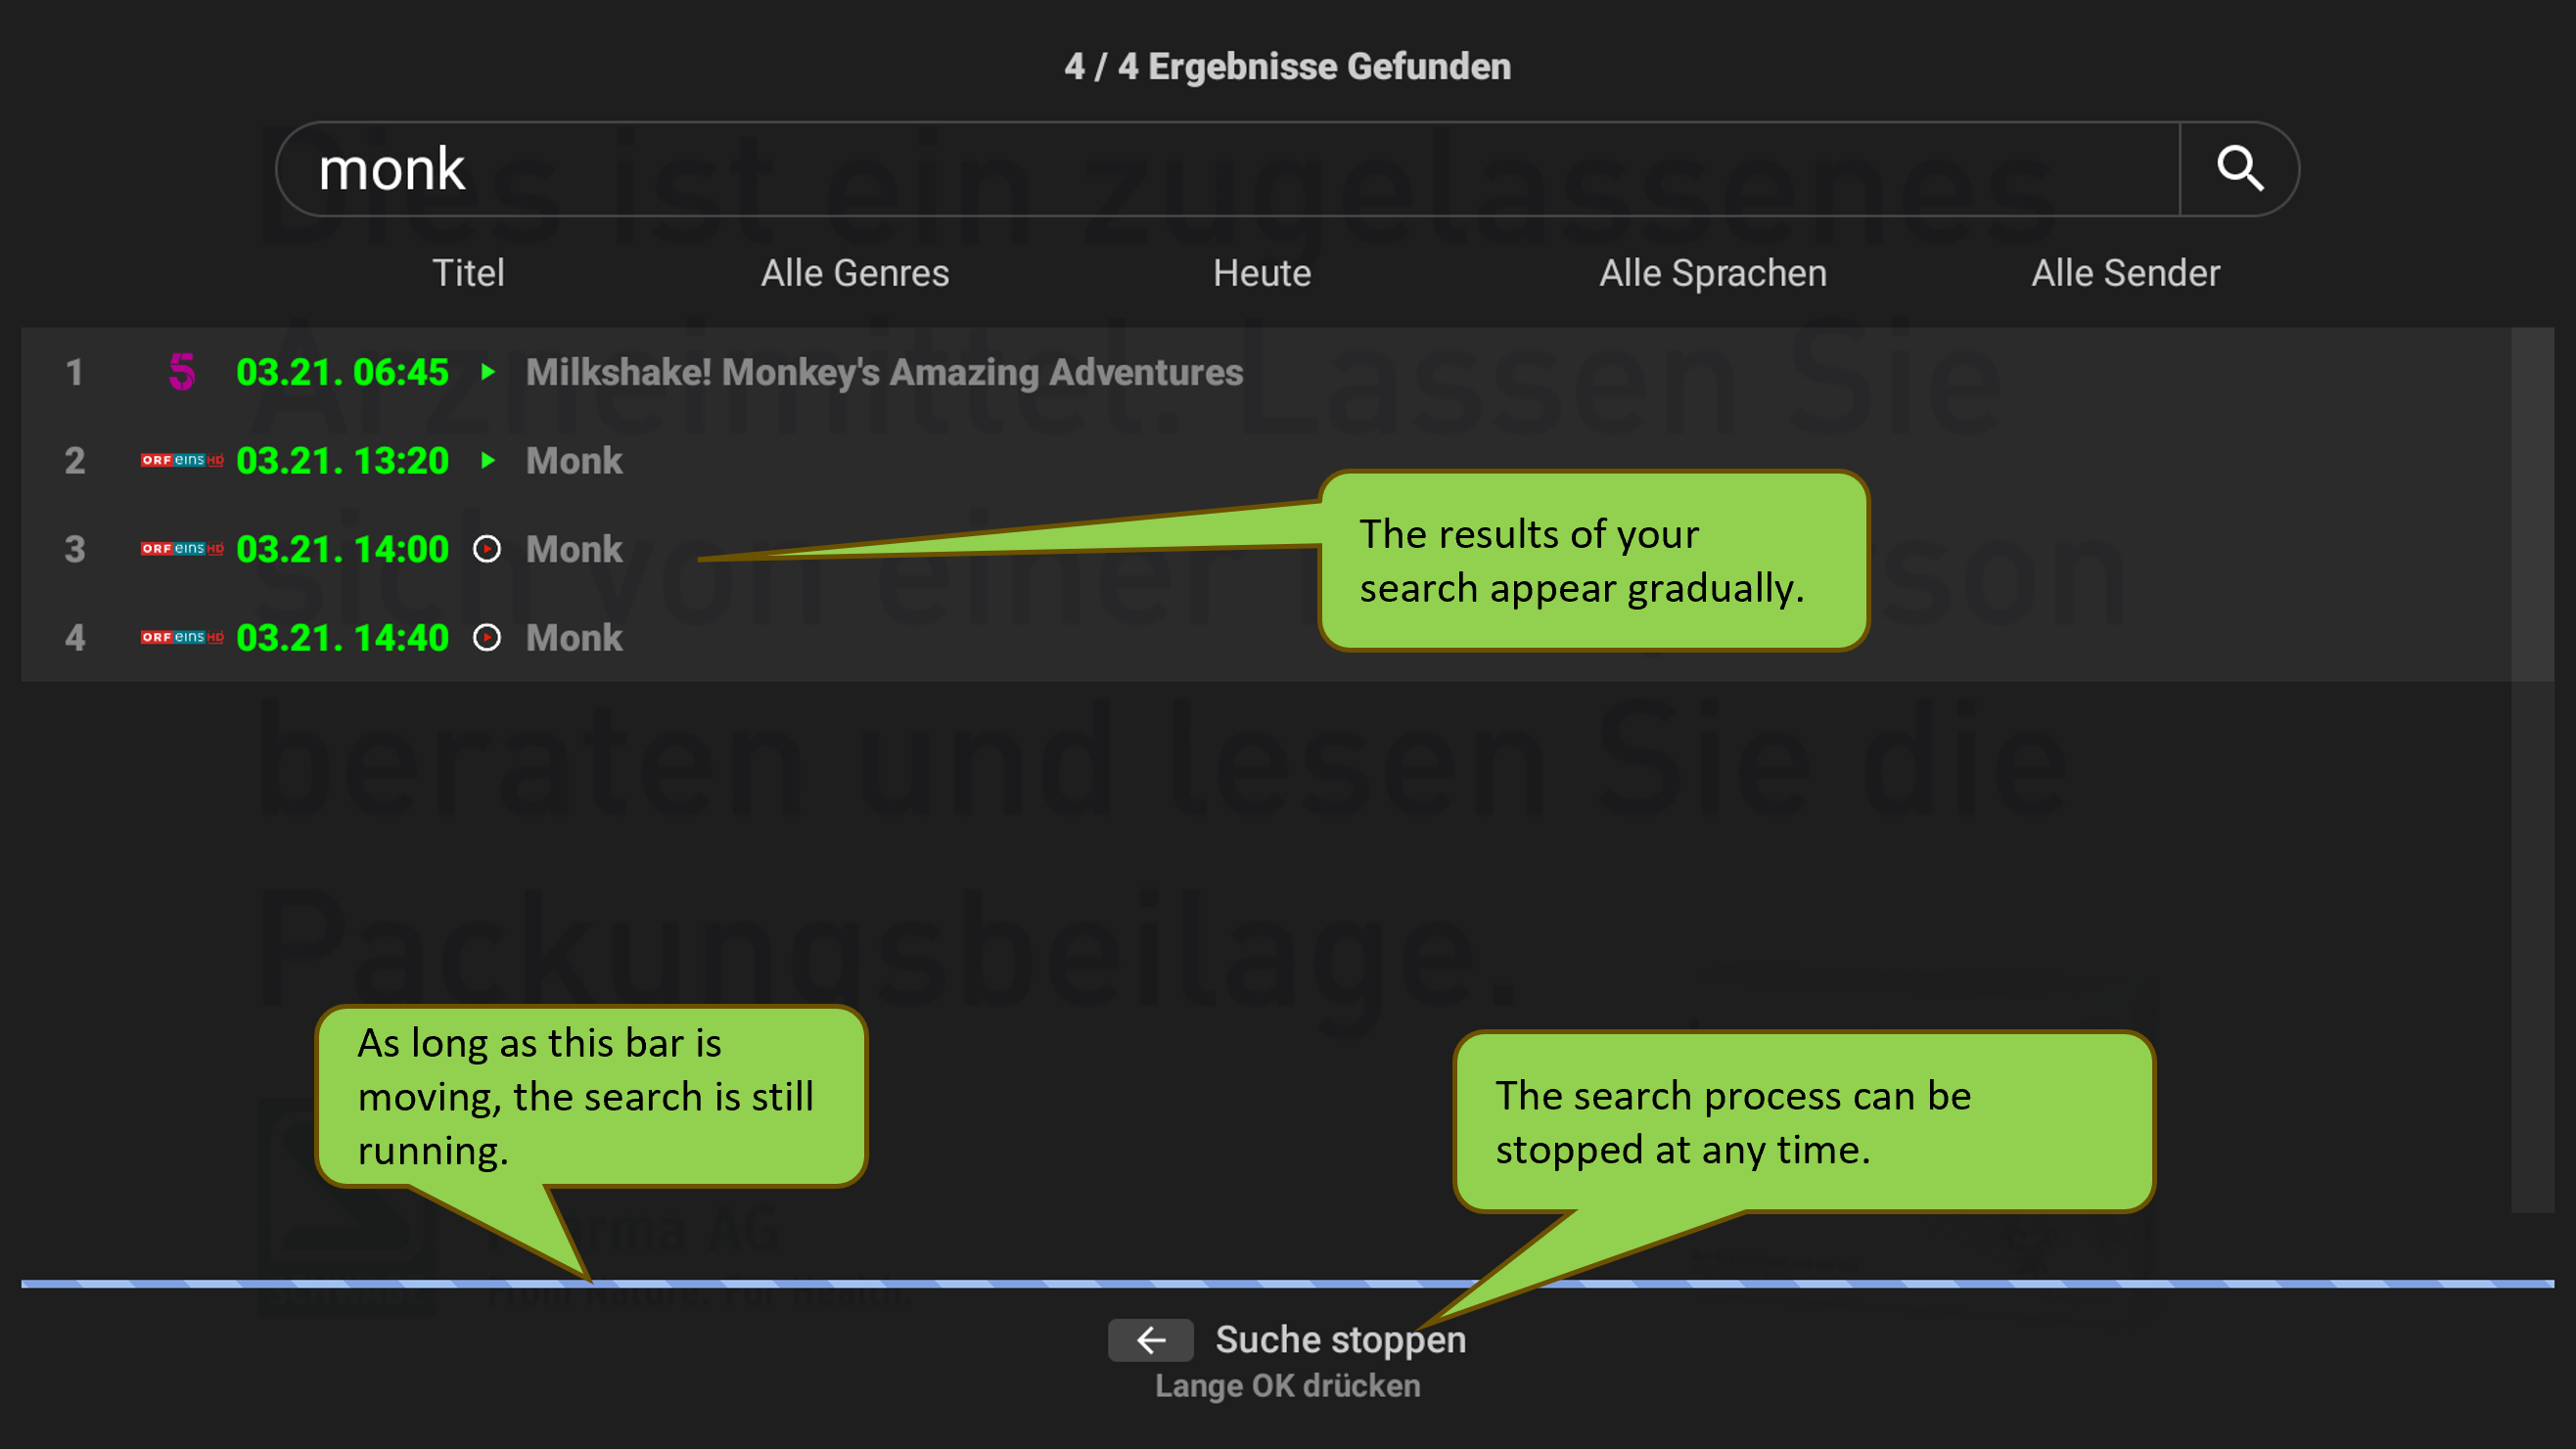
Search has finished
The search is now complete, and the results are fully displayed. A list of results will appear with all the programs that match your criteria. For each program, the channel, the time of the program, and the title/episode number will be shown. The results also have different icons that explain what you can do with the selected program, such as watch the program, record the program, and more.

At the bottom, additional options will appear.
The “Reset Search” function will clear the results list, remove the search text, and reset all selected filters to their default settings. This allows you to start a fresh search.
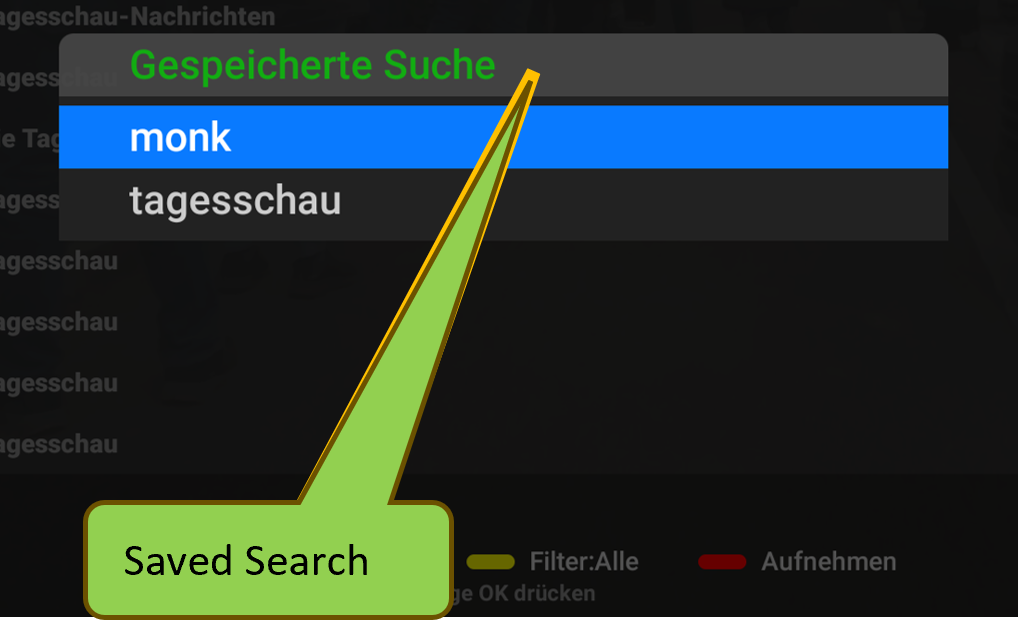
Saved Searches
Instead of typing, you can use the “Saved Search” option to view and reuse previously used search terms.
Tip: The “Reset Search” function does not delete the search terms in the “Saved Search” list. These search terms will always be available for use.
On the user interface of your Android TV device, you’ll see apps and recommendations from various providers. The GoodTV app also offers such recommendations.
Note: Currently, only devices running the Android TV operating system support these recommendations. Devices with the Google TV operating system are expected to follow soon.
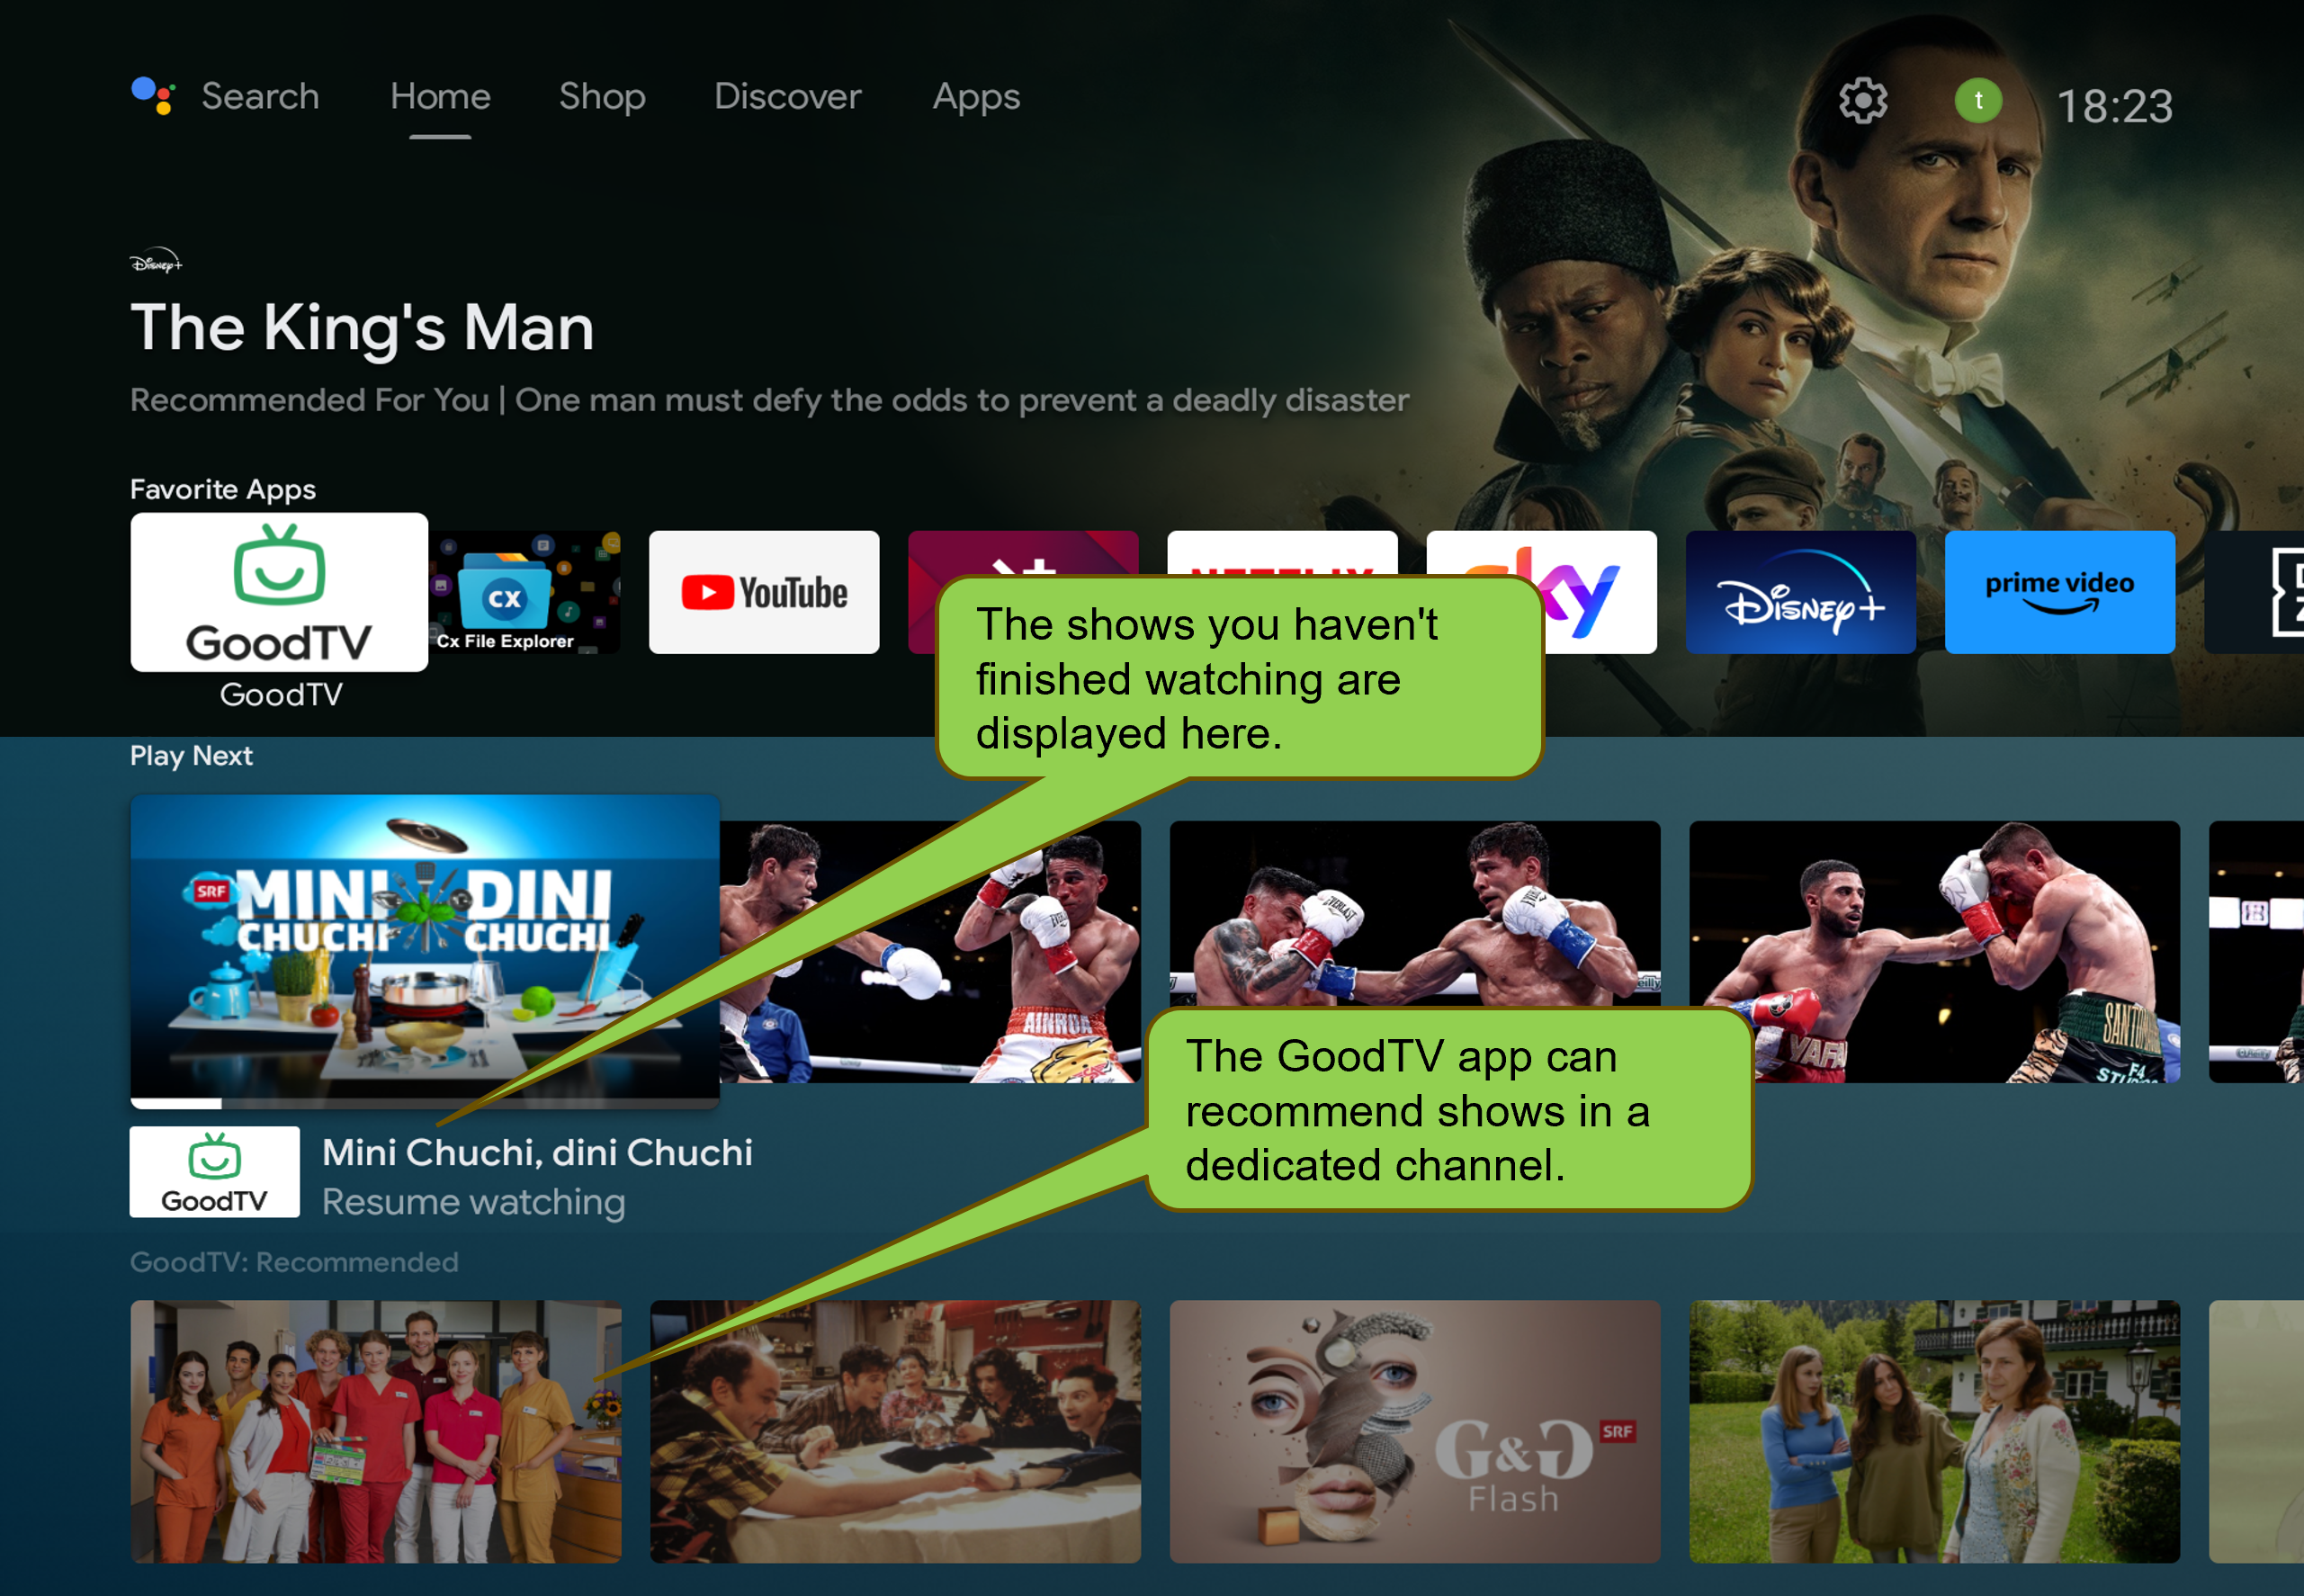
There are 2 types of recommendations from GoodTV:
- “Play Next” displays programs you’ve started but haven’t finished watching. Simply click on one of these programs to continue watching.
- “GoodTV Recommended” is a channel that shows recommended programs from GoodTV. The channel is initially at the very bottom but can be moved up, as shown in this screenshot.
For more details about the layout of your user interface, please consult the Android TV documentation.
Go to the Language & Subtitles control. A menu will appear with settings for the spoken language of the program and subtitles.
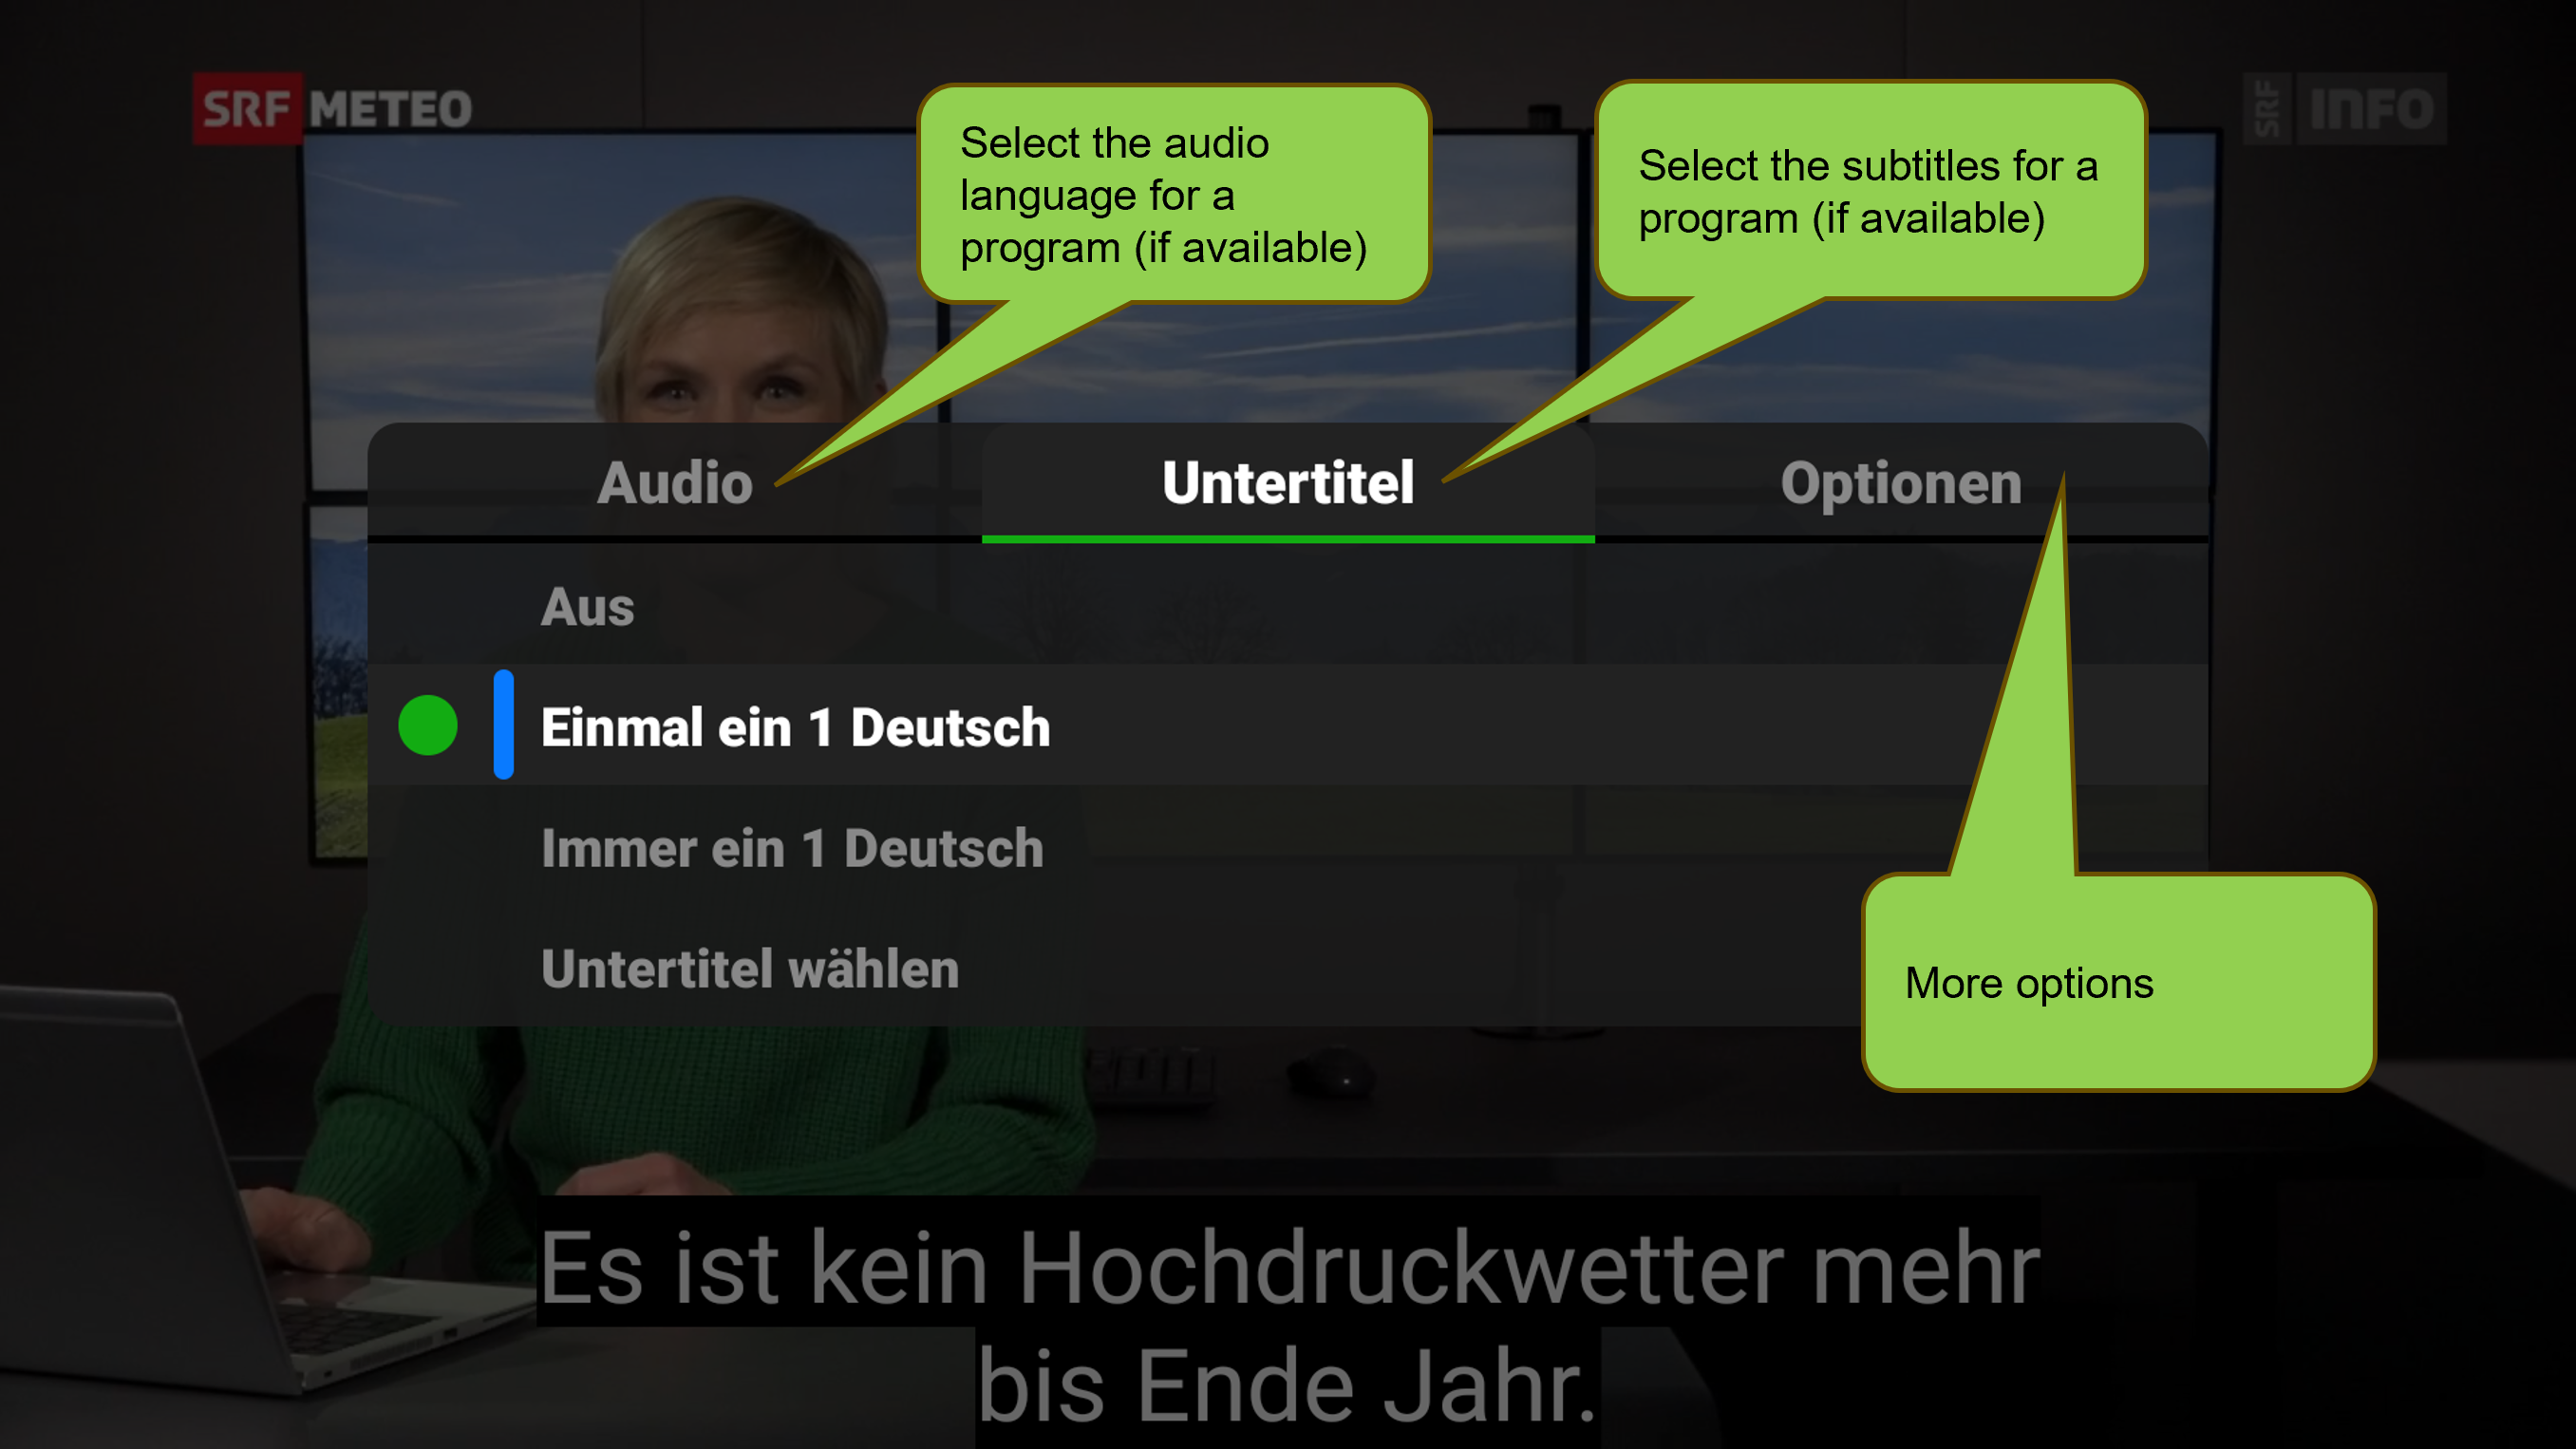
Use the LEFT, RIGHT, UP, or DOWN buttons to navigate between the options. When an option is selected, press the OK button to activate the corresponding function. The options become active as soon as they are selected.
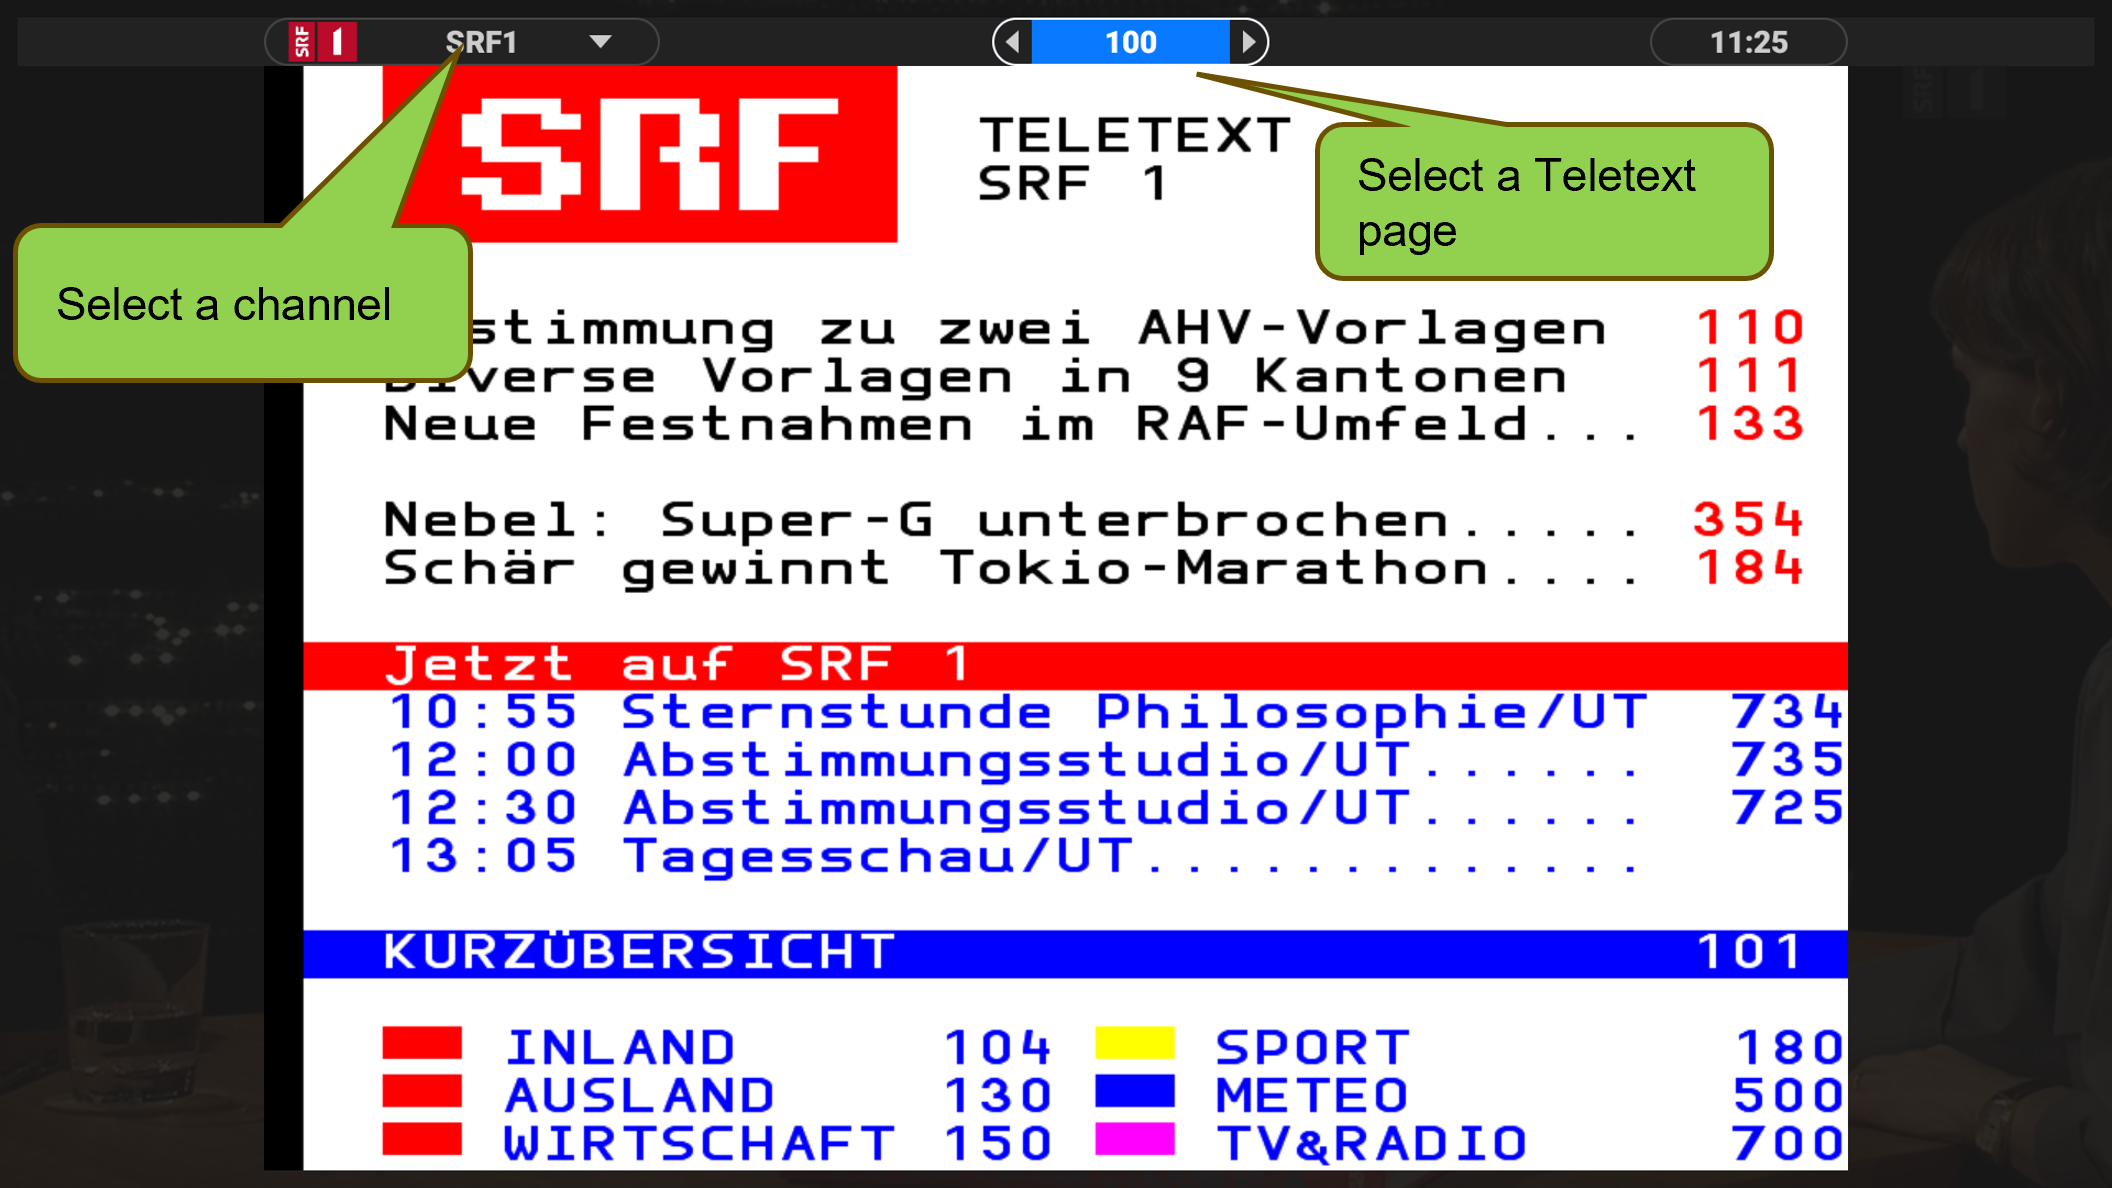
Teletext is available for all major Swiss channels.
Go to the Gear icon (GoodTV Settings). A menu will appear with settings and technical information. Normally, you won’t need to change anything here very often.
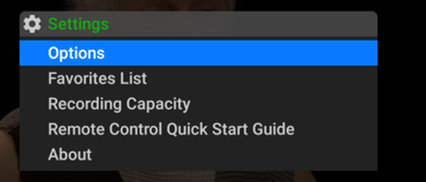
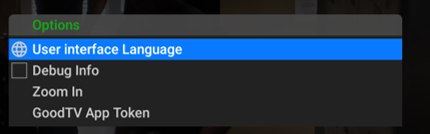
In the Options Menu you can make the following settings:
- Change the language for the user interface
- Display debug information
- Use “Zoom In” to adjust the size of menus and control fields
- Generate a token for the GoodTV Web App and Mobile Apps
In the Favorites List Menu ypou can set up your favorite channel lists.
See separate explanation above.
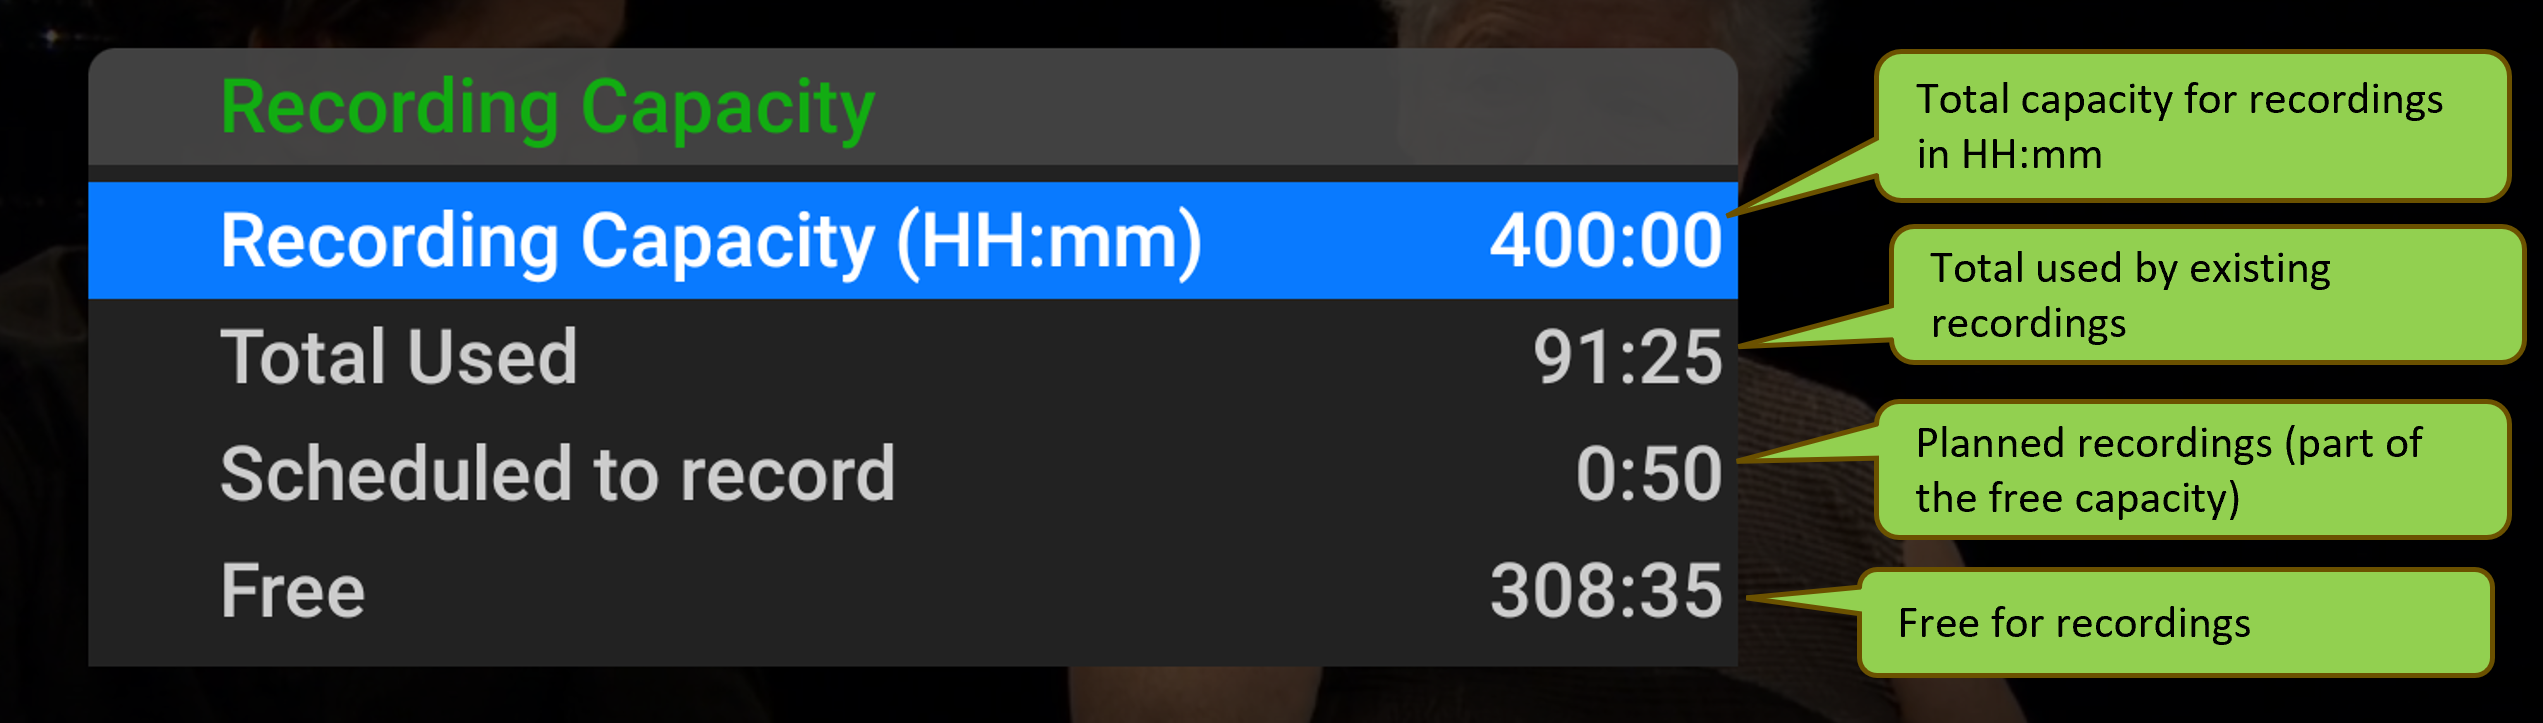
In the Recording Capacity Menu you can check the usage of the storage space :
Simplifies the management of recordings.
The Remote Control Quick Start Guide Menu shows the use of the Remote Control.
After activating the app, a page with remote control tips will appear once. These tips are only shown after the first start post-activation but can be accessed again at any time here.
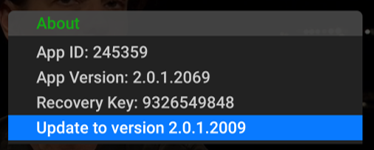
In the About Menu you can see imortant information about the app :
For efficient support, we will always ask for the App ID so that we can find your app in our system and assist you with any issues. It’s a good idea to write down the App ID and Recovery Key somewhere, just in case…
From this menu, you can also specifically update your app to a new version. This option will only appear if a new version is available.
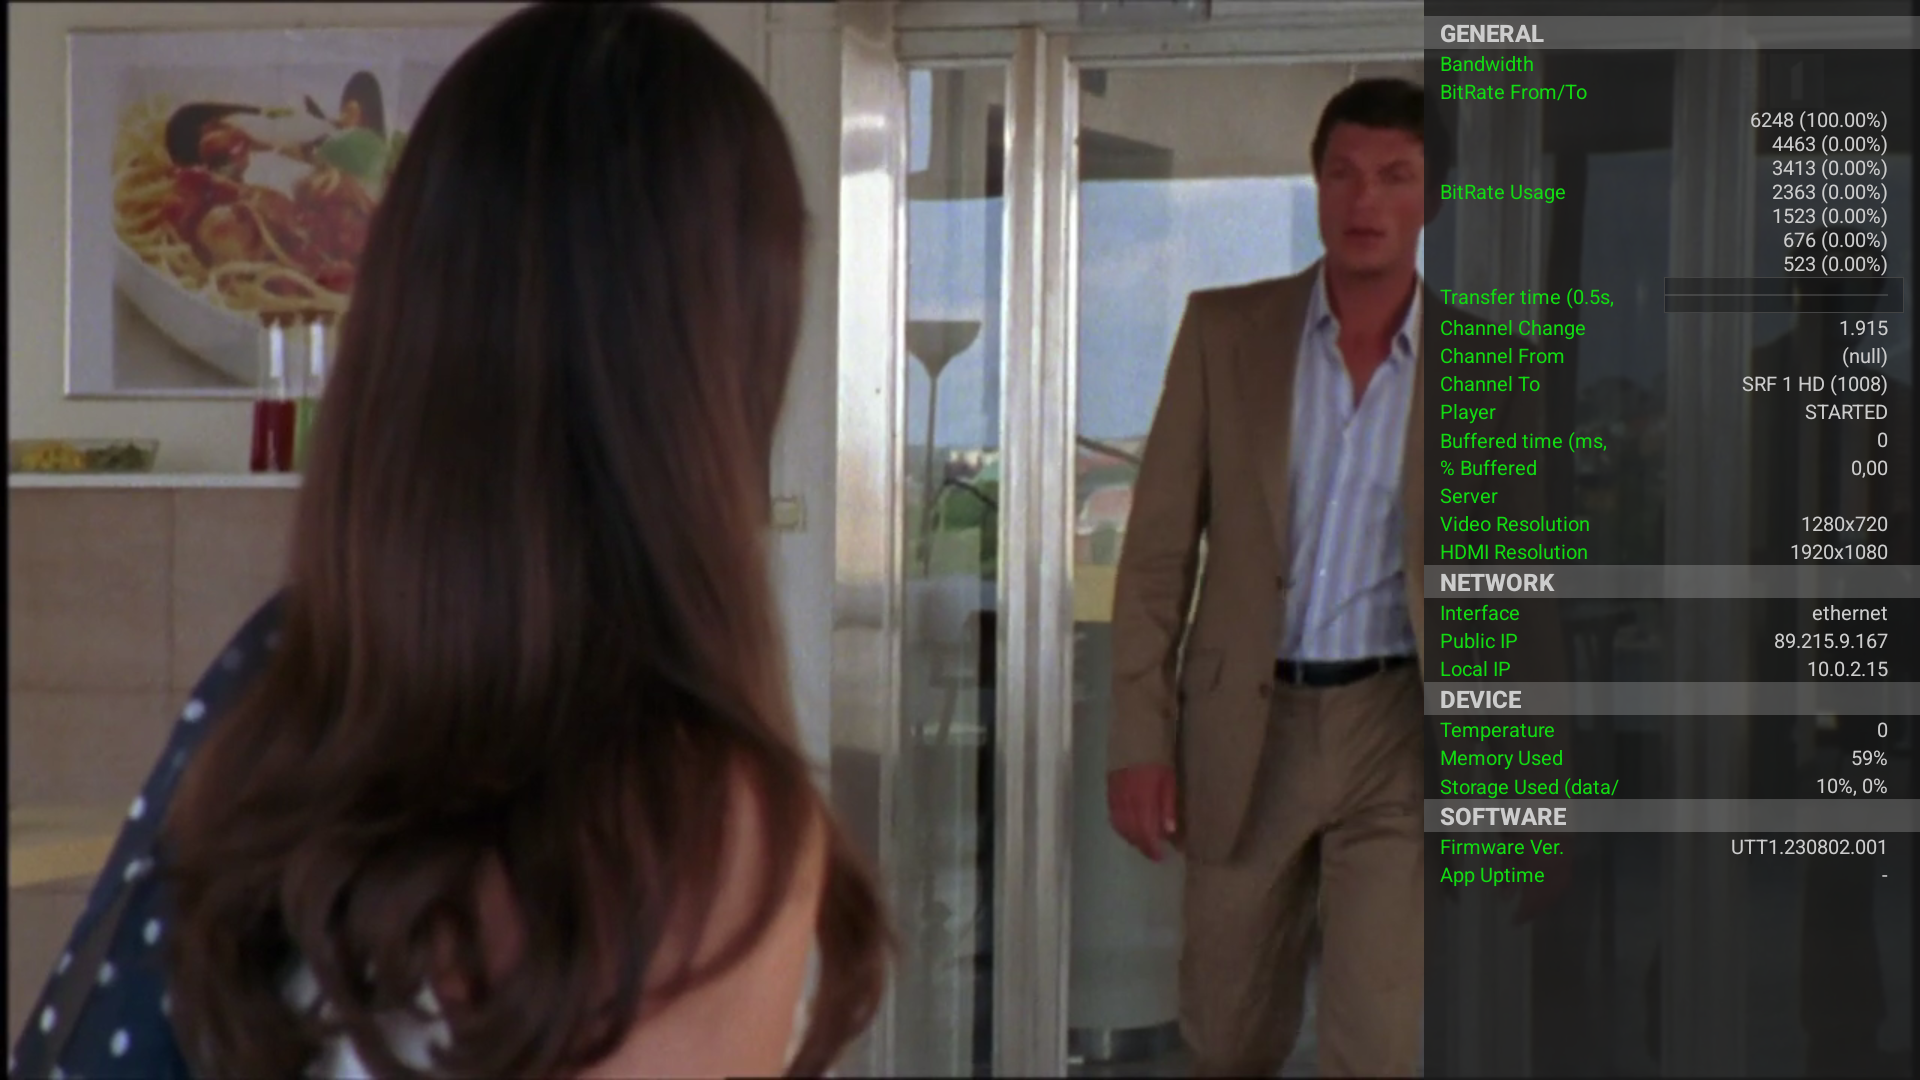
Debug-Information:
These are of interest to a technician in case something isn’t working as expected. When debug information is enabled, a series of technical details will appear on the screen. You can, for example, take a photo of them and send it to a technician in a support case. You can turn off the debug information from the Options menu. They will no longer appear after restarting the app. Here is an example of the debug information:
GoodTV App Token:
If you want to use the GoodTV Web App or the Mobile Apps, you can generate the required tokens from the Options/GoodTV App Token menu and also download the corresponding apps directly to your phone. The tokens are valid for 5 minutes. More information can be found here. This is what the Token Page looks like:
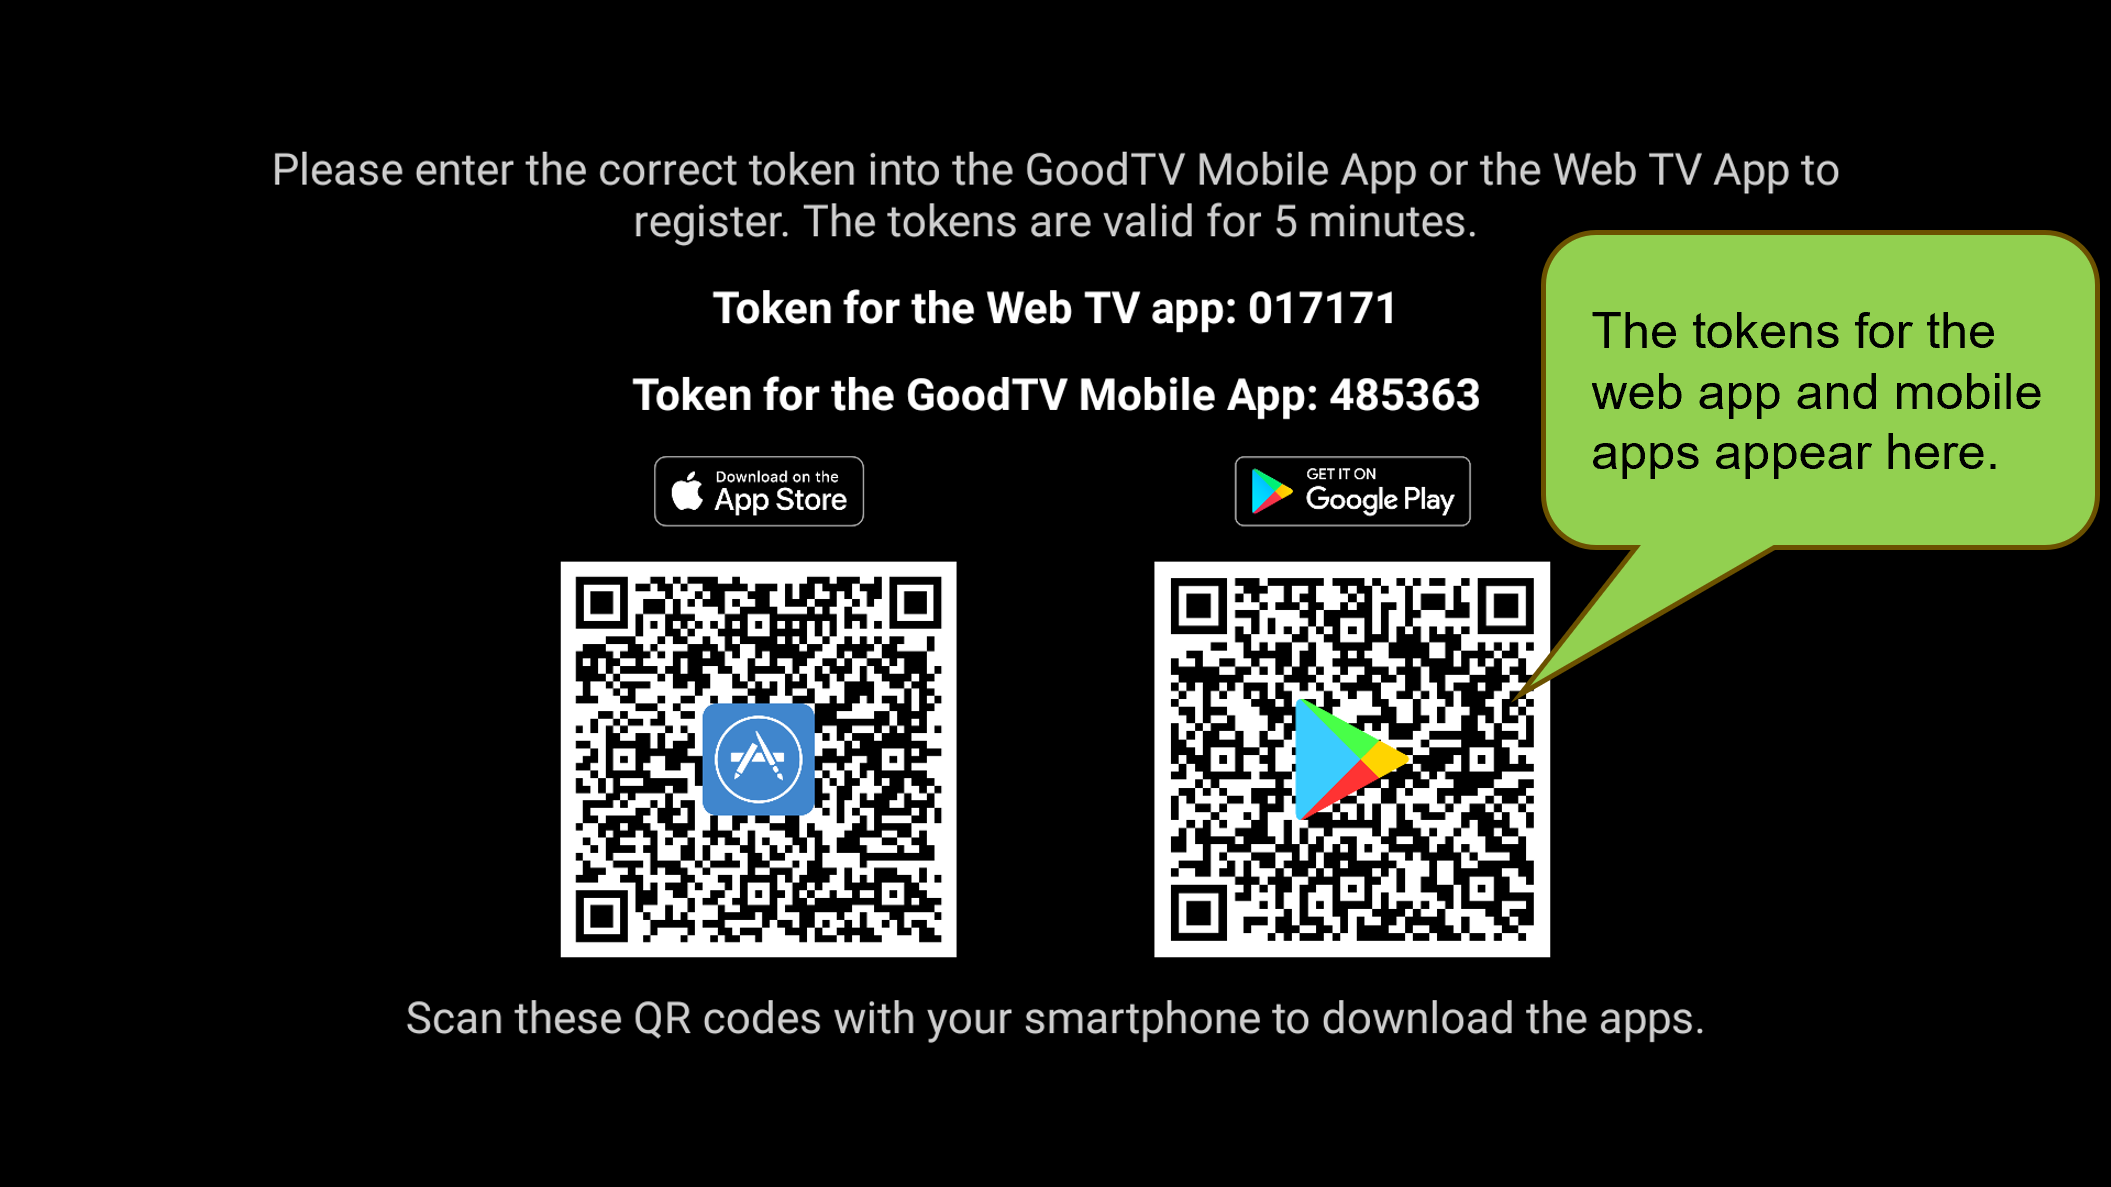
Note: The GoodTV Web App and the Mobile App are only available with the “Classic” and “Top” subscriptions.
LAST BUT NOT LEAST: If you are using our TV Box, you can use the preinstalled apps without ever logging in to a Google account. If you wish to install any other apps, you can do that, but you need to log into your Google account on the box first.
The most common issues occur with new users during registration. Here is a brief explanation of the concept for all our apps:
We have 4 types of GoodTV apps: AndroidTV, Android Mobile, iOS Mobile, and Web TV App. You can find more details about these app types here, after selecting a provider. All of these 4 types can be activated using a token (6 digits). The token is generated in the settings menu of the TV Box under the same account.
The Web TV App requires a different token than the Mobile Apps. This is indicated on the token screen. For security reasons, the tokens are only valid for 5 minutes.
Only the GoodTV app for AndroidTV can also be activated with an activation code from here or from your user account.
Possible errors when using tokens:
- More than 5 minutes have passed since the token was displayed on the TV Box.
- There was an attempt to activate the Mobile App with a WebTVApp token, or vice versa.
- There was an attempt to activate the WebTVApp or Mobile App with a 10-digit activation code intended for the AndroidTV app.
- Or, there is a technical issue in our system.
Special Feature of the GoodTV App for AndroidTV:
The GoodTV app for AndroidTV/GoogleTV can also be used to generate a token. See the section “For the technically inclined…” above.
And:
If you’re still stuck, simply contact your provider.

